
Our funding comes from our readers, and we may earn a commission if you make a purchase through the links on our website.
How to create an SFTP server using Cygwin
UPDATED: March 27, 2023
Creating an SFTP server on a Linux or Unix server is relatively easy. By default, SFTP is installed in most Unix-like environments, and to use it, it’s only a matter of adjusting some settings such as authentication, users, directory, etc., and you are good to go.
But setting up an SFTP server on Windows is a different story. It can be more challenging and may need help from third-party software. This is why many IT pros are using Cygwin, a fantastic tool that lets you run a UNIX shell on Windows. And fortunately, Cygwin comes with OpenSSH— the de facto standard SSH daemon in the UNIX/Linux world.
In this tutorial on creating a Cygwin SFTP server, we’ll go through the process of starting with Cygwin, configuring users, their permissions, the SSH file, and finally, testing the server.
Table of Contents
- Starting with Cygwin
- Download and Install Cygwin
- Setting up Cygwin SFTP and its SFTP users
- The “passwd” or “group” files
- Give read/write permissions to passwd and group files
- Configuring the SSH file
- Checking and starting the service
- Adding new Cygwin SFTP users and Directories
- Re-configure the home directory for each SFTP user
- Testing and Tweaking the Cygwin SFTP Server
- Opening Firewall Ports
- Generating SSH Keys
- Troubleshooting
- Using Cygwin Alternatives
Starting with Cygwin
Cygwin is a collection of open-source and GNU tools that allow Unix or Linux applications to be compiled and run on Windows. Cygwin provides a DLL (cygwin1.dll), also known as the Cygwin Portable Operating System Interface (POSIX) emulator, which contains essential procedures and driver functions that Windows can use.
Cygwin comes with an installation directory similar to the root file system of UNIX and Linux. It includes the familiar directories like /bin, /home, /etc., and more. In addition, Cygwin provides access for the Windows systems to the hundreds of command-line tools only found in the Unix and Linux systems. You can even extend its functionality further with programs and tools found in the packaging system.
Downloading and Installing Cygwin
Go to Cygwin and click on “Install Cygwin” on the left menu column. Then, download the most recent version of Cygwin.
- Download the setup-x86_64.exe for 64-bit Windows.
- Or download the setup-x86.exe for 32-bit Windows.

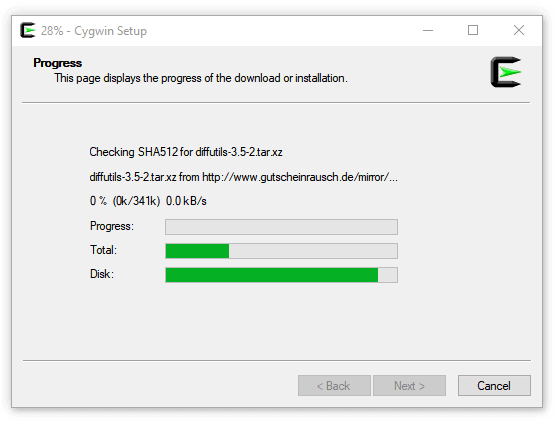
- Install by running the Cygwin setup that you just downloaded. The installation process is very straight forward.
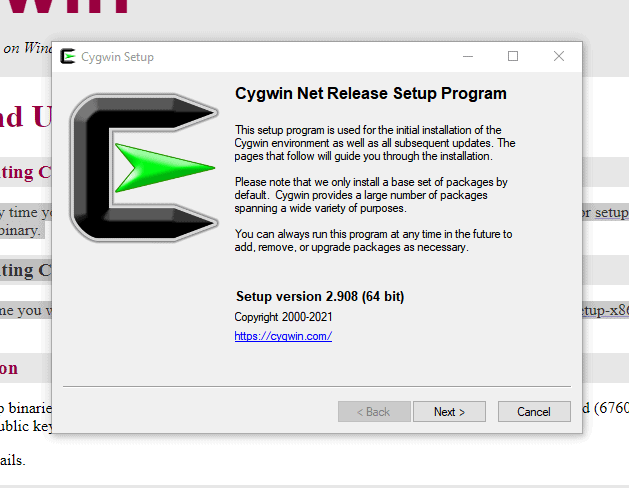
- Click Next and configure your proxy (if you are using one), the root directory (leave the C:\cygwin root configured as default), and select a download mirror (go by default or choose one that is closer to your location).
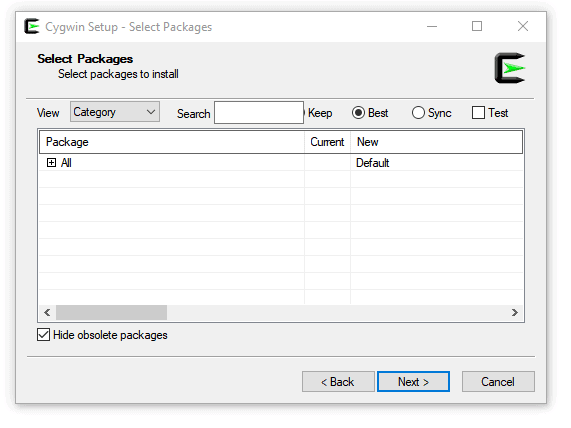
- Finally, you’ll reach the Cygwin Setup – Select Packages, where you can choose the packages to be installed.
- To create an SFTP server in Windows using Cygwin, you’ll need to include the “OpenSSH package” along with the rest.
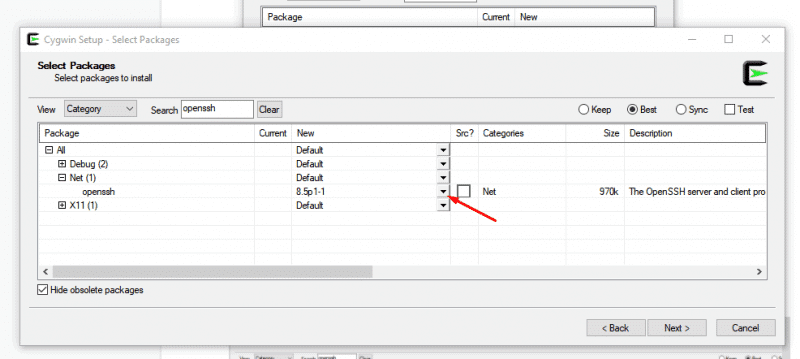
- Go ahead and search for OpenSSH and select the Net package of the OpenSSH application. Then, from the drop-down list, select the newest version of OpenSSH. Optionally, you can also install the OpenSSH Debug package.
- Leave the rest of the packages selected by default.
- Click Next.
- Wait for the Cygwin Setup to finish.
Setting up Cygwin SFTP and its SFTP users
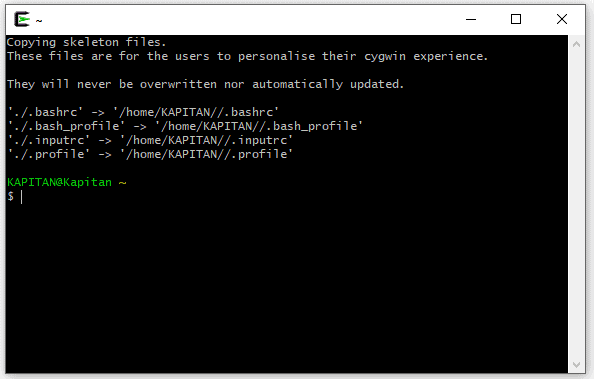
When launching the Cygwin terminal, run it as an Administrator. The first time you open Cygwin, it generates the home directory and file structure. It should look something like this:
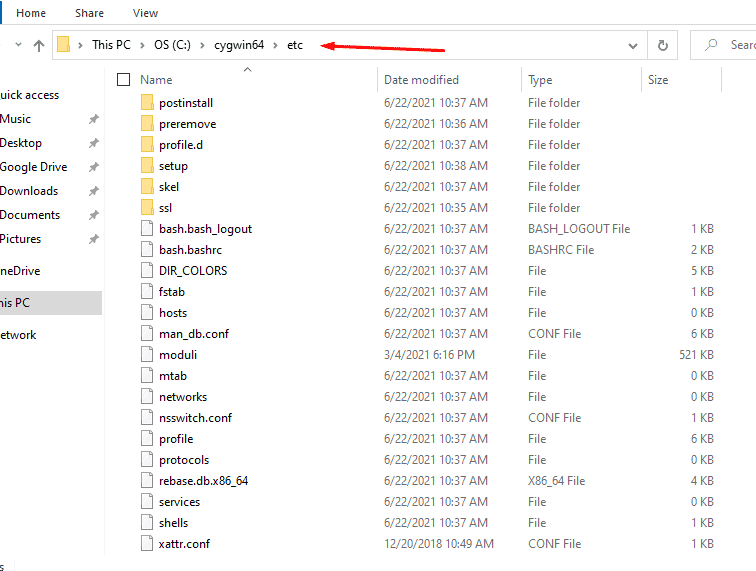
- Go to the Cygwin’s installation folder (C:/cygwin64, in my case), then open the /etc. folder.
- Look for “passwd” or “group” files. If they don't exist, you will need to create them.
The “passwd” or “group” files
These passwd and group files are important because they store the user account and group information. So every time you create a new user, it will be automatically added in a new entry on these files.
The “/etc/passwd” file stores information using the following format:
- username:x:UID:GID:comment:home_directory:login_shell
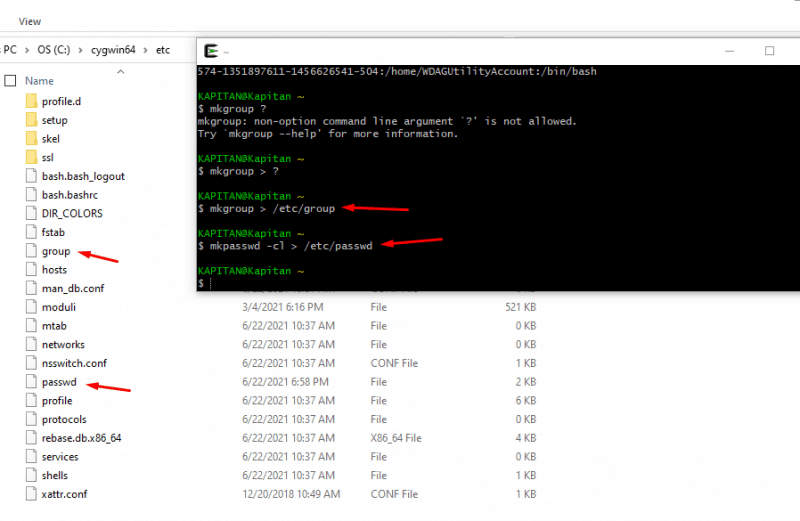
To create these two files, go into the cygwin terminal and use the following utilities: mkgroup and mkpasswd.
- mkgroup > /etc/group
- mkpasswd -cl > /etc/passwd
Both utilities will create an initial /etc/group and /etc/passwd file. If you configured correctly, you should now be able to see them in Cygwin’s installation folder (C:/cygwin64)
With the proper permission level, every time a new user is created, these files will include further user information on a new line entry.
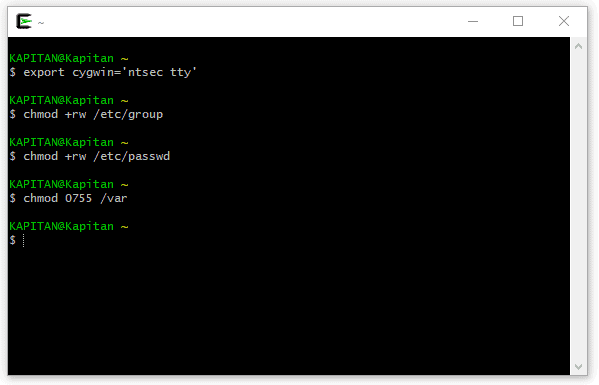
Give read/write permissions to passwd and group files
Execute the following commands on the Cygwin terminal:
- export CYGWIN=’ntsec tty’
- chmod +rw /etc/group
- chmod +rw /etc/passwd
- chmod 0755 /var (optional)
The “chmod 0755/var” is needed to allow users to upload directories into the document root. With 0755, the local users in a group will be able to access the content.
Configuring the SSH
Once Cygwin is installed and users are given permissions, you can configure the CYGWIN SSH daemon (sshd service). The sshd daemon provides SSH access to Windows systems. To configure it, you’ll need to run the “ssh-host-config” program setup. Type on the Cygwin interface:
- ssh-host-config
Once you execute this command, you’ll be asked some questions. You can say “yes” to all and leave default values, for example:
- Should strict modes be used?
- Do you want to install sshd as a service?
- Enter the value of CYGWIN daemon: [ ] (press enter to leave default value)
![Entering the value of CYGWIN daemon: [ ]](https://www.pcwdld.com/wp-content/uploads/image202.png)
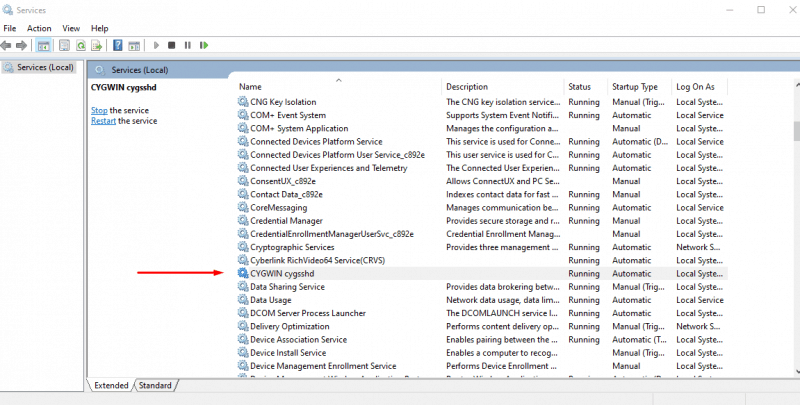
Checking and starting the service
If you configured the cygwin ssh service correctly, you should now be able to start it. You can do this from the cygwin terminal by running the command:
- cygrunsrv –start cygsshd (or in most cases sshd)
You can also do this from the Windows console.
Go to the Windows command (cmd) line terminal (Win+R > type “cmd”) and type “net start cygsshd.” Or you can also go to Services (Win+R > type “services.msc”) and look for the “CYGWIN cygsshd” service to make sure it is “Running.”
Adding new Cygwin SFTP users and Directories
When setting up your Cygwin SFTP server, you’ll need to configure the users and the directory access unique for each user. You may also want to configure groups and assign each particular user to a specific group, to improve security. This helps organize users into departments or areas and apply for policies, settings, or permissions on mass.
To create users and groups:
- Go to “Open Local Users and Group” by going to “Run” (Win+R) and typing “lusrmgr. msc”.
- Or, you can also go to Control Panel > Administrative Tools > Computer management > Local User and groups. If you are using a different edition of Windows (other than Server), you’ll need to create a standard local account. Configure this from the User’s Account tool in the Control Panel.
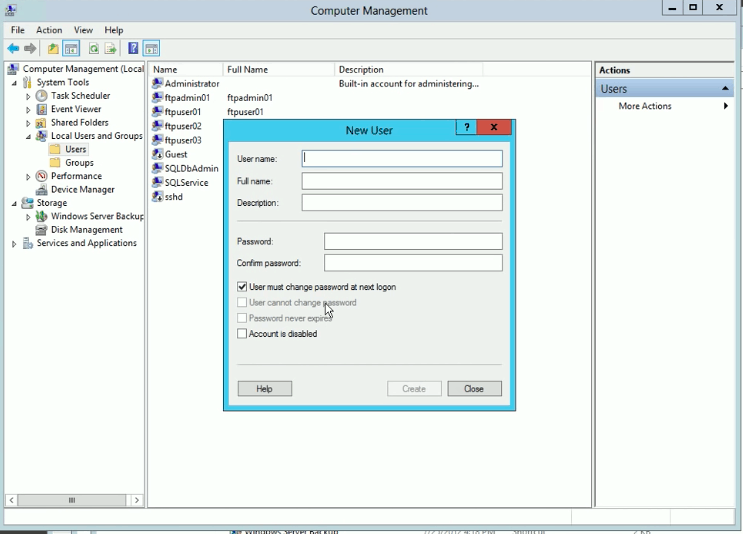
- Create a user and group for SFTP. For example, create a Windows user (SFTP-USR01, SFTP-USR02, SFTP-USR03, etc.), and “optionally” create a Windows group, such as SFTP-GRP. Make all new users members of the new SFTP group.
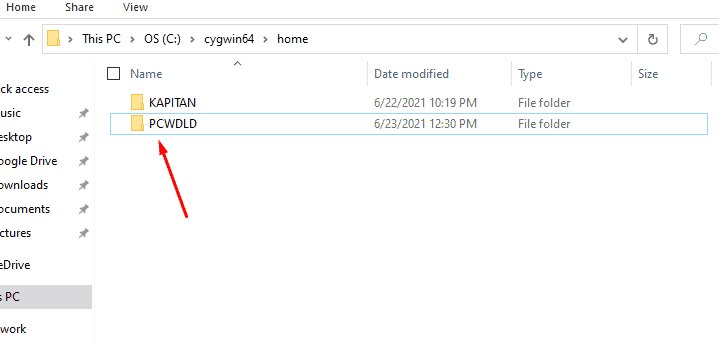
- Create a folder to be used as the SFTP root folder. For example, under the System, the directory creates the folder C:\SFTP-SRV-ROOT.
- Now, create a folder inside C:\SFTP-SRV-ROOT for each SFTP user. Using the same name as the SFTP user is a good folder naming practice, for example:
- C:\SFTP_ROOT\SFTP-USR01
- C:\SFTP_ROOT\SFTP-USR02
- And so on…
- In my case, I created a new directory under the “cygwin64\home” and named it: PCWDLD
Re-configure the home directory for each SFTP user
If you are managing various Windows user’s profiles across different physical or virtual environments (roaming profiles), you’ll want to re-configure Cygwin’s home directory.
Once a user logs in with their new account, the SFTP server will provide access to Cygwin's home directory. So, you rather configure the user to access its home directory.
To do this:
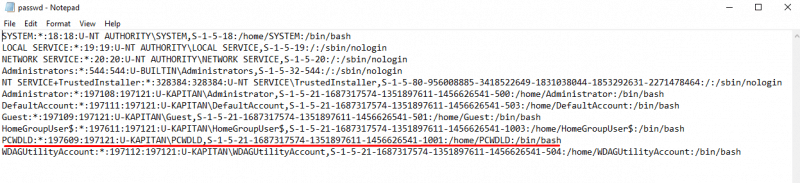
- Open the new passwd file on “C:\cygwin64\etc\passwd” with notepad (or any text editor).
- For each user you create (shown in the passwd file), set its home directory to a new one. The home directory is the absolute path, usually something like: /home/$USER.
- For example, I previously created a user called PCWDLD (as you can see from my Cygwin passwd file). This new user will use /home/PCWDLD as its home directory.
- For more users, you can define different directories outside Cygwin, for example.
- From: USR01… :/home/USR01: /bin/bash
- To: USR01… :C\Documents and Settings\USR01: /bin/bash
Testing and Tweaking the Cygwin SFTP Server
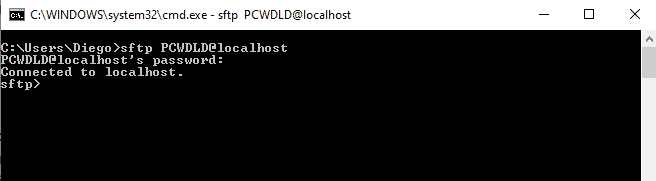
If you configured the users, permissions, and the sshd service is up and running, you should be able to establish an sftp connection into your Cygwin SFTP server. We will test the SFTP connection with “localhost or 127.0.0.1” or from the server itself.
You can test via the cmd.
Or you can also test via a third-party client such as FileZilla.
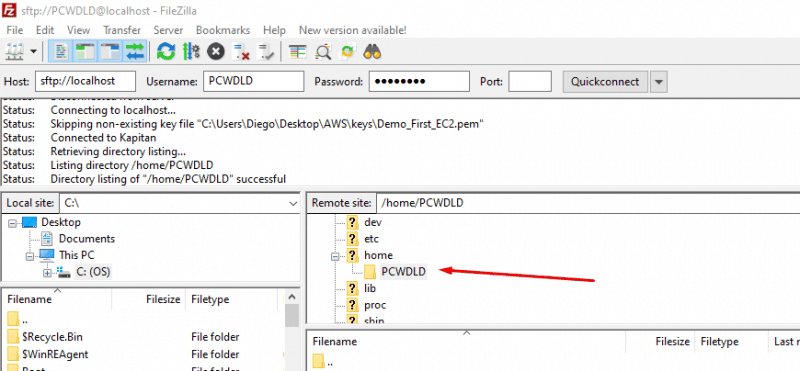
As you can see from the screenshots, we were able to login successfully to sftp://localhost, with a new user: PCWDLD, and logged directly into “home\PCWDLD”.
Opening Firewall Ports
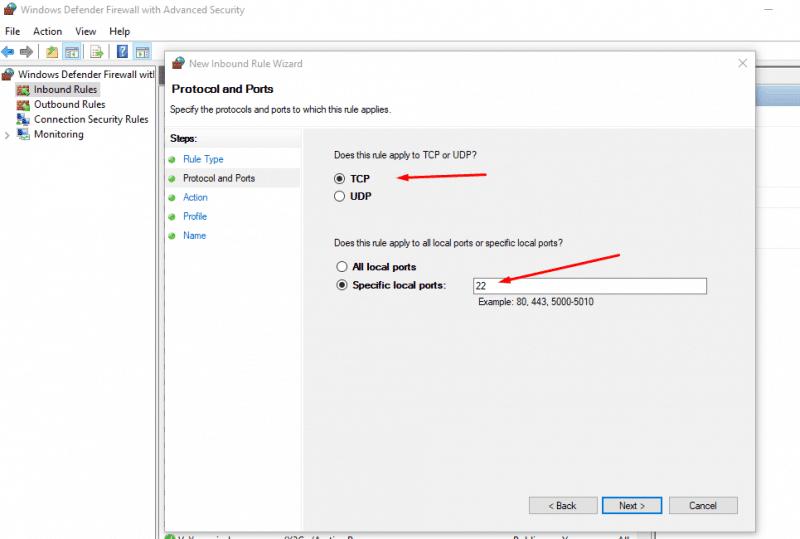
If you have trouble connecting to the SFTP server from outside, make sure the Cygwin SFTP server allows inbound connections to port 22 (SSH). To do this, you’ll need to configure the Windows Firewall to allow incoming TCP connections to port 22.
- In Windows go to Windows Firewall > Advanced Settings.
- Inbound Rules > New Rule.
- Rule Type > Port > Click Next.
- TCP > Specify local ports (22).
- Actions? Allow the connection.
- Apply the rule to any profile (Domain, Private, or Public), and give it a name.
Generating SSH Keys
One of the reasons people use SFTP is because it relies on the SSH’s cryptographic functionality. SSH uses asymmetric (public-key) cryptography, which consists of two separate keys (or a key-pair), one the secret (or private) and the other the public. In asymmetric cryptography, both keys are used by server and client.
If necessary, SSH can use public-key cryptography to authenticate a remote user rather than with a password. If you prefer to use a key pair for authentication, you can create a DSA key pair and share the public one with the user.
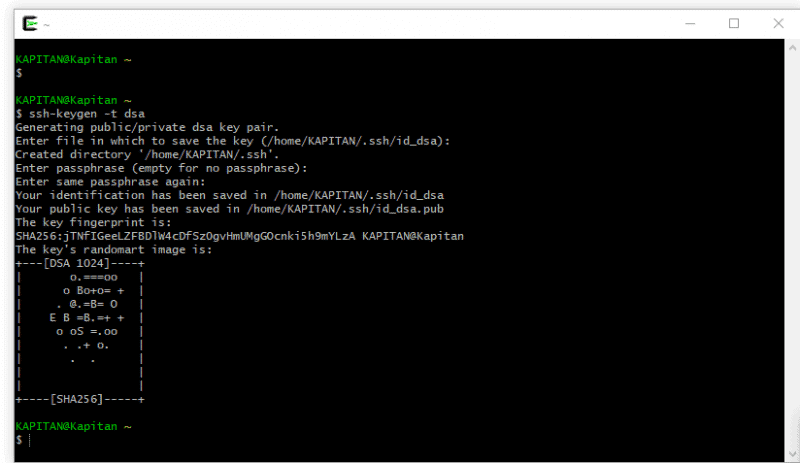
To generate the public/private DSA key pair to be used by SFTP (SSH):
- Open Cygwin
- Type “ssh-keygen -t dsa”
You’ll need to specify two configuration sets: the file and directory on where to save the key and the passphrase. This passphrase is used to configure service components to connect to your local SFTP server.
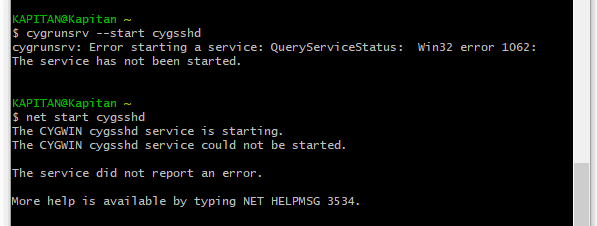
Troubleshooting
A common problem when setting up a Cygwin SSFTP server is that the sshd service cannot start. For example, errors like “Error starting a service: QueryServiceStatus: Win32 error 1062: The service has not been started” or “The CYGWIN cygsshd service could not be started” are common.
Check the log
- Go to “C:cygwin64/var/log” and open the cygsshd.log (sshd) file.
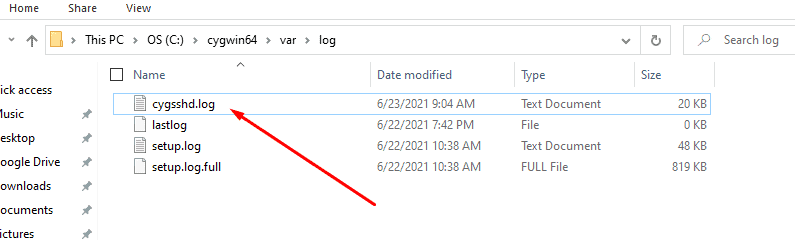
An example of an sshd log.
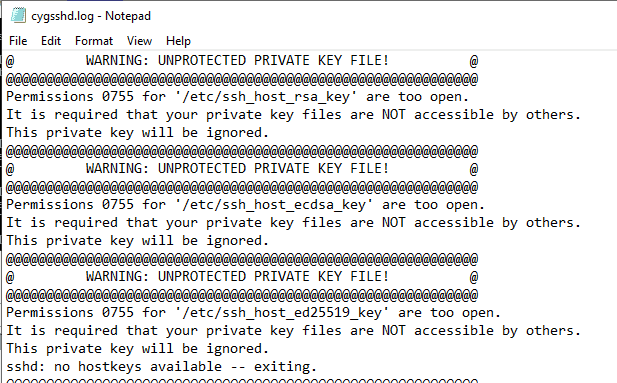
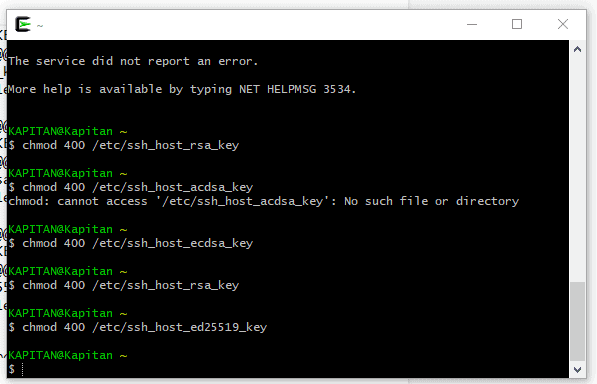
If you get an error like “Permissions 0755 for ‘/ your key’ are too open.” then you will need to lower the permission level to your keys. This can be done by setting the permissions to the keys to 600 or 400.
If the keys will be only readable by you > (chmod 400 /etc/ssh_host_rsa_key) or if the keys will be read/writable by you > (chmod 600 /etc/ssh_host_rsa_key).
- Check and start the service again.
- From Cygwin terminal > cygrunsrv –start cygsshd

Using Cygwin Alternatives
Cygwin is a favorite tool for Linux/Unix admins that find themselves using Windows servers. But if you are looking for more accessible alternatives to Cygwin, other free solutions are easy to implement and run on Windows.
SolarWinds SFTP server, for example, is a free tool used by IT and network managers. It allows you to push the device’s OS images/firmware, configuration updates, backups, versions, or any file up to 4GB in size. It also runs as a Windows service.
Its server settings are pretty comprehensive.
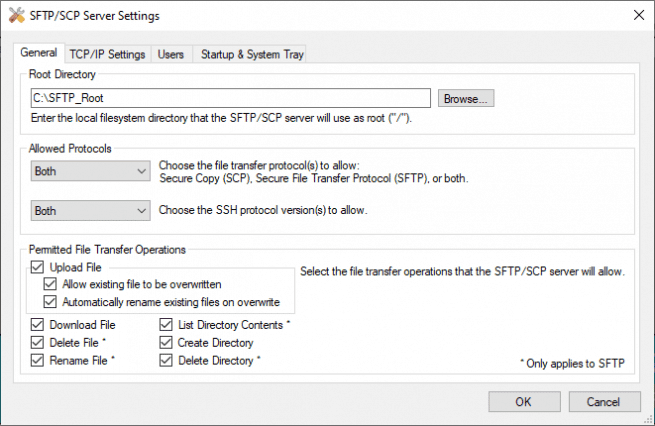
Additional features
- Fine-tune your server by authorizing a specific or range of IPs
- Define users and their access
- Allows concurrent transfers from multiple devices
- Used also as a TFTP and SCP (SFTP) server
SolarWinds SFTP server is available to download for free.
Looking for more?
Suppose you are looking for a more robust SFTP server that helps you meet the strict regulatory compliance of industries like healthcare or finance. In that case, the Serv-U Managed File Transfer Server can be the best alternative to the Cygwin SFTP server regarding file transfer management, automation, security, and support.
Create SFTP server using Cygwin FAQs
What are the requirements for creating an SFTP server using Cygwin?
To create an SFTP server using Cygwin, you'll need a Windows machine with the following components:
- Cygwin installed and configured
- OpenSSH package installed
- User accounts created for each user who needs access to the SFTP server
How do I configure the SFTP server using Cygwin?
To configure the SFTP server using Cygwin, you'll need to edit the OpenSSH configuration file "/etc/ssh/sshd_config" and make any necessary changes, such as specifying the SFTP port or restricting access to specific users. After making changes to the configuration file, you'll need to restart the OpenSSH daemon.
How do I test the SFTP server using Cygwin?
To test the SFTP server using Cygwin, you can use an SFTP client such as FileZilla and connect to the SFTP server using the IP address or hostname of the Windows machine and the SFTP port specified in the OpenSSH configuration file.
Related Post: What is SCP & How To Use It

