
Our funding comes from our readers, and we may earn a commission if you make a purchase through the links on our website.
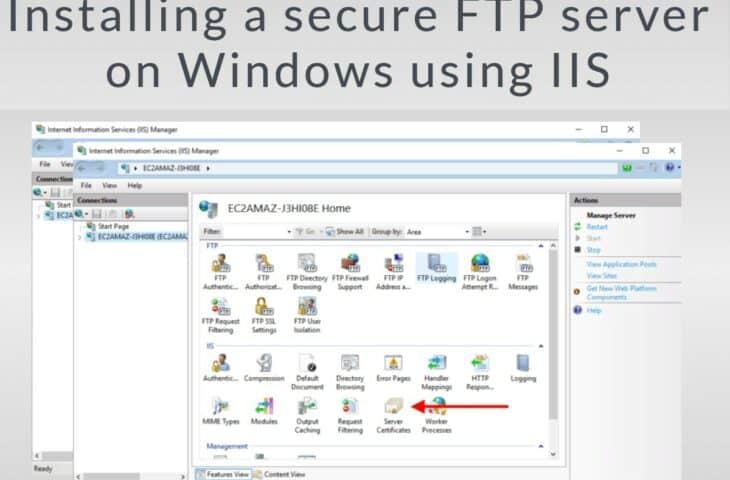
Installing a secure FTP server on Windows using IIS
UPDATED: February 7, 2023
In this step-by-step guide to installing a secure FTP Server (FTP over SSL), we’ll go through setting up IIS with FTP over SSL site, getting an SSL certificate, creating a user with permission, and testing (plus troubleshooting) your connections.
For this guide, we’ll use an IIS version 10 deployed on an AWS EC2 Windows Server 2016.
Table of Contents
- What is FTPS, and what do you need?
- Installing IIS and FTP Server features.
- Creating an SSL certificate.
- Creating a new FTP user with Windows.
- Creating the new FTP site in IIS
- Testing your new FTP Server.
What is FTPS, and what do you need to build a server?
FTPS (FTP over SSL) depends on SSL (Secure Sockets Layer) to build a secure channel between client and server. SSL uses certificates for proving identity and ensuring security for communications across internal or external networks (Internet).
By itself, FTP does not provide any form of encryption or authentication. Instead, FTP relies on SSL (thus FTPS) to build an SSL tunnel so that FTP can send all data in clear text through the tunnel. In simple words, FTPS is the classic FTP but with added SSL support.
What is not FTPS? FTPS (FTP over SSL) is not SFTP (FTP over SSH). Both are completely different file transfer mechanisms. Although you could install OpenSSH in your Windows Server to create an SFTP server, IIS does not support SFTP.
What do you need to build an FTPS server on IIS?
- A Windows Server running IIS.
- FTP services installed on IIS.
- Depending on the use-case, a self-signed, domain-certificate, or CA-signed SSL certificate.
- A root folder for FTP content with permissions.
- A firewall or routing device that allows connections over the FTP Server.
Installing IIS and FTP Server features
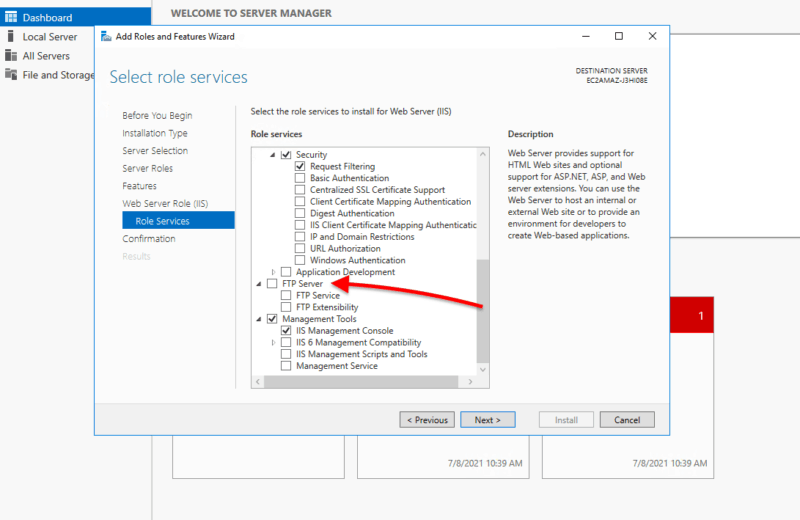
Whether installing IIS or having it already installed, you’ll have to enable the FTP Server feature. In your Server Manager, when setting the “Web Server Role (IIS),” you’ll need to include the FTP server functionality as an IIS “role service.” The FTP server feature is disabled by default.
- Open Server Manager > choose “Role-based installation.”
- Then, on Server Roles, find Web Server (IIS) and open it.
- Select FTP Server, and make sure “FTP service” and “FTP Extensibility” are selected.
- In addition, you’ll also need to install Management Tools.
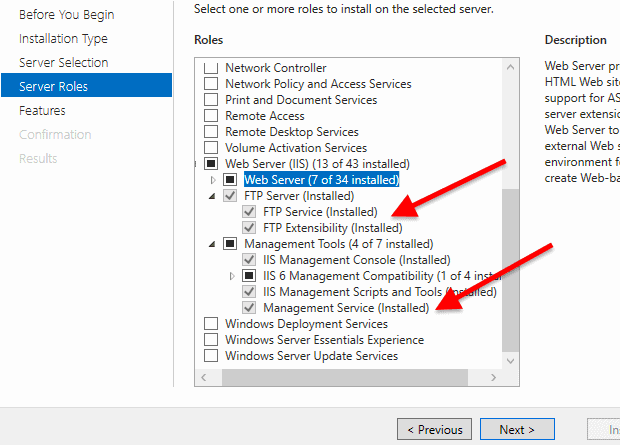
- Confirm your installation by clicking “Next,” proceed to install, and wait for the installation to finish.
- Make sure that FTP Server along with Management Tools is installed.
Creating an SSL certificate
You can’t create an FTPS server without an SSL certificate. Your FTP server needs an SSL certificate to establish an SSL connection between client and server. This SSL certificate contains information about the server’s identity, along with the encryption technique used to establish the secure channel. Certificates help end-users verify the identity of a remote computer.
You can create three types of certificates depending on your particular scenario:
- CA-signed certificates: These are used in production servers and when users access the server from outside (NAT and firewall) over the Internet. Certificate Authority signed certificates guarantee FTP clients that your server is who it says it is.
- Domain Certificate. These are certificates used internally (inside domains) and signed by the organization’s certificate authority. Users within the domain will not receive any warning message, but users outside will.
- Self-signed. Self-signed certificates can be used for internal websites, but the client will always receive a warning message. Self-signing a certificate is like creating your ID. You know that the ID is real, but others have no way of proving that the ID is yours unless an authority created it.
Creating an SSL certificate with IIS
With IIS, you can create a self-signed and a domain certificate, but if you allow external users to connect to your FTPS server, you should get a CA-signed certificate.
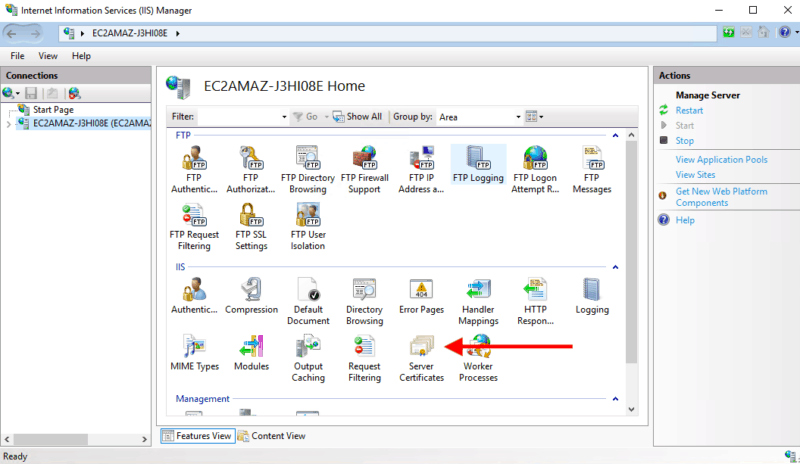
- Open IIS Manager from the Administrative Tools. In addition, you can open IIS Manager from the “Run” utility by typing “inetmgr.”
- In the IIS manager, select your connection (or server), and go to “Server Certificates.”
- On the Actions menu on the right-hand side of the IIS Manager, choose the option “Create Self-Signed Certificate.”
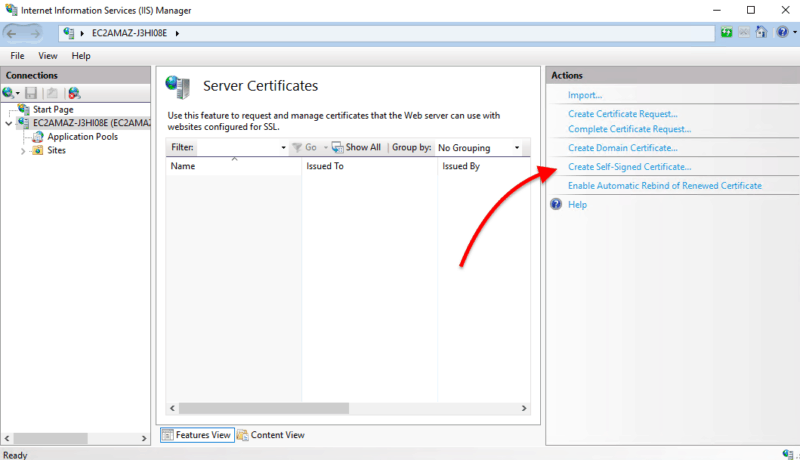
- Give it a friendly name and click on Ok.
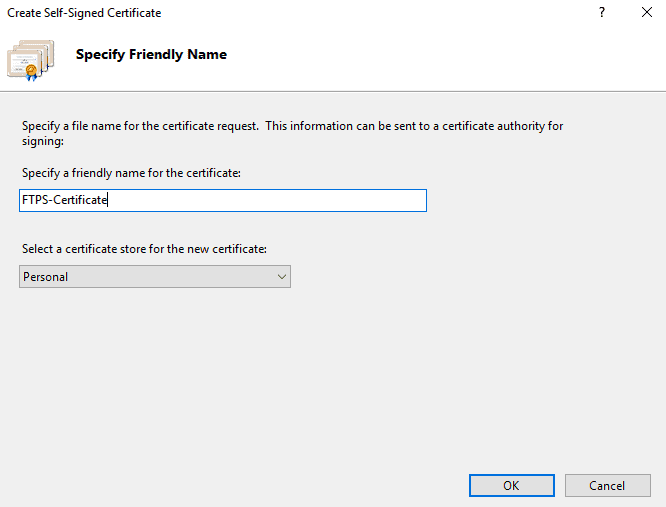
Bear in mind that although your self-signed certificate should be safe to use, all the web browsers and FTP clients don’t know about it, so your FTP clients will be warned.
Creating a domain certificate.
Use a domain certificate if you are going to use the FTPS server within your domain.
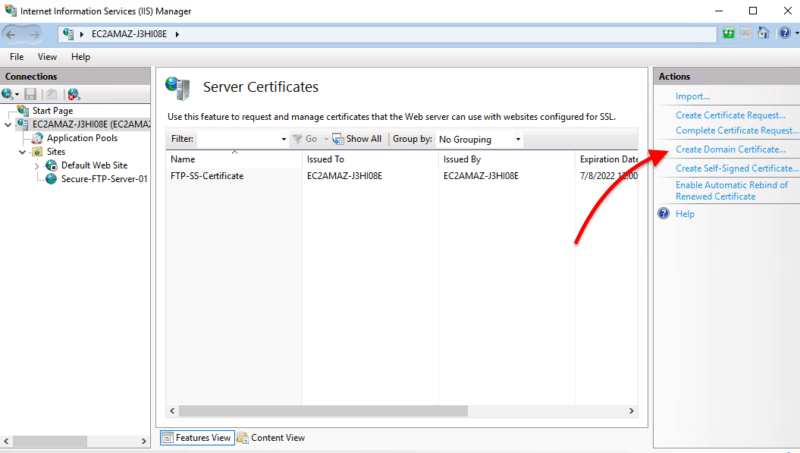
- Go to Server Certificates, and select “Create Domain Certificate.”
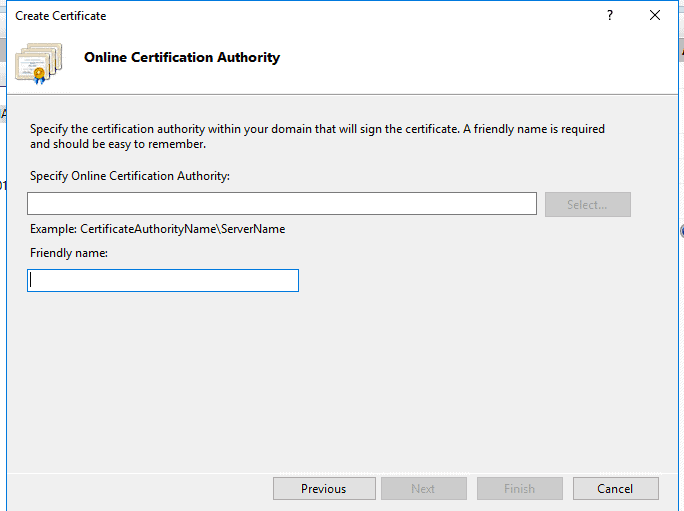
Distinguished Name (DN) information is required when enrolling and creating a Certificate Signing Request (CSR).
- In the “Common name” field, use the Fully Qualified Domain Name (FQDN) of the computer or web server.
- In Organization, use the legal company name.
- In Organization Unit (OU), use the department or area (optionally for Active Directory domains).

- Specify the Online CA within your domain. If there is an Online Certification Authority online, you should see the “select” option available. If the “Select” option is unavailable, you can specify the DA using the appropriate naming, such as CertificateAuhtorityName\Name\ServerName.
Use third-party SSL/TLS Certificate management tools.
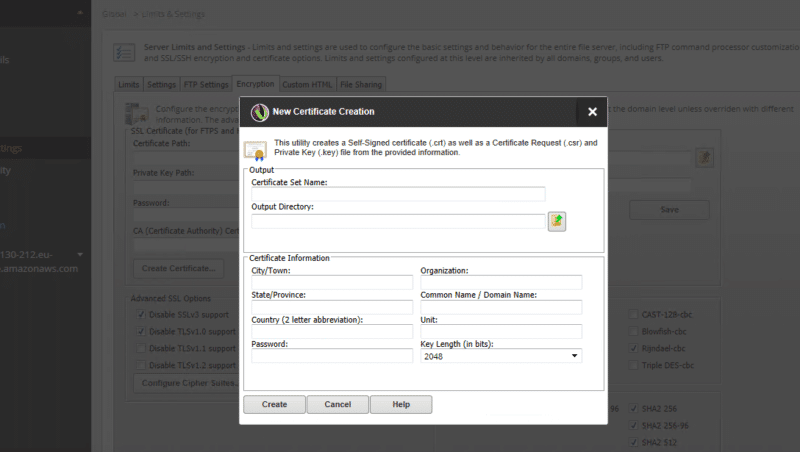
In addition to creating your certificates with IIS, you can also use third-party tools. For example, using a multi-protocol file server like SolarWinds Serv-U helps you create self-signed certificates or certificate requests (CSR).
Another useful third-party certificate management service is Certify The Web. This service allows you to manage (install and auto-renew) SSL/TLS certificates for IIS, Windows, and other services.
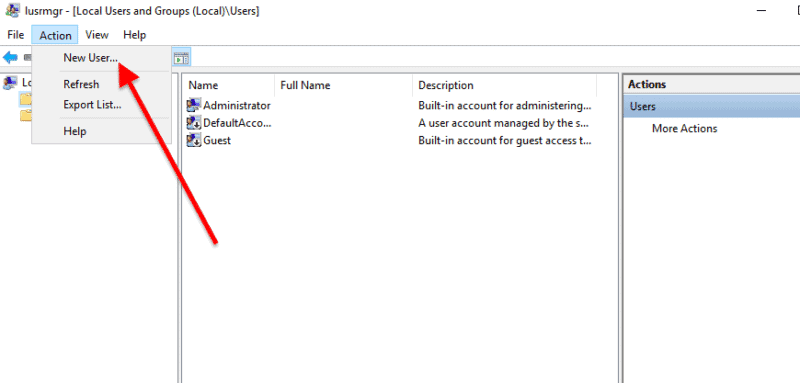
Creating a new FTP user with Windows
Create a new user to connect to the FTPS server with the proper permissions.
- Open Local Users and Groups. Go to Server Manager > Tools > Computer Management. Expand the Systems tools > and open “Local Users and Groups.” You can alternatively use the Win+R to open “Run” and type “lusrmgr.msc”
- Go to Action and click on “New User.”
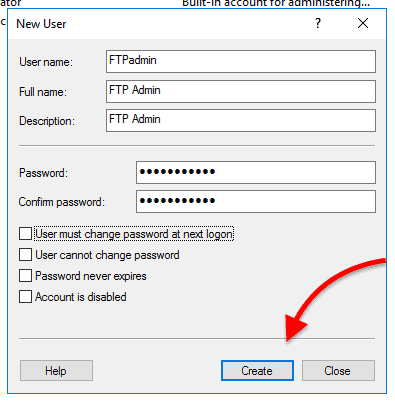
- On the “New User” window, go ahead and enter the user’s credential information.
- Click on “Create.”
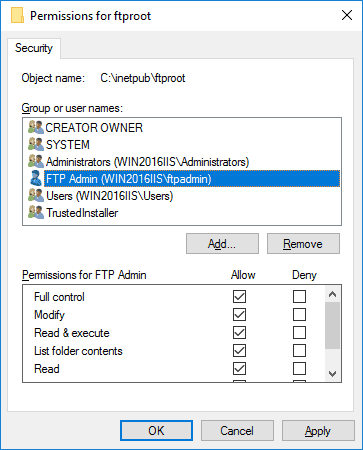
Now, let’s give the new user permission to the FTP root folder
- The default folder in IIS for storing content is called “inetpub.” Go to the C:\inetpub, and find the folder “ftproot.” Right-click on it and open “Properties.”
- Go to the Security tab > and then click on “Edit.”
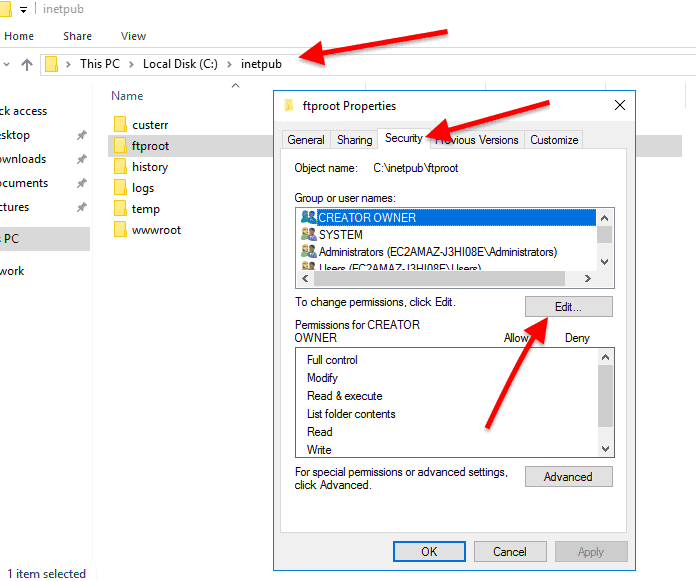
- Find the user that you created previously and set the permissions. For example, you can restrict or allow the user access to the FTP Root folder resources.
We created a user, but we still need to access our FTP site access to our content folder.
Create the FTP Site in IIS
You could create an FTP server without an SSL certificate, but that would technically be an FTP server, not an FTPS server. In addition, you could have an FTPS server, but you’ll also need a user to connect it and authenticate successfully. If you haven’t created the certificate and the user, go back to the previous sections.
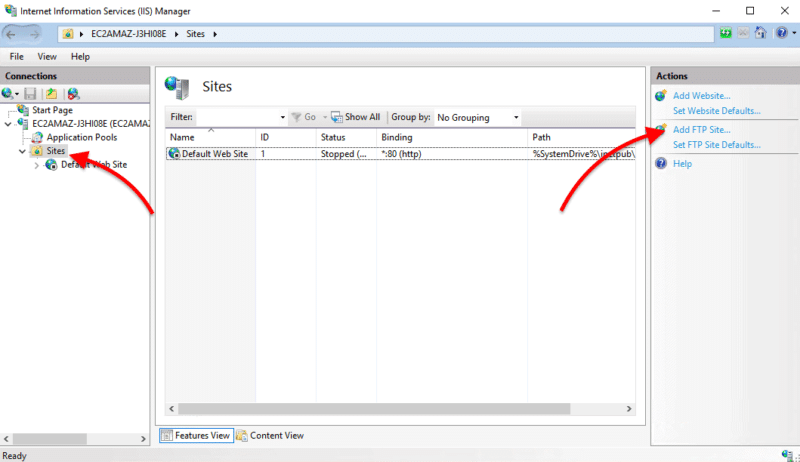
- Creating the FTP Site. Bear in mind that IIS calls it an FTP site, much like a website. An FTP site is a server that can be accessed from outside the LAN— from any place across the Internet.
- Open IIS Manager > go to your home Server > then “Sites.”
- Add FTP Site. Right-click on “sites” and select “Add FTP Site” or go to the “Actions” menu on the right-hand side.
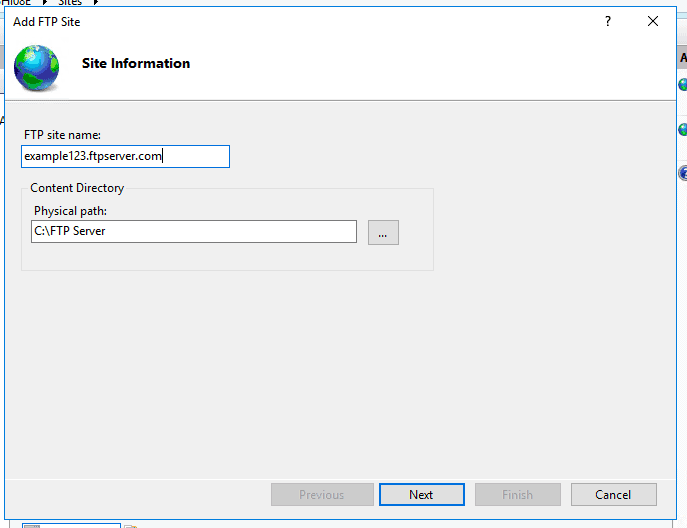
- Enter FTP Site’s information and the content directory’s physical path. Whatever path you have selected here, make sure it has the correct permissions to allow or restrict access.
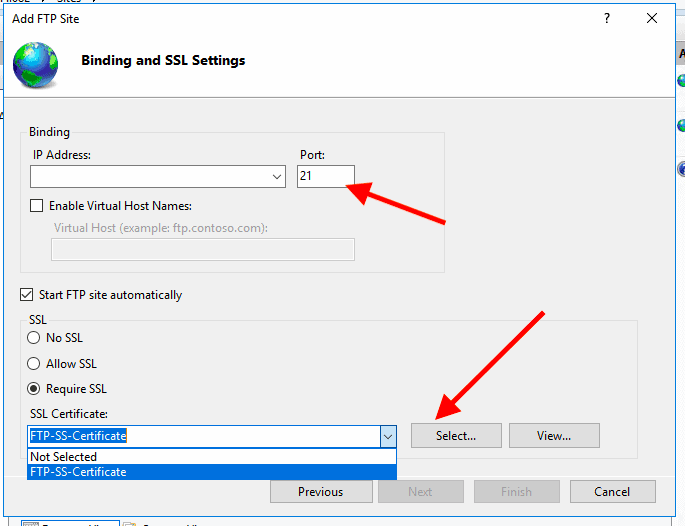
Bind the certificate to SSL in IIS
You can bind SSL certificates while you are creating or after you created your FTP site.
- Select Server IP and the port number. Enter the IP address of the FTPS server and select the port. FTPS uses port 21 for its explicit FTPS control connections and port 990 for the implicit FTPS control connections.
- Optionally, check the “Start FTP site automatically.” This option is helpful whenever the server goes down. IIS will start the FTPS site automatically after the server comes back online.
- Select “Require SSL” and locate your certificate. Next, select your self-signed certificate, domain certificate, or browse through any certificate created by other means.
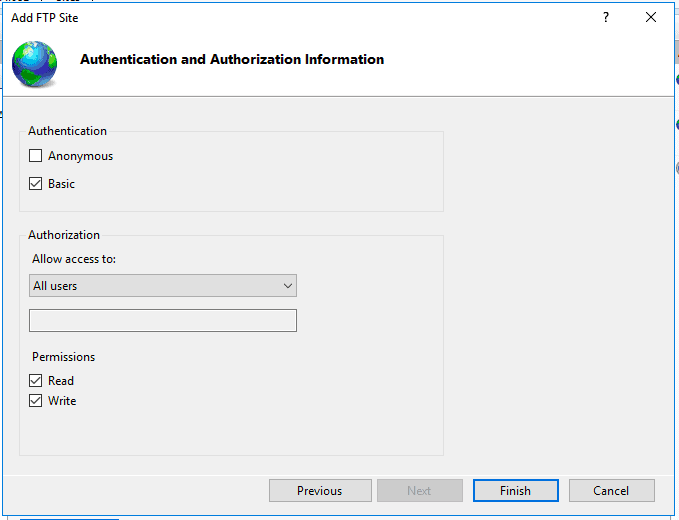
Add Authentication and Authorization information
On the next screen, you’ll be able to define who and how users are connecting to your FTPS server. You can select Anonymous (encryption-enabled) or Basic (no encryption), which depends on the type of SSL certificate.
- If you already created an FTP user with IIS (as shown in the previous section), you’ll be able to see it here. But, if you want to allow FTP access to all users from the domain, select “All Users,” otherwise specify them in the textbox.
- In addition, you can also grant read, write, or read/write permissions to the FTP server user from this window.
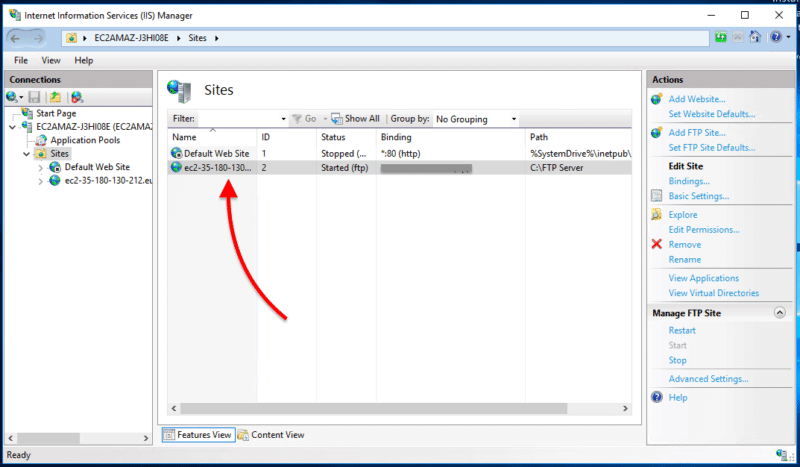
- Once your FTP site is created, you’ll be able to see it on the IIS Manager “Sites.” First, make sure the status is “started.”
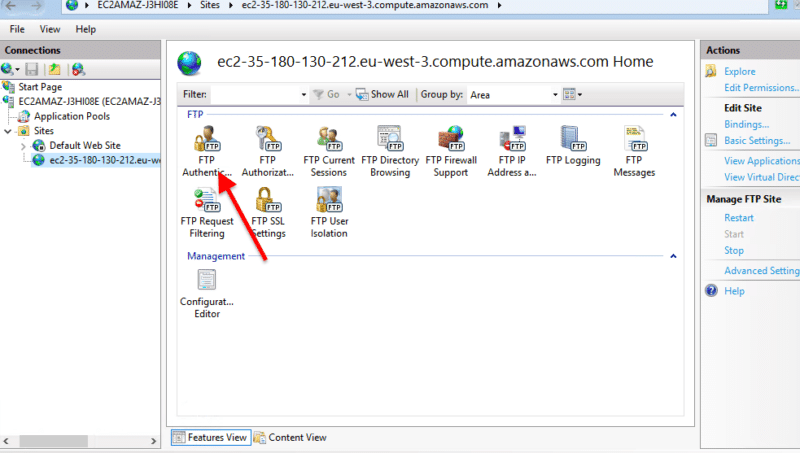
Configure FTP Authentication and Authorization
- Go to your new FTP site and select “FTP Authentication.”
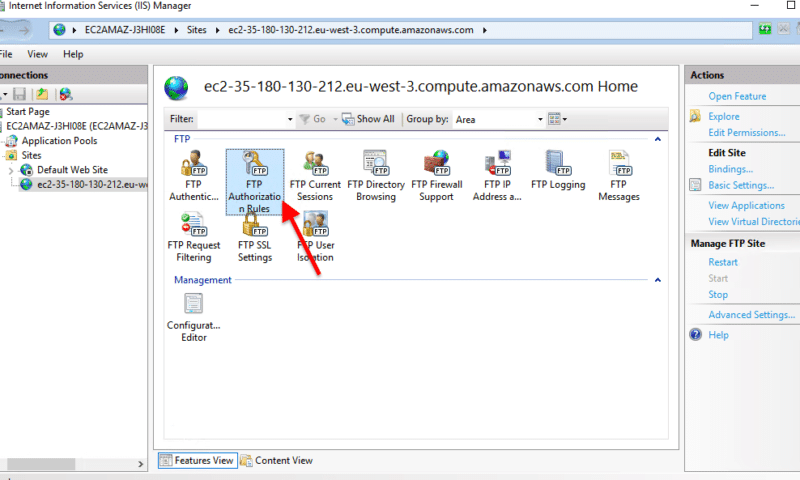
- On the next window, go ahead and enable “Basic Authentication” and disable “Anonymous Authentication.” Again, this depends on your certificate.
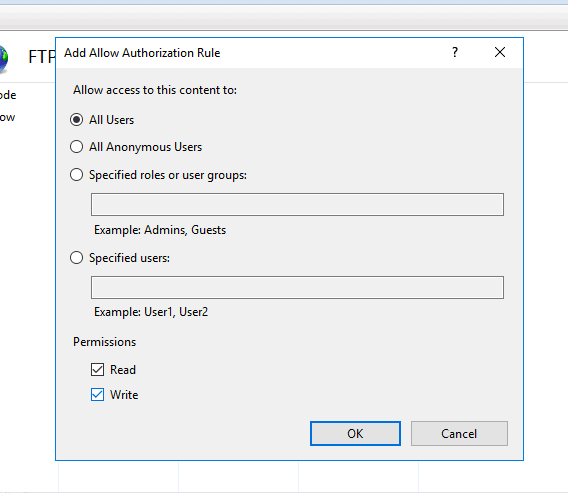
- Now, go back to the FTP feature’s menu and select FTP Authorization Rules. Bear in mind that if you already created an Authorization Rule while initially creating the FTP site, this step won’t be necessary.
- On the next window, click on “Add Allow Rule.” Here, select “All users” (unless you would like to specify users), then give the necessary permissions.
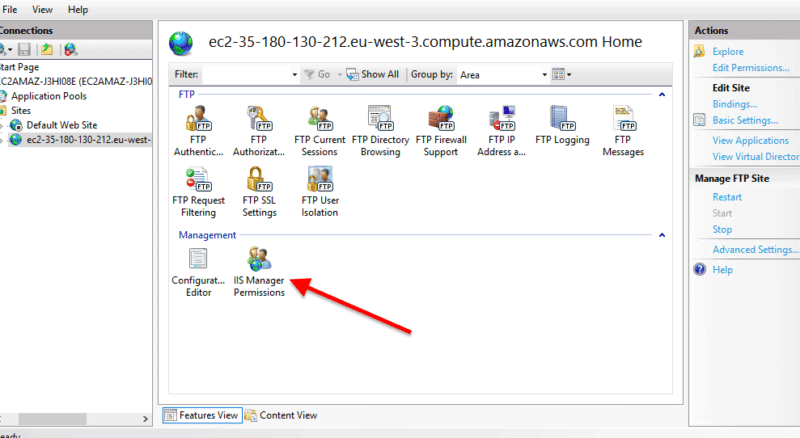
- Go back to the FTP site features menu and open the IIS Manager Permissions. If you don’t see this feature, you’ll need to go back to Server Manager > Server Roles > Web Server (IIS) > Management Tools > and make sure that all the Management tools are selected.
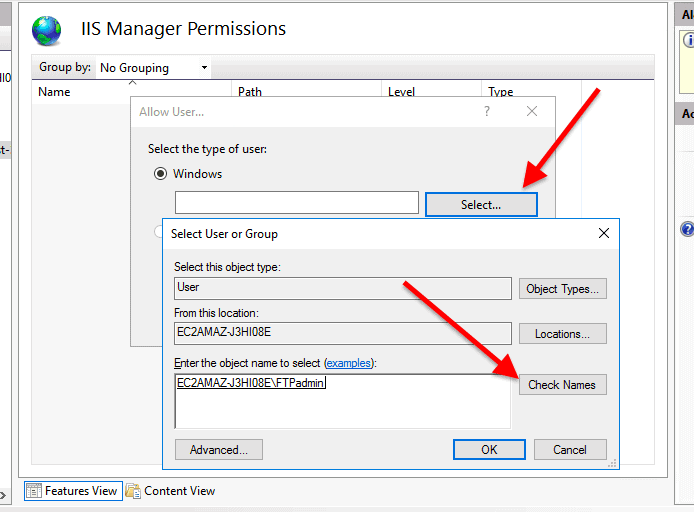
- Click on “Allow User.” In the next window, you’ll need to select the user to access the FTP site. Since we created a user with Windows, go ahead and click on “Select.” Next, find the object name (user) and click on “Ok.”
Testing your new FTP Server
To verify your FTPS Server is working, you can begin your testing from the localhost, then use third-party clients.
- Test localhost. Go to any web browser in your server and type “FTP://localhost.”
- Use third-party FTP clients such as Serv-U FTP Server with integrated FTP Web Client, which allows file transfer using FTP and FTPS. In addition, you can try FTP from external networks using an FTP client.
- Another alternative is using cloud-based file transfer solutions such as Files.com, which can work as an inbound FTP server, a client, or a sync solution. The advantage of using a solution like Files.com is that you can mount your IIS external FTP site directly into Files.com as a folder. Thus, Files.com acts as an FTP Client and makes your FTP site available via the Files.com web interface. You can access a 7-day free trial.
Troubleshooting
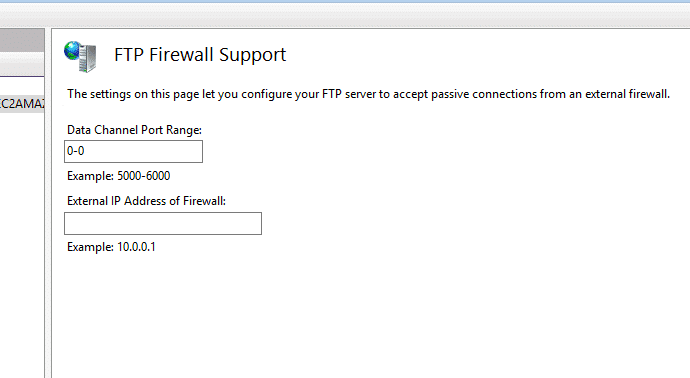
If you are attempting to connect externally but can't FTP, the reason might be that your server is behind a firewall or NAT. To allow “passive mode” FTP connections, you’ll need to specify the IP address of the external firewall.
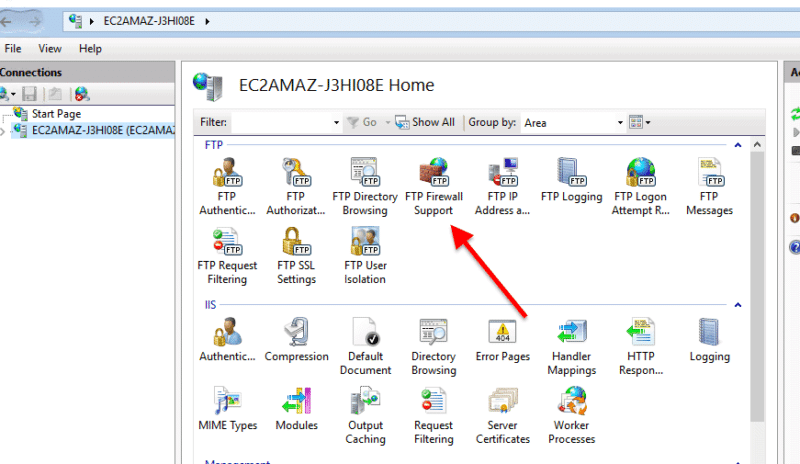
- To do this, go to “FTP Firewall Support” on the main IIS dashboard.
This option will make the FTP server accept passive connections when using FTP over SSL or when your firewall does not filter packets.
- Specify the external IP address of a Firewall.
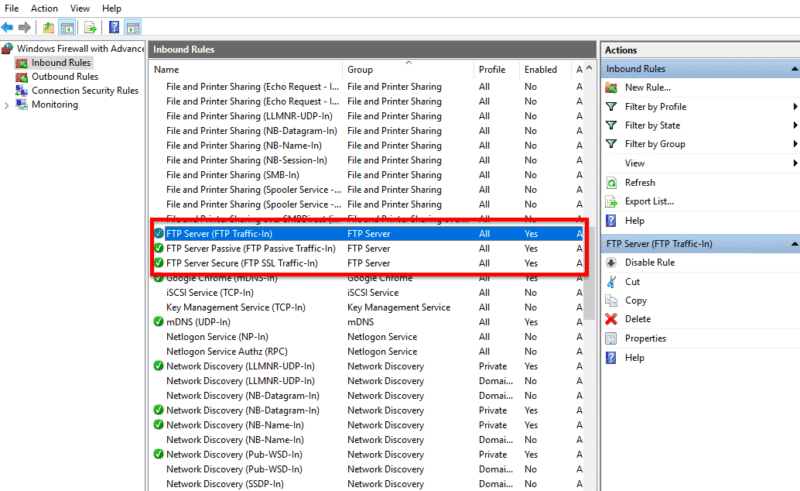
Additionally, the firewall will need to accept incoming connections from both FTPS ports 21 and 990. Although, when you initially installed the IIS FTP server, the Windows Firewall automatically configures rules for ports 21 and 990. But this doesn’t happen for some specific versions of Windows, so you’ll need to locate the FTP server rules and enable them.
- Open Windows Firewall > Inbound Rules.
- Find the three FTP Server rules > make sure they are enabled.
If you enable the rules, you’ll need to restart the FTP service. Go to Administrative Tools and open Services (or services.msc), find Microsoft FTP Service and click on “Restart the service.”
Ιnstall SFTP Server Using IIS FAQs
What are the system requirements for installing an FTP server on Windows Server?
An FTP server on Windows Server requires a Windows Server operating system (Windows Server 2008 or later), at least 2 GB of RAM, and 1 GB of free hard disk space.
How do I install an FTP server on Windows Server?
To install an FTP server on Windows Server, you will need to follow these steps:
- Download an FTP server software, such as Serv-U FTP Server
- Install the software by following the on-screen instructions.
- Configure the FTP server by setting up user accounts, specifying the FTP root directory, and defining firewall rules.
What are the steps for configuring an FTP server on Windows Server?
To configure an FTP server on Windows Server, you will need to perform the following steps: Set up user accounts: Define the users who will have access to the FTP server and assign permissions. Specify the FTP root directory: Choose the location on your server where the FTP files will be stored. Define firewall rules: Allow incoming FTP traffic by creating a firewall rule.
How do I secure my FTP server on Windows Server?
To secure your FTP server on Windows Server, you can take the following steps:
- Use SSL/TLS encryption to secure FTP traffic.
- Limit access to the FTP server by using IP-based access control.
- Use strong passwords for all FTP user accounts.
- Regularly monitor the server logs to detect any suspicious activity.
How do I troubleshoot common problems with an FTP server on Windows Server?
To troubleshoot common problems with an FTP server on Windows Server, you can try the following steps:
- Check the firewall settings to make sure that incoming FTP traffic is allowed.
- Verify that the FTP server software is running and configured correctly.
- Check the FTP log files for any error messages or warnings.
- Test the FTP connection from a client to ensure that it is working correctly.

