
Our funding comes from our readers, and we may earn a commission if you make a purchase through the links on our website.
Access Control Lists – Your Guide to Securing Networks with ACL [ Tutorial & Commands ]
UPDATED: March 27, 2023
When you leave your house in the morning, you (probably) lock the doors behind you. In a normal scenario, only people who have the keys to unlock your door should have access to your house. We do this for security reasons. In the same way, we may want to control who/what has access to different parts of our network and one of the ways we do this is using Access Control Lists (ACLs).
In this article, we will be doing a deep-dive into ACLs as applicable to network access control. We will consider the structure of an ACL, how ACLs are processed, and also how to apply configured ACLs. Furthermore, to make this article as practical as possible, we will consider a case study where we configure ACLs on a Cisco IOS device. The knowledge from this case study can be applied across devices from other vendors.
Note: ACLs are not only useful for filtering purposes; they also find application in other areas like Network Address Translation (NAT) configuration, matching which routes to advertise/accept in dynamic routing protocols, policy-based routing, and many more. Furthermore, ACLs are not restricted to networking as they are also used in other systems such as file systems to control access to files/objects.
Access Control Lists
What is an Access Control List?
Just like the phrase says, an Access Control List (ACL) is a list that controls access. This means that, when used for network access control, ACLs determine which hosts are allowed (or not allowed) to access other devices/destinations. This is typically done on a per-packet basis which means that each packet is checked against the ACL to determine whether to allow or deny that packet.
Note: ACLs can be used to check various fields in a packet including Layer 2 (e.g. MAC addresses), Layer 3 (e.g. IPv4 addresses), Layer 4 (e.g. TCP port number), and so on. In this article, we will restrict our discussion to Layer 3+. Furthermore, most ACLs are considered “stateless” which means that each packet in a flow is considered on its own, unlike stateful filtering which keeps track of the state of a connection.
Structure of ACLs
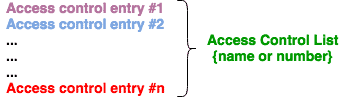
Like we already said, an ACL is a list which means that it is a list of something. In technical terms, we say an ACL is a list of Access Control Entries (ACEs), with each entry containing matching criteria for a particular packet.
Based on this description, an ACL can be broken down into two main parts:
- ACL Identification which is typically a name or a number. As we will see later on, ACLs can also be identified by their type.
- A number of access control entries which are typically identified by sequential numbers.
Access Control Entries (ACEs)
ACEs make up the bulk of an ACL with each ACL containing one to as many entries allowed by a particular device. Without paying attention to the specific type of an ACL, an ACE is made up of the following:
- An identification which is usually a line number. For example, the first ACE in the ACL configured on a Cisco IOS router has a line number of 10 by default; the next one has a line number of 20; and so on.
- An action to be performed for a packet that matches the entry. Typically, this is either “permit” or “deny”.
- In some cases, the protocol and port information to be matched in a packet. For example, an ACE can match all IP traffic while another ACE matches only HTTP traffic.
- The source to be matched. This is usually the (IP) address of the source of the packet. It can be a single address, a range of addresses, a subnet, or even any address.
- The destination to be matched. This is usually the (IP) address of the destination of the packet. It can be a single address, a range of addresses, a subnet, or even any address.
Keep in mind that the source and destination components of ACEs are subjective, depending on the direction of the packet. Consider the diagram below:

There are two scenarios we can consider from the perspective of the router, R1:
- If PC1 initiates communication to PC2 (e.g. ping from PC1 to PC2), the source of the traffic is 192.168.1.100 while the destination is 192.168.2.200.
- If PC2 initiates communication to PC1 (e.g. ping from PC2 to PC1), the source of the traffic is 192.168.2.200 while the destination is 192.168.1.100.
ACL Processing
When a packet is checked against an ACL, the following processing rules apply:
- The ACEs in an ACL are checked in order from top to bottom. This means ACE #10 will be checked before ACE #20.
- If a packet does not match an ACE, it is checked against the next entry in the ACL.
- If a packet matches an ACE, checks against the entire ACL stops and the action specified on the matched ACE is applied to the packet.
- If a packet does not match any entry in an ACL, most ACL implementations will deny/drop this packet because there is an implicit deny entry at the end of every ACL.
Let’s take an example to understand these processing rules. Imagine that we have an ACL with the following entries:
- Seq #1: Permit ICMP from 192.168.1.100 to 192.168.2.200
- Seq #2: Deny ICMP from any source to any destination
- Seq #3: Permit HTTP traffic from 192.168.1.100 to any destination
- Seq #4: Permit HTTPS traffic from 192.168.1.0/24 to any destination
Q1: What will happen to a ping packet from 192.168.1.100 to 192.168.2.200?
A1: Since ping is based on ICMP, the packet from 192.168.1.100 to 192.168.2.200 will be allowed because it matches the ACE with Seq #1.
Q2: What will happen to a ping packet from 192.168.1.50 to 192.168.2.200?
A2: The packet will be checked against the ACL starting at Seq #1. Since it doesn’t match this entry, the next entry (Seq #2) will be checked. This entry denies ICMP from any source to any destination. Since this is a ping packet (i.e. ICMP) and the source qualifies as “any” and the destination also qualifies as “any”, the packet will be denied.
Q3: What will happen to an HTTPS packet from 192.168.1.50 to 41.1.1.1?
A3: This packet will not match the first three entries of the ACL. However, it will match the 4th entry because it is an HTTPS packet, with a source that is contained in the 192.168.1.0/24 subnet, and a destination that qualified as “any”. Therefore, this packet will be allowed.
Q4: What will happen to an HTTP packet from 192.168.1.50 to 41.1.1.1?
A4: This packet will not match any entry in this ACL (only 192.168.1.100 is permitted to send HTTP traffic). Therefore, it will be denied assuming that the “implicit deny” rule applies to this ACL.
Applying ACLs
Just as it is ineffective to install a lock on your door and leave the house without locking the door, configuring ACLs without applying them is also pointless. When used for network access control/filtering, ACLs are typically applied on device interfaces, devices such as routers, multilayer switches, firewalls, and so on.
Generally speaking, an ACL can be applied in two directions on an interface:
- Inbound: This applies to packets coming into the interface
- Outbound: This applies to packets going out of the interface

Because understanding which direction to apply ACLs can be difficult, let’s take an example. In the image below, PC1 is connected to the Fa0/0 interface of R1 while PC2 is connected to the Fa0/1 interface of R1.

Now, imagine we want to apply an ACL on R1 such that only ping (ICMP) traffic from PC1 to PC2 should be allowed; where can we apply that ACL?
- First, we can apply this ACL on the Fa0/0 interface in the inbound direction. This is because ping traffic from PC1 to PC2 will come into R1 from its Fa0/0 interface.
- Alternatively, we can apply this ACL on the Fa0/1 interface in the outbound direction. This is because the ping traffic from PC1 to PC2 will go out of R1 through its Fa0/1 interface.
Tip: Something I learned a while back that may help with the understanding of ACL directions is to think of yourself as a router. Stand up and stretch out your arms by your side like you are forming a cross: traffic coming in from your fingers into your body is inbound while traffic going from your body to your fingers is outbound.
Case Study: ACLs on Cisco IOS Devices
On Cisco IOS devices, there are two types of ACLs (at the minimum):
- Standard ACLs which match only on the source address
- Extended ACLs which can match on a combination of protocols, source/destination addresses, source/destination ports, options, and so on.
Note: Cisco has other types of ACLs such as time-based ACLs, reflexive ACLs, dynamic ACLs, and so on. However, these are beyond the scope of this article.
Irrespective of the type, ACLs on Cisco IOS devices can be named (e.g. “TESTACL”) or numbered (e.g. 100). Note that if using numbered ACLs, there are particular number ranges for standard and extended ACLs.
When specifying the source and destination addresses on an ACL in the Cisco IOS configuration, you use something called a Mask also known as an Inverse mask or Wildcard mask. At the basic level, the wildcard mask is just the subnet mask flipped i.e. 1s become 0 and 0s become 1. For example, the corresponding wildcard mask for the subnet mask 255.255.255.0 is 0.0.0.255.

For the wildcard mask, 0 means “must match” while 1 is a “don’t care” bit. For example, a 10.1.1.0 network with a wildcard mask of 0.0.0.3 will match traffic from IP addresses 10.1.1.1 through to 10.1.1.3.

Note: It will also match 10.1.1.0 but since this is a network address, it is not a valid source address on a packet.
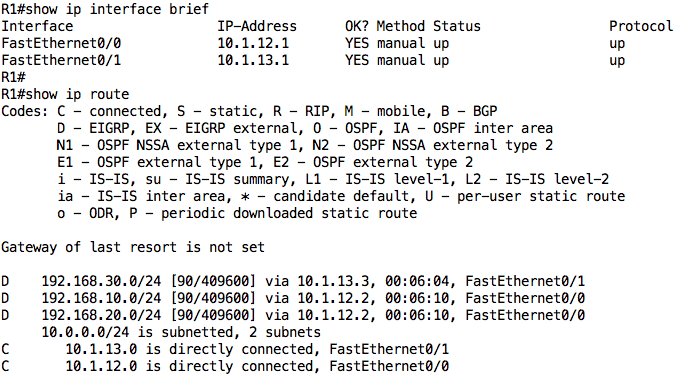
Let’s use the following lab setup for our case study:

You can build this topology in GNS3 or Packet Tracer. The IP addresses have been configured on all interfaces and EIGRP is running on the network such that there is connectivity among all devices:
R1:
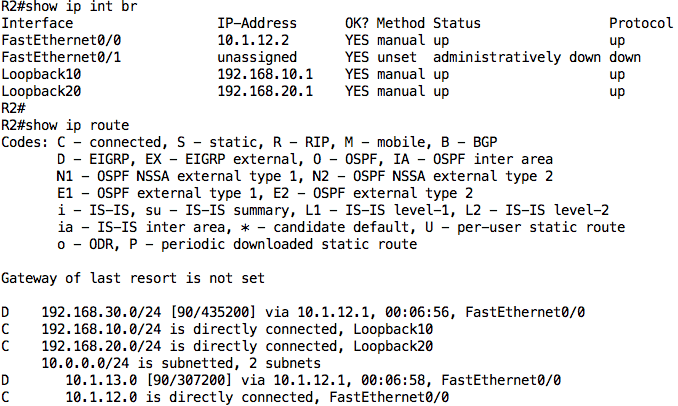
R2:
R3:
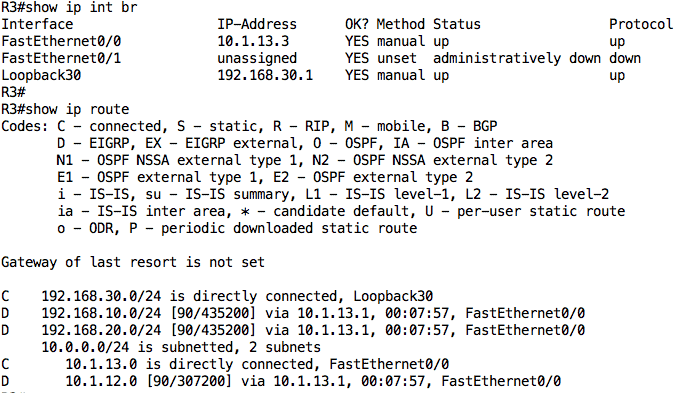
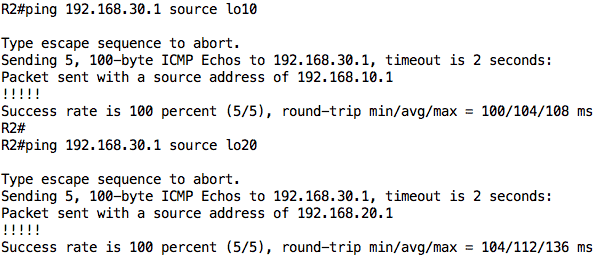
To test connectivity, I will ping R3 from R2’s loopback interfaces:
Creating ACLs on Cisco IOS
Let’s now configure an ACL on R1 such that the following conditions are met:
- All ICMP traffic from 192.168.10.0/24 to any destination should be allowed
- All other ICMP traffic should be denied
- All IP traffic from 192.168.20.0/24 to 192.168.30.0/24 should be allowed
- Devices on the 192.168.10.0/24 network should be able to connect to the 192.168.30.1 host using SSH; Telnet should be denied.
- All other traffic should be denied
To configure an ACL on a Cisco IOS device, we use the following steps:
- Define the ACL using a name or number. Keep in mind that Named ACL are easier to edit. The command to configure a named ACL is ip access-list [extended|standard] <ACL name>
- Configure ACEs under the ACL using the basic syntax: [permit|deny] <protocol> <source network> <source wildcard mask> <destination network> <destination wildcard mask> <options>
- Go under the necessary interface and apply the ACL using the command ip access-group <ACL name> [in|out]
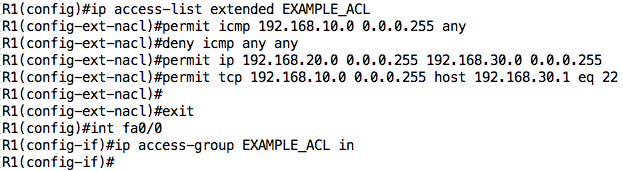
Therefore, the configuration to achieve this on R1 is as follows:
ip access-list extended EXAMPLE_ACL

permit icmp 192.168.10.0 0.0.0.255 any

deny   icmp any any

permit ip 192.168.20.0 0.0.0.255 192.168.30.0 0.0.0.255

permit tcp 192.168.10.0 0.0.0.255 host 192.168.30.1 eq 22

!

interface FastEthernet0/0

ip access-group EXAMPLE_ACL in

!
There are a couple of things to note about this configuration:
- I have configured an ACL named “EXAMPLE_ACL”. This ACL is extended because I need to match on several fields.
- We can use the keyword “any” to match any address
- We can use the keyword “host” to match a single address
- We can specify a port to be matched using keywords such as “eq” which means equal to, “gt” which means greater than, and so on.
- I have not explicitly denied all other traffic – the “implicit deny” rule at the end of every Cisco ACL will deny any traffic that isn’t matched by this ACL
- I have applied this ACL in the inbound direction on the Fa0/0 interface. I could have also applied it outbound on the Fa0/1 interface.
Verifying ACLs
I can view the ACL configuration and statistics using the show ip access-lists or show access-lists command:
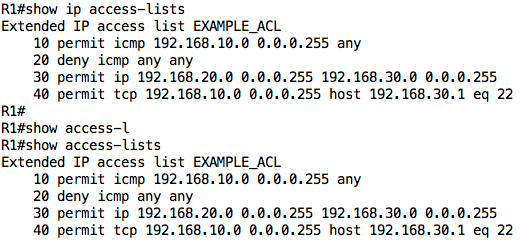
Notice the numbering: it starts at 10 and each new entry is added below the previous entry. I can use the show ip interface command to view the ACLs applied on an interface:
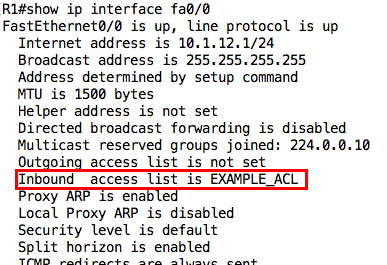
Note: You can apply up to two ACLs on an interface, one in each direction.
Editing ACLs
However, by applying this ACL, I have created a problem between R1 and R2:

The EIGRP relationship has been terminated because EIGRP packets are being denied by the “implicit deny” rule at the end of the ACL. We need to resolve this issue by explicitly allowing EIGRP packets in our ACL.
Warning: You need to be careful when editing an ACL since new ACEs are added at the bottom of the ACL (before the implicit deny). However, with named ACLs, you can specify the line number where you want an entry to be placed.
In our case, it does not matter where we add the entry to permit EIGRP traffic since there is no other entry that affects that traffic before the implicit deny rule. However, just to see how to add entries at any line of an ACL, let’s add the “permit eigrp any any” entry on line 5 of our ACL:

Cool! Our EIGRP relationship is back.
Testing ACLs
We can now go ahead to test our ACL. Remember that when testing ACLs, you should not only test what should be working, but also what should NOT be working.
Test 1: Ping from 192.168.10.1 to 192.168.30.1 should be allowed because of ACL line entry 10.
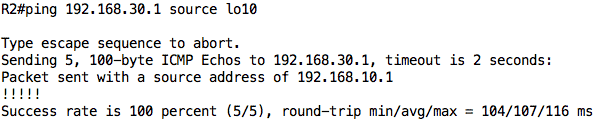
We can check the counters on our ACL to see that this traffic was matched by the ACL:

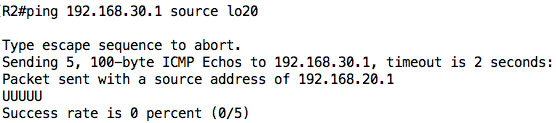
Test 2: Ping from 192.168.20.1 to 192.168.30.1 should fail because of ACL line entry 20.
Test 3: Telnet and SSH from 192.168.20.1 to 192.168.30.1 should be allowed because of ACL line entry 30.
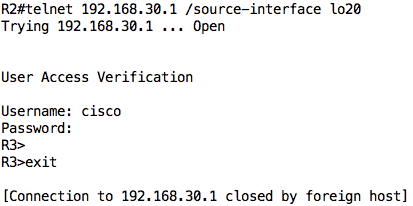
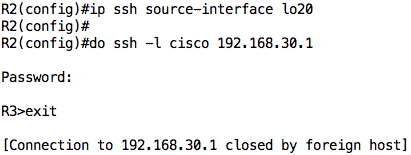
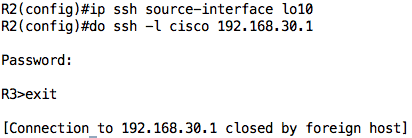
Test 4: SSH from 192.168.10.1 to 192.168.30.1 should be allowed because of ACL line entry 40.
Test 5: Telnet from 192.168.10.1 to 192.168.30.1 should fail because of implicit deny rule.

We can check the counts on the ACL to ensure that the traffic really hit the ACL:

Helpful Hints for ACLs
Here are some hints to help with your ACL implementation:
- Since matching on an ACL is stopped once an entry is matched, put your more specific entries at the top of the ACL and more generic ones below.
For example, if you put the:deny icmp any any
entry before the
permit icmp host 1.1.1.1 any
entry, ICMP traffic from the 1.1.1.1 host will also be denied.
- Since ACLs are searched from top to bottom, you should put your most likely-to-be-matched traffic towards the top of the ACL. This will reduce search time and resource consumption.
- You can use remarks to make your ACLs more readable i.e. so that you can understand what a particular entry does and why it is there.
- As much as possible, apply an ACL as close to the source of traffic as possible. There is no point for traffic to go all the way across the network only to be denied. Note that this tip may not be applicable for standard ACLs.
- If you can afford it, apply an ACL inbound instead of outbound. This is because packets are already processed (e.g. routing table lookup) before they are checked through an outbound ACL. Why waste processing resources only to later drop the traffic? Of course, there are times when this cannot be helped.
Conclusion
This brings us to the end of this article where we have looked at Access Control Lists in detail, focusing on how they are used for network filtering. We saw that ACLs are made up of Access Control Entries (ACEs) which either permit or deny traffic based on certain criteria.
We discussed processing rules for ACLs: top to bottom; stop once a match is made. We also looked at how ACLs can be applied to interfaces either in the inbound or outbound direction. Finally, we looked at a case study on implementing ACLs on Cisco IOS devices along with helpful hints.
Guide to Access Control Lists FAQs
How does an ACL work?
An ACL works by associating a list of permissions with a specific resource. When a user attempts to access the resource, the system checks the ACL for the resource to determine if the user has the necessary permissions. If the user does not have the necessary permissions, the access request is denied. If the user has the necessary permissions, the access request is granted and the user can perform the actions specified by the permissions in the ACL.
What are the types of permissions in an ACL?
The types of permissions in an ACL vary depending on the specific system and resource, but common permissions include read, write, execute, delete, and modify. Some systems also provide more specific permissions, such as the ability to list the contents of a directory or to change the attributes of a file.
How are ACLs applied to a resource?
ACLs are applied to a resource by the system that manages the resource. For example, a file system may have an ACL associated with each file and directory, while a network resource may have an ACL associated with the resource itself. The process for applying an ACL to a resource depends on the specific system and resource, but it typically involves specifying the permissions for each user or group that has access to the resource.
Can ACLs be inherited by child resources?
In many systems, ACLs can be inherited by child resources. For example, if a directory has an ACL associated with it, the permissions specified in the ACL may be applied to all files and subdirectories within the directory. This allows administrators to manage access control for a group of resources in a single location, rather than having to specify the permissions for each resource individually.
Can ACLs be overridden or modified by users?
The ability to override or modify ACLs depends on the specific system and the permissions assigned to the user. In some systems, only administrators or users with specific permissions can modify ACLs, while in other systems, users may be able to modify the ACLs associated with their own resources. The exact behavior depends on the specific system and the configuration of the ACLs.

