
Our funding comes from our readers, and we may earn a commission if you make a purchase through the links on our website.
How to configure a Cisco Layer 3 Switch-InterVLAN Routing Without Router
UPDATED: April 20, 2023
Cisco Layer 3 switches are versatile and powerful networking devices. They offer both Layer 2 and Layer 3 functionality. One of the most valuable features of a Layer 3 switch is its ability to perform inter-VLAN routing without needing an external router.
In this article, we will explore how to configure a Cisco Layer 3 switch for inter-VLAN routing step by step. We will cover a few fundamentals of Layer2 and Layer3, VLAN configuration, switch ports, trunk ports, and switch virtual interfaces.
Table of Contents
- Networking Devices: Layer 3 Switch vs. Router
- Inter-VLAN routing without a router
- How to configure a Cisco Layer 3 switch to route between VLANs?
- Network Diagram
- Configure VLANs
- Assign switch ports to VLANs
- Configure trunk ports
- Configure a switch virtual interface (SVI)
- Routing, Redundancy, DHCP, etc.
- Final Words
1. Networking Devices: Layer 3 Switch vs. Router
A Layer 3 switch (L3 OSI or Network Layer) is also called a multilayer switch because it can operate at layers 2 and 3. This device is similar to a router in many ways. Both perform OSI network layer (layer 3) functions (i.e., IP address assignment and routing). Additionally, both also interconnect different subnets and control network traffic and QoS. In addition, they also support various routing protocols, such as OSPF, BGP, and EIGRP, to exchange routing information. In addition, both can also operate at layer 2 (data link layer).
What are the differences between a Layer 3 and a router?
- Layer 3 switches typically have faster switching speeds and lower latency than routers, as they are designed to handle large amounts of data traffic in a network.
- Layer 3 switches are designed for large enterprise networks and provide a high-performance and scalable solution for routing and switching. This results in L3 switches being usually more expensive than routers.
- Using an L3 switch rather than a router can provide several benefits, such as increased network performance, reduced network latency, and increased network security.
- Routers are more configurable and offer more advanced security features than layer 3 switches. Routers are typically used in home and small business networks. There are more options in the market, so their price range is much broader than L3 switches.
Why not a Layer 2 switch?
Layer 2 switches create broadcast domains, which are helpful for small LANs, but as networks grow in size and complexity, they become unscalable and unreliable. Layer 2 switching does not provide a scalable solution for routing between different networks or controlling network traffic. In such a case, an L3 device should be used to provide the routing and traffic management functionality required to maintain a stable and secure network.
2. Inter-VLAN routing without a router
VLANs (Virtual Local Area Networks) are a logical grouping of devices in a network that share something in common and use L2 MAC addresses for communication. VLANs can segment a large layer 2 broadcast domain into smaller, isolated broadcast domains. This segmentation helps prevent broadcast storms and improves network security and performance.
Having separate broadcast domains (sub-networks) means that clients across different VLANs cannot talk directly with each other. So, they need an external device with layer 3 capabilities (network) to route and forward traffic. A technique known as inter-VLAN routing can be used to allow traffic to flow between different VLANs in a network.
NOTE: Ports on a switch can be assigned to VLANs, and switches can only forward traffic between devices only if they belong to the same VLAN. A switch (Layer 2) would not allow inter-VLAN routing because its interfaces (or ports) do not allow any network configuration (Layer 3) IP address.
There are three ways to implement inter-VLAN routing:
- Legacy Inter-VLAN routing is a solution that relies on a router (L3 device) with multiple Ethernet interfaces. This solution has poor scalability.
- Router-on-a-Stick: This inter-VLAN solution overcomes the scalability limitations of the legacy inter-VLAN routing, as it relies on only one router interface to route VLAN traffic (via subinterfaces), but it still requires a router.
- Layer 3 switch + SVIs. A highly scalable solution that uses L3 switches and switched virtual interfaces (SVIs). This solution is much faster than the Router-on-a-Stick because all switching and routing computations occur at the hardware level. The only disadvantage of this approach is that L3 switches tend to be more expensive than most L2 switches and some routers.
The Layer 3 Switch + SVIs solution is the scope of this article. You don’t need a router for this, so keep reading!
3. How to configure a Cisco Layer 3 switch to route between VLANs?
What Cisco switch to use?
Before buying any specific Cisco model, always check its capabilities and ensure it supports layer 3 (L3) routing. All Cisco switches that support Layer 3 routing should be capable of supporting inter-VLAN routing. Some commonly used Cisco switches that support inter-VLAN routing include Cisco Catalyst 3560, 3750, 3850, 4500, 6500 Series, and Cisco Nexus 7000 or 9000 Series.
Why do you require SVIs to allow inter-VLAN routing?
To enable inter-VLAN routing, VLAN interfaces (with IP addressing) would need to be configured on the Layer 3 switch. Note that a router can have an IP address directly assigned to its port, while L3 switches usually can’t. So they instead use something called virtual Layer 3 interfaces (SVI) (more of SVIs in the next section).
a. Network Diagram
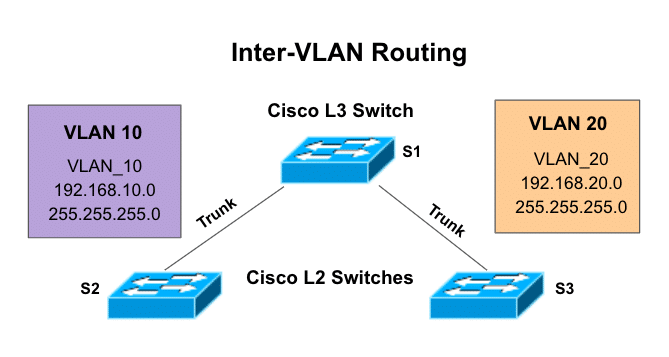
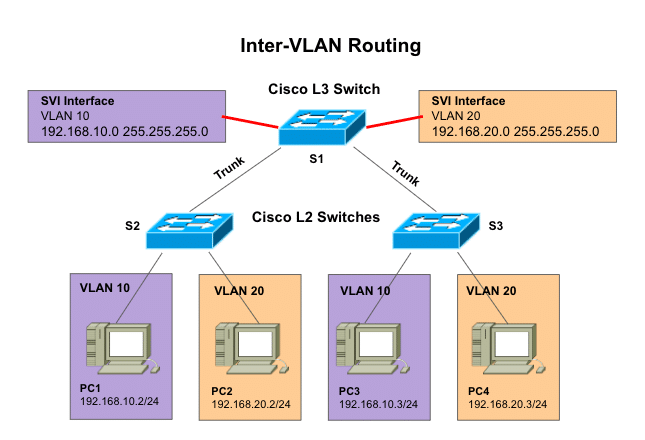
For illustration purposes, we will configure Cisco Layer 2 and Layer 3 (IOS-based) Cisco switch for Inter-VLAN routing. We will follow this network diagram.
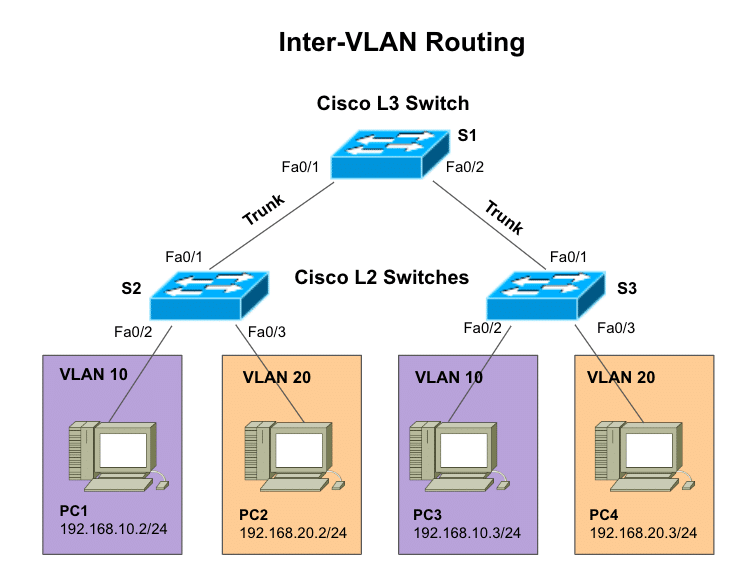
Network diagram details
- S1 (Switch 1) – The Cisco L3 Switch with two Fast Ethernet interfaces (Fa0/1 and Fa0/2) connecting VLANs 10 and 20 across two Cisco L2 switches via trunk links.
- S2 and S3 (Switch 2 and Switch 3) – Two Cisco L2 Switches connecting PCs at different VLANs (VLAN 10 and VLAN 20) via Fast Ethernet interfaces.
- VLANs 10 and VLAN20. These VLANs configured in L2 switches (S2 and S3) create a logical grouping of certain PCs within the network. Keep in mind that each VLAN gets a separate broadcast domain, even though they are spread across different switches.
- PCs. PC1, PC2, PC3, and PC4 are connected to the L2 switch that belongs to a certain VLAN.
b. Configure VLANs
First, you’ll need to create the VLANs that will be used in the network. According to our network diagram, we will be using two VLANs; VLAN 10 and VLAN 20. You can do this via the “vlan” command in global configuration mode. According to our network diagram:
Configuration on L3 Switch (S1)
| S1# configure terminal S1(config)# vlan 10 S1(config-vlan)# name VLAN_10 S1(config-vlan)# endS1# configure terminal S1(config)# vlan 20 S1(config-vlan)# name VLAN_20 S1(config-vlan)# end |
Configuration on Switch 2 (S2)
| S2# configure terminal S2(config)# vlan 10 S2(config-vlan)# name VLAN_10 S2(config-vlan)# endS2# configure terminal S2(config)# vlan 20 S2(config-vlan)# name VLAN_20 S2(config-vlan)# end |
Configuration on Switch 3 (S3)
| S3# configure terminal S3(config)# vlan 10 S3(config-vlan)# name VLAN_10 S3(config-vlan)# endS3# configure terminal S3(config)# vlan 20 S3(config-vlan)# name VLAN_20 S3(config-vlan)# end |
c. Assign switch ports to VLANs
Next, you’ll need to assign switch ports to the appropriate VLANs. This can be done using the “switchport mode access” command to make those interfaces access ports and the “switchport access vlan” command to assign the specific vlan.
Configuration on Switch 2 (S2)
| S2(config)# interface fastethernet 0/2 S2(config-if)# switchport mode access S2(config-if)# switchport access vlan 10S2(config)# interface fastethernet 0/3 S2(config-if)# switchport mode access S2(config-if)# switchport access vlan 20 |
Configuration on Switch 3 (S3)
| S3(config)# interface fastethernet 0/2 S3(config-if)# switchport mode access S3(config-if)# switchport access vlan 10S3(config)# interface fastethernet 0/3 S3(config-if)# switchport mode access S3(config-if)# switchport access vlan 20 |
d. Configure trunk ports
To enable inter-VLAN routing on a Cisco switch, you’ll need to configure the trunk ports. Trunk ports are a type of switch port in charge of essential tasks like carrying traffic for multiple VLANs between switches, tagging VLAN traffic, supporting VLAN management, increasing bandwidth efficiency, and, of course, enabling inter-VLAN routing.
To configure the trunk ports on all of our Cisco switches (according to the network diagram):
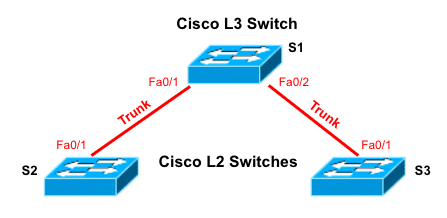
Configuration on L3 Switch (S1):
| S1(config)# interface fastethernet 0/1 S1(config-if)# switchport trunk encapsulation dot1q S1(config-if)# switchport mode trunk S1(config-if)# exitS1(config)# interface fastethernet 0/2 S1(config-if)# switchport trunk encapsulation dot1q S1(config-if)# switchport mode trunk S1(config-if)# exit |
Configuration on Switch 2 (S2)
| S2(config)# interface fastethernet 0/1 S2(config-if)# switchport trunk encapsulation dot1q S2(config-if)# switchport mode trunk S2(config-if)# exit |
Configuration on Switch 3 (S3)
| S3(config)# interface fastethernet 0/1 S3(config-if)# switchport trunk encapsulation dot1q S3(config-if)# switchport mode trunk S3(config-if)# exit |
Note: You can use different types of trunk encapsulation, just make sure both ends match the type of encapsulation.
e. Configure a switch virtual interface (SVI)
Now, in the Layer 3 switch, you’ll need to configure a Switch Virtual Interface (SVI) for each VLAN that will be routing traffic.
What is an SVI? An SVI is a Switched Virtual Interface on a switch that is used to enable inter-VLAN routing. It gets associated with a VLAN and acts as a default gateway for devices on that VLAN. The SVI performs the routing between the VLANs and forwards the packet to the destination. So an L3 switch would need one SVI for each VLAN to allow L3 forwarding.
According to our network diagram, we have two VLANs (10 and 20), so we need to configure two SVI interfaces. To configure an SVI you’ll need to use the “interface vlan” command in global configuration mode. You will also need the specific IP network related to devices in the same vlan.
Configuration on Cisco Layer 3 Switch 1 (S1)
| S1(config)# interface vlan 10 S1(config-if)# ip address 192.168.10.0 255.255.255.0 S1(config-if)# no shutdownS1(config)# interface vlan 20 S1(config-if)# ip address 192.168.20.0 255.255.255.0 S1(config-if)# no shutdown |
f. Extras: Routing, Redundancy, and DHCP
The benefit of using the SVI is that the switch can perform inter-VLAN routing without a router. It does not need to forward traffic to another external device like a router to move VLAN traffic.
You will simply need to ensure that the Layer 3 switch allows IP routing to forward VLAN traffic. To do this, issue the following command:
| S1# configure terminal S1(config)# ip routing |
Unless there is a need for Internet access, firewall, or other networks outside the reach of the Layer 3 switch, then you’ll need to implement a route to a Layer 3 core device. (this is outside the scope of this article).
Aside from routing, consider the following extras to improve your inter-VLAN network.
- Redundancy. Configure HSRP (or other redundancy methods) on both switches for added redundancy.
- For DHCP services, you will have to configure an IP helper on each SVI on the switches.
Final Words
This tutorial explains the limitations of Layer 2 switches when it comes to inter-VLAN communications. It also explains the three inter-VLAN routing solutions and why using a Layer 3 switch with switched virtual interfaces (SVIs) is the most scalable and reliable solution as compared to the other inter-VLAN routing methods.
In the tutorial, we also went through the detailed steps for configuring a Cisco Layer 3 switch for inter-VLAN routing without a router. We configured VLANs, assigned access ports, trunk ports, and configured SVIs.

