
Our funding comes from our readers, and we may earn a commission if you make a purchase through the links on our website.
TraceRoute Guide – Everything You Want to Know about TraceRt
UPDATED: February 6, 2023
With Ping, you might be able to know whether you have connectivity or not.
A simple binary, yes or no.
But traceroute takes native-OS network analytics to a higher level.
Traceroute will not only tell whether you have connectivity, but it will point out where is the problem precisely and why would that be happening.
In this article, we will discuss everything you want to know about traceroute.
- What is Traceroute?
- How Does Traceroute Works?
- What is the Difference between Tracert and Traceroute?
- Running a TraceRoute on Windows, Linux, or macOS.
- Ping vs Traceroute: In-Depth Traceroute Explanation.
- Traceroute Command Syntax and Options (for Windows).
- Traceroute IPv4 and IPv6.
What is Traceroute?
Traceroute is a monitoring command commonly used by network and system administrators in their day-to-day operations.
This basic network diagnostic tool has three primary objectives, which give you an accurate and complete understanding of a network problem.
With Traceroute, you can?
- Get the complete path that a packet uses to reach its destination.
- Discover the names and identity of routers and devices within the path.
- Find the time it took to send and receive data to each device on the path.
Traceroute gives you complete information about the path that your data will take to reach its destination, without actually sending data (other than ICMP).
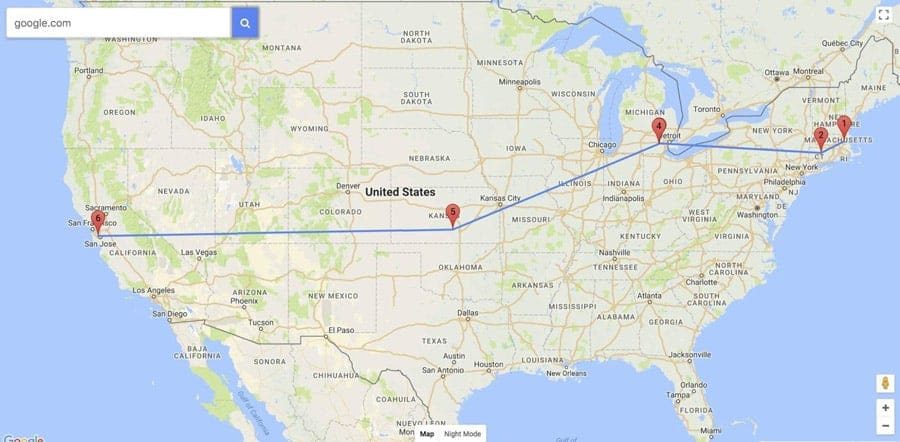
For example, if the source of the path (your computer) is in Boston, Massachusetts and the destination in San Jose, California (a Server), Traceroute will identify the complete path, each hop (the computers, routers, or any devices that comes in between the source and the destination) on the path, and the time it takes to go and come back.
How Does Traceroute Works?
Each IP packet sent on the Internet has a field known as Time-To-Live (TTL). But this field is not explicitly related to the time measured by the number of hops. It is instead, the maximum number of hops that a packet can travel across the Internet before it gets discarded.
The TTL field in an IP packet is so essential because if there wasn’t one, the packet would keep flowing from one router to another forever searching for its destination, in a never-ending loop.
The TTL value helps in route poisoning, and most importantly, it can help Distance Vector protocols to avoid routing loops.
Traceroute depends on TTL to measure the distance between source and destination and to find the hops in between.
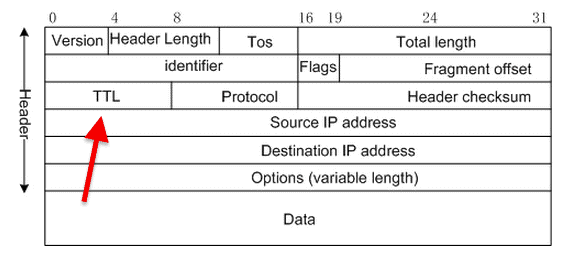
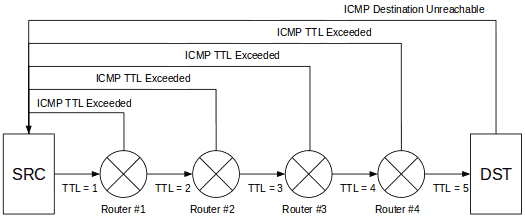
In a traceroute, the source re-defines the TTL value every time it gets a response and sends the packet with TTL= +1 until it reaches its destination.
When a packet reaches its maximum TTL, the last hop in line will send back an “ICMP TTL Exceeded” packet back to the source.
This communication is what traceroute is looking for. The “ICMP TTL Exceeded” contains valuable information, such as the time it took to reach that particular hop and the name of the server that is replying.
What is the Difference between Tracert vs Traceroute?
Tracert and Traceroute have different syntax but both of these commands do the basic same thing.
What makes them different is the Operating System where they are executed, Tracert for Windows and Traceroute for Linux.
The other thing is how each command is implemented in the background.
On the foreground, you see the same kind of information for both cases. As a result of running tracert or traceroute, you will see the same route and transit delays of packets across the entire path.
The command is available in Unix-based, Linux, and MacOS as ‘traceroute’, while it is available as ‘tracert’ in Windows.
Running a Trace Route on Windows, Linux, or MacOS.
Although the functionality is the same, the syntax and output are not. To run a traceroute command on a Windows, Linux, or macOS you need to follow the below instructions:
For Windows.
You can run a traceroute command on almost all Windows platforms, including, XP, Vista, Server, Windows 7, 8, 10, etc.
- Start by opening the “Command Prompt”. Go to “Start”, type in “CMD” and press enter.
- Use the “tracert” command. Type in “tracert” along with a target to trace a route towards a destination.
For Linux
To perform a traceroute on any Linux OS, such as Debian, Red Hat, Ubuntu, etc
- Start by opening the Terminal.
Press Ctrl + Alt + T or type in “terminal” in the search bar. - Install traceroute.
If you do not have traceroute already installed, you may need to install it. For instance, in Ubuntu, the command to install traceroute is “sudo apt-get install traceroute”. - Use the traceroute command.
Type in “traceroute” along with a hostname or IP address.
For Mac OSX
You can also run a traceroute command in your macOS.
- Open the terminal.
First, you need to open the Terminal. It can be done by going to “Applications”, then “Utilities” and double-clicking on “Terminal”. - Type in the traceroute command.
Use the traceroute command and enter the target.
Ping vs Traceroute: In-Depth Traceroute Explanation
During a non-Traceroute test such as Ping, the TTL would start with any value between 1 and 255, which is usually defined differently depending on the Operating System.
Let's say you ping the IP address 8.8.8.8, and your default TTL value is set to 51 hops.
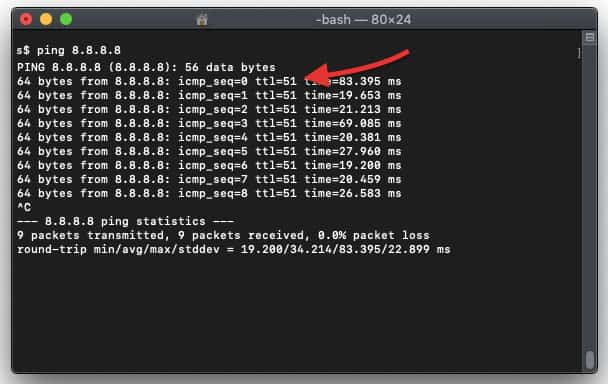
Your packet will start with a “hop limit of 51” to avoid any further loop, and it will travel a maximum of 51 hops to reach its destination before it gets discarded.
Each router that comes in between the source and destination will reduce the TTL before sending it to the next router.
This reduction of TTL by -1 will happen across the entire path until the packet reaches its destination or the TTL value limit reaches, and the last hop sends an ICMP TTL Exceeded message.
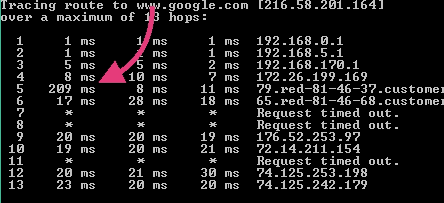
To help visualize the Ping example…
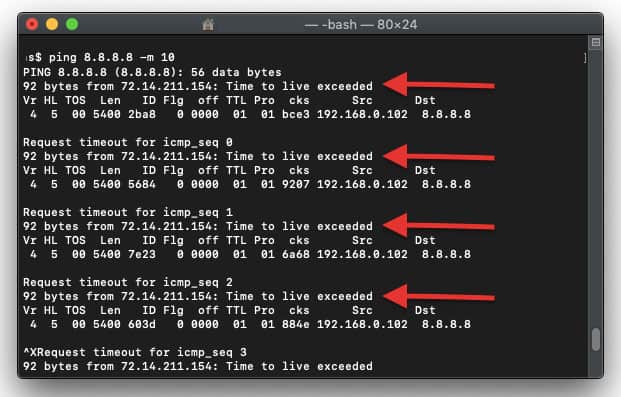
Let's send a ping with a limited TTL to 10.
This computer won't be able to reach its destination, because there are more than ten hops towards server 8.8.8.8.
So, with this Ping, we are getting some valuable information from hop number 10, such as the IP 72.14.211.154 and additional data.
Traceroute Example
Traceroute starts its journey towards its destination differently. It begins with a TTL=1 (instead of the default 51) and adds one until it reaches its final destination.
When beginning the Traceroute test, the next hop that receives the packet with a TTL=1, which in my case, is the gateway, will execute the TTL-1 by protocol, which will result in TTL=0. That means there will be no further forwarding and the packet will be discarded.
The next-hop (my gateway) will notify the source that the TTL exceeded with the “ICMP TTL exceeded” message, containing valuable information such as IP, hostname, and delay.
As mentioned in the previous section, the main job of the Traceroute command is to +1 to the TTL until the packet reaches the final destination.
So, back to our example, let’s traceroute 8.8.8.8.
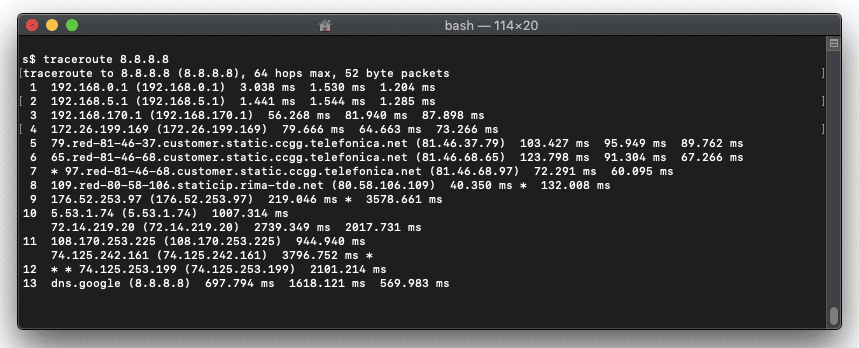
The Traceroute example shows that the packet took 13 hops from the source (192.168.0.1) to reach its destination (8.8.8.8), along with all information from the hops in between.
From the same screenshot, you can see that the hop number 10 is “72.14.219.20” the same IP that we got from command “ping 8.8.8.8 -10”.
Traceroute Command Syntax and Options (for Windows)
The tracert (for windows) command is available at the Command Prompt in all Windows operating systems including Windows 10, Windows 8, Windows 7, Windows XP, Windows Vista, and older versions of Windows as well.
The tracert command syntax is given below:
tracert [-d] [-h MaxHops][-j HostList] [-w TimeOut][-R RoundTrip] [-S Source] [-4] [-6] target [/?]
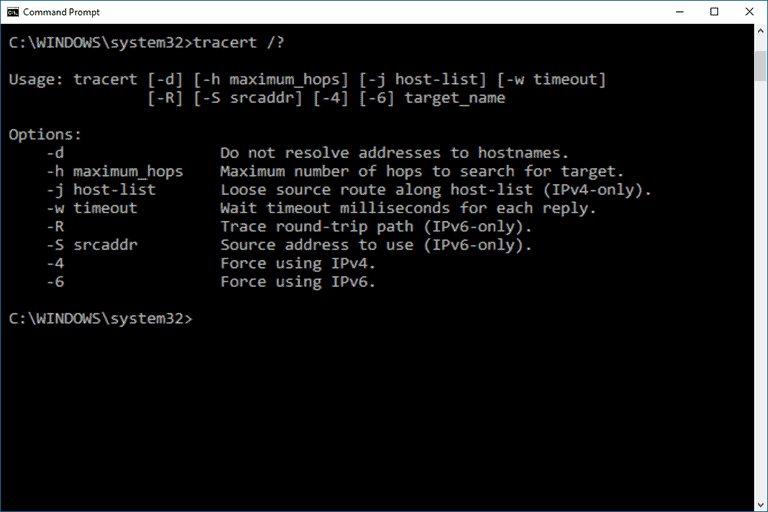
Below is a brief description with each tracert option in Windows…
| Option | Description |
| -d | This tracert option prevents tracert from resolving IP addresses to hostnames, often resulting in much faster results. |
| -h MaxHops | This option specifies the maximum number of hops in the search for the target. If you do not specify MaxHops, and a target has not been found by the default max hops (30 for Windows), tracert will stop looking. |
| -w TimeOut | Using this tracert option, you can specify the time, in milliseconds, to allow each reply before timeout. |
| -4 | It forces tracert to use IPv4 only. |
| -6 | It forces tracert to use IPv6 only. |
| Target | A mandatory option. It is used to specify the destination, either an IP address or hostname. |
| /? | Use the help switch with the tracert command to show detailed help about the command's multiple options. |
Reading The “tracert” Output.
Now that we know how traceroute works and its syntax, let’s find out how to read the output.
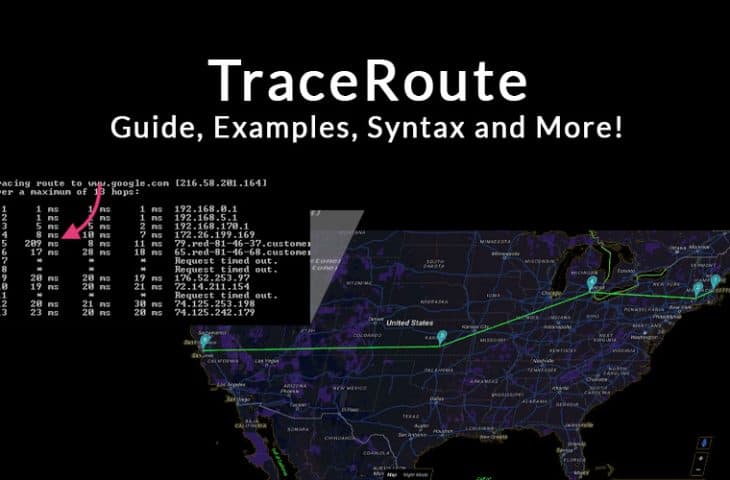
With the tracert example shown below, we're requesting the command to display the path from the local computer to the network device with the hostname “www.google.com” (with additional requests)
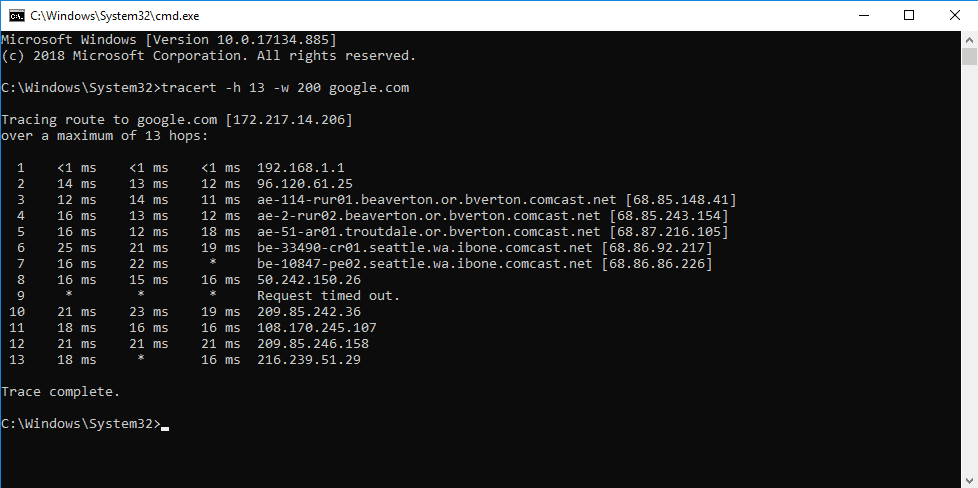
If you noticed Windows tracert output is different than Linux or macOS. There are five columns, the first is the number of hops, the next three columns are three ICMP (pings) with the delay, and finally the IP or hostname.
In the example shown above, we didn’t reach our final destination (google.com). The last hop that sent us the “ICMP TTL Time Exceeded” message was number 13 or (public IP 74.125.242.179). This was because we limited the number of hops to 13, with (-h 13). Probably Google was at hop 14, or more.
The other option we tested was timeout (-w 200). This is the maximum waiting time in milliseconds for each packet before it is considered lost. To read the delay columns, you can start with 1 ms, which is the hop to the gateway.
The largest delay we can see here was on hop 5, which took 209 ms (from source 1 to hop 5). In other words, it took (209 – 8) 201 ms from hop 4 to 5.
Traceroute Command Syntax and Options (for Linux)
The traceroute command syntax for Linux can be written as:
traceroute [-dFInrvx] [-f first_ttl] [-g gateway] [-i iface] [-m max_ttl]
[-p port] [-q nqueries] [-s src_addr] [-t tos] [-w waittime] [-z pausemsecs] host [packetlen]
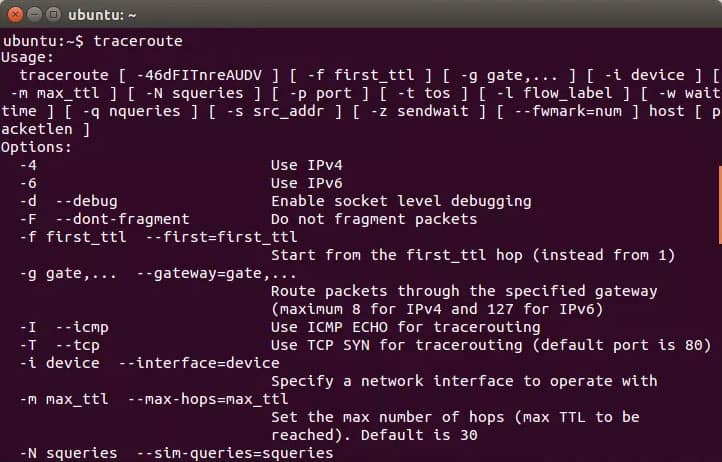
Below is a brief description with each traceroute option in Linux systems.
| Option | Description |
| –help | Used to Display a help message, and exit. |
| -4, -6 | Explicitly force IPv4 or IPv6 tracerouting. |
| -f | Sets the initial TTL on the first outgoing packet. |
| -F | Sets the “don't fragment” bit. |
| -d | Enables debugging. |
| -g | Specifies a loose source route gateway (8 maximum). |
| -i | Set a network interface to obtain the source IP address. |
| -I | Use ICMP ECHO. |
| -m | Set the maximum TTL used in outgoing packets. The default is set at 30 hops. |
| -n | Print hop addresses numerically. |
| -p | For UDP tracing, it specifies the destination port base. This option can be used to find unsued ports. |
| -r | Avoid the normal routing tables and send directly to a host on a specific network. |
| -s | Chooses an alternative source address. Note that you must select the address of one of the interfaces. |
| -t | Type of service. The value must be a decimal integer in the range from 0 to 255. You can use it to check if different type-of-service results in different paths. |
| -v | The verbose output. |
| -w | Sets the time to wait for a response. The default is 5 seconds. |
| -z | Set the time in milliseconds to pause between tests. |
Traceroute IPv4 and IPv6
By default, tracert and traceroute will test the path only for IPv4 addresses. But that doesn’t mean you can’t test IPv6. All modern OSs come with full support for IPv6 addresses, including all commands, such as ping, traceroute, netstat, etc., to support IPv6.
But IPv4 is the preferred addressing method, so you might not have IPv6 routes in your router ready to send the ICMP packet towards the IPv4 destination. If you do have IPv6 routes support in your OS and your router, you can perform a test.
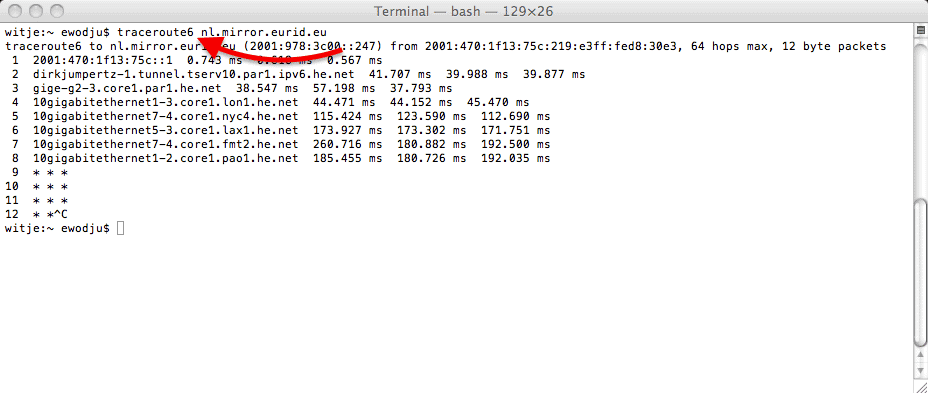
To test a route for an IPv6 address, use the “tracert6” or “traceroute6” for Linux OS. The tracert6 command sends a sequence of User Datagram Protocol (UDP) to the destination host. While in the case of Windows, you can traceroute to IPv6 addresses using “tracert -6”.
- For macOS and Linux: traceroute6 2a00:1450:400a:804::2004
- For Windows: tracert -6 2a00:1450:400a:804::2004
Summary
Although it is underestimated, Traceroute is one of the best OS-native network analytics tools. It is not only capable of testing connectivity, as Ping does, but it also finds all hops in between source and destination, including names, and delay times.
And all of this is done with the same protocol that Ping uses, ICMP. Also, by altering a field in the IP packet, the TTL.
Some software developers are even creating a front-end version of traceroute and including things such as GUIs, Geographical maps, graphs, etc. All to make a simple tool even more powerful.
But if you understand the basics and some of the tricks shown in this article, you probably won’t need fancy software.
Traceroute comes in all OS out there, from Linux, Windows, UNIX-based, to macOS.
The underlying functionality is the same, but remember that there are few command syntax and output distinctions.
TraceRoute FAQs
What's the difference between tracert and ping?
The main difference between tracert and ping is that ping is used to check the reachability of a host and measure the RTT, while tracert is used to trace the path of a packet to a host and measure the RTT of each hop.
Does traceroute show your IP?
Traceroute does not display your IP address. The tracert command shows the IP addresses of the routers or devices along the path from your device to the destination host, and the round-trip time (RTT) for packets to reach each hop.
Does traceroute use DNS?
Traceroute does not use DNS. Instead, it uses IP addresses to trace the path between the packet and the destination host. Traceroute sends a series of ICMP echo request packets rather than relying on DNS.

