
Our funding comes from our readers, and we may earn a commission if you make a purchase through the links on our website.
How to setup an SFTP server on Ubuntu
UPDATED: December 11, 2023
There are a couple of ways to set up an SFTP server in Ubuntu; one uses OpenSSH, the suite of secure networking utilities based on the Secure Shell (SSH) protocol. The second is using the FTP Server with Very Secure FTP Deamon (VSFTPD) and then running it through an SSH, but this second approach is not an SFTP but FTP over an SSH server. Third, you can leverage a cloud-based service to mount an SFTP server as a folder in Ubuntu.
In this guide, we are going to set up an SFTP server on Ubuntu 18.04 with OpenSSH. We’ll also create a user, and a folder with permissions, restrict access, configure firewall rules, configure authentication keys, and finally test our server.
Table of Contents
- What is SFTP and what is not?
- Ways to set up an SFTP server on Ubuntu?
- Installing and configuring the OpenSSH server
- Configuring users, access, and traffic
- Authenticating via public keys
- Connecting from an SFTP client using a key
- Extend your SFTP server functionality with an external service
- Advantages of SFTP
1. What is SFTP, and What is not?
Secure Shell (SSH) is a cryptographic networking protocol that gives users secure access to remote resources via unsecured networks. It creates a tunnel to allow remote command execution, login, and command-line, but it also protects any network service, including SFTP and SCP. SSH provides a secure channel using the client-server architecture. Therefore, it needs an SSH client to connect to an SSH server.
SFTP is not FTP over SSH or FTPS
SFTP is a file transfer protocol that provides manipulation capabilities and routes data through an SSH tunnel. Unfortunately, many people confuse FTP terms and end up configuring something they don’t need.
Do not confuse SFTP with FTP over SSH or FTPS (FTP over SSL). FTP over SSH is the old FTP, but running through SSH's cryptographic algorithms, and FTP over SSL is the old FTP but using SSL/TLS cryptography.
Although SFTP has the benefits of security that FTP does not, SFTP still has one drawback. By default, all SSH SFTP users can access directories and files from users outside their home directory. So, you’ll need to enforce some access control in case you are allowing multiple users access to your SFTP resources.
2. Ways to set up an SFTP server on Ubuntu?
There are different approaches to setup up an SFTP server.
a. Use the good old OpenSSH-server
OpenSSH is a collection of command-line networking tools based on the SSH protocol. OpenSSH is developed for OpenBSD Operating Systems, but now, it can be integrated into different systems, including Linux, macOS, and Windows. The OpenSSH includes demons and utilities like SFTP, an FTP replacement to securely copy files between computers, SCP, a substitute for RCP, and Deamon (sshd), the program for the SSH client. OpenSSH is the recommended path to take if you are configuring a dedicated SFTP server.
b. Use a standalone FTP server, like vsftpd or ProFTPD
VSFTPD is handy if you use UNIX-like or Linux, as it is the default FTP server for various Linux distributions, including Ubuntu, CentOS, RHEL, Fedora, and more. It is free and open-source and supports IPV6, TLS/SSL, and FTPS. In addition, VSFTP comes with a built-in jail functionality, which saves many headaches in terms of configuration overhead. Although VSFTPD is famous around the web as an SFTP server, the reality is that VSFTPD and SFTP are two completely different things. Still, VSFTPD can be configured as an FTP over the SSH approach, but still, this is not truly an SFTP server.
c. Use a third-party SFTP server software
Use a third-party SFTP server and mount it as a folder to synchronize files into Ubuntu or other platforms. Files.com is an example of a cloud-based file-sharing solution used to mount an external SFTP server into Ubuntu as a folder. In addition, you can also set up Files.com as an SFTP client to make an existing SFTP server available via a web interface, API, SDKs, and other inbound SFTP connections. Access a 7-day free trial of Files.com
Which one to use?
OpenSSH is the true path to an SFTP server but requires more configuration and maintenance. On the other hand, VSFTP can configure a headache-less and more accessible maintenance FTP over an SSH server, but not an SFTP server. Finally, a third-party cloud-based SFTP server can be the easiest and fastest route but gives you less control.
3. Installing and Configuring the OpenSSH-server
We are going to set up an SFTP server on Ubuntu18.04, using OpenSSH. By default, Ubuntu Desktop and lightweight Ubuntu server come without sshd. So, we’ll need to install the SSH server using the following steps.
- Update your system
- $ sudo apt update
- $ sudo apt upgrade
- Install OpenSSH using the following command:
- $sudo apt-get install openssh-server
- Verify that the SSH service is operational (if not, enable and restart it)
- $sudo systemctl status ssh
- $sudo systemctl enable ssh
- $sudo systemctl start ssh
- or $sudo systemctl restart ssh

4. Configuring Users, Access, and Traffic
One of the only vulnerabilities when starting with SFTP is that, by default, any user can have access to the entire root folder structure. With OpenSSH, you can restrict access to users with a chroot jail environment. The chroot isolates processes and their children from the rest of the system. In addition, you’ll have to allow SFTP inbound and outbound traffic in Ubuntu’s UFW.
a. Create users and directories
First, we’ll create a user and group and make the user a group member.
- Add a new user and group for SSH, and make the new user a group member
- sudo adduser sftpuser01
- sudo addgroup ftpaccess
- sudo usermod -a -G ftpaccess sftpuser01
- Change the user’s home directory permission. It must be owned by root and have 755 permission
- sudo chown root: /home/sftpuser01
- sudo chmod 777 /home/sftpuser01
- Create a directory inside user’s home for upload and download. And modify permission with the group
- sudo mkdir /home/sftpuser01/www
- sudo chmod 755 /home/sftpuser01/www
- sudo chown sftpuser01:ftpaccess /home/sftpuser01/www
b. Configuring the SFTP subsystem of SSH
As mentioned earlier, when using OpenSSH, you’ll need to restrict users to their home directory and subdirectories. You can do this via Jail (Chroot) to be limited. For example, to their directory when logging in. To do this, you’ll need to edit the user’s ChrootDirectory at /etc/ssh/sshd_config
- Before configuring your OpenSSH server, make a backup of your sshd_config file. To backup copy the file into your home directory:
- $sudo cp /etc/ssh/sshd_config /etc/ssh/sshd_config.backup
- Let’s open and edit /etc/ssh/sshd_config file. In Ubuntu:
- Go to “/etc/ssh” and open the “sshd_config” file with an editor like vi or nano
- Scroll down the file and find the line “Subsystem sftp /usr/lib/openssh/sftp-server”
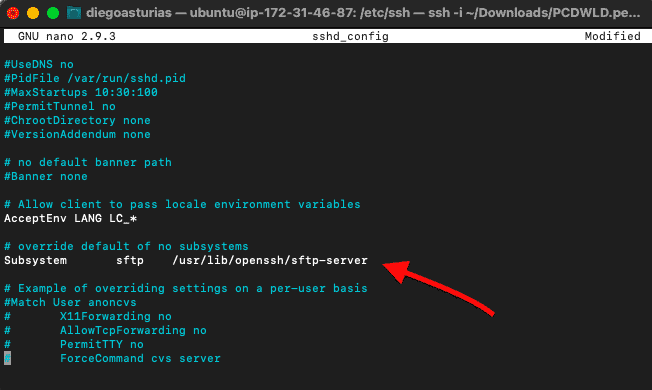
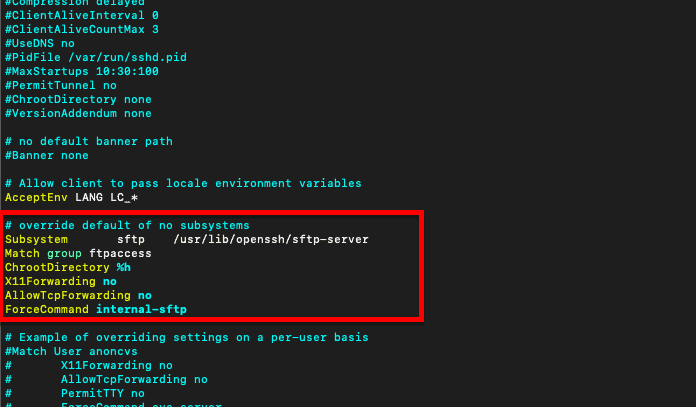
- Add the following lines below “Subsystem sftp /usr/lib/openssh/sftp-server”
-
- Match group ftpaccess
- ChrootDirectory %h
- X11Forwarding no
- AllowTcpForwarding no
- ForceCommand internal-sftp
- Restart your sshd service.
- $ sudo service ssh restart
c. Allowing SFTP traffic
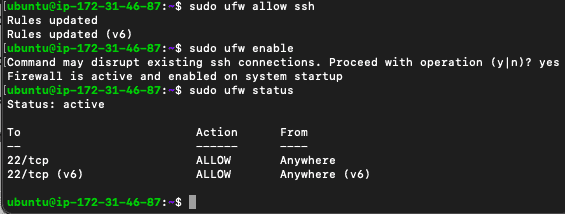
Allow inbound/outbound traffic from port 22 in the Uncomplicated Firewall (UFW)
- $ sudo ufw allow ssh
- $ sudo ufw enable
- $ sudo ufw status
5. Authenticating via public keys
The SFTP server can authenticate using either credentials or keys. For security’s best practices, it is always recommended to use a set of keys.
In a PKI (Public Key Infrastructure) system, a pair of keys (private and public) are created and stored in separate places. Users hold a private key (which generates the public key), and the public key is shared with the server to authenticate.
Authenticate a new user in your SFTP server
If you want to allow your SFTP clients access via a pair of keys rather than credentials, you’ll need to do the following.
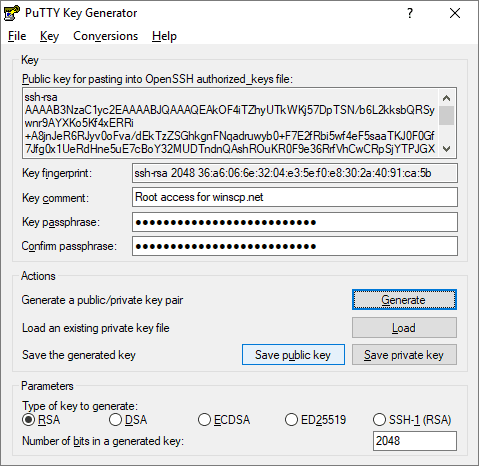
- On the local computer/client, create a new set of keys. A user (SFTP client) can create a set of keys with PuTTy (for Windows) or with OpenSSH (if using Linux). Private keys can be saved in .pem format or .ppk format and are kept secret. For example, if the SFTP client is using Windows, they can generate a public key with PuTTYgen.
- On the local client: Retrieve the public key. Look for the public key from the key pair. This can be done using the command (from a local machine):
- $ ssh-keygen -y -f /path_to_key_pair/my-key-pair.pem
- Users can also use the PuTTYgen tool to load in an existing private key and get the public key
- Copy the public key to the server. For the SFTP server to accept the authentication from the client’s private key (.pem or .ppk), the client-side generated public key must be shared with the server via a one-line format or .pub file. In addition, this public key one-line must be copied into the OpenSSH authorized_keys file.
- From the local machine, upload the public key to your server. If the client’s account does not have an authorized_keys file, the below command will create a new one.
- $ cat ~/.ssh/id_rsa.pub | ssh sftpuser01@example.com ‘cat – >> ~/.ssh/authorized_keys'
- From the server, you’ll need the user content and .ssh directories. If not already, create a directory for the new user:
- $ cd /home/sftpuser01 && mkdir .ssh
- $ chmod 700 .ssh
- $ touch .ssh/authorized_keys
- $ chmod 600 .ssh/authorized_keys
- Paste the public key results from the local machine into “.ssh/authorized_keys” from the remote server. For example, you can use the following to paste the contents of the public key.
- $ cat >> .ssh/authorized_keys
Testing your SSH
Test the login by remotely or locally connecting with SSH.
- Locally: $ssh sftpuser01@127.0.0.1 -p 22
- Remotely (if using key): $ssh -i “key_name.pem” sftpuser01@hostname
6. Connecting from an SFTP client using a key
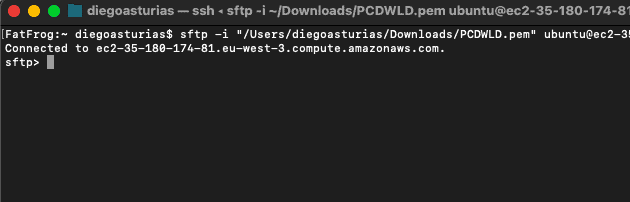
To test the remote SFTP connection from your client to your server, you can use the “sftp” command from your macOS or Linux terminal. Bear in mind that you’ll have to specify it was appending the “-i” attribute if you are using keys.
From an SFTP client:
$ sftp -i “location of .pem (private key)” user@domain
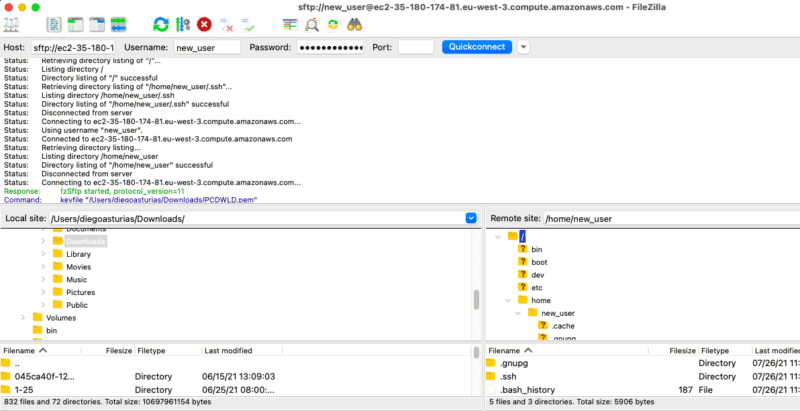
You can also use third-party tools like FileZilla client to connect to your server.
7. Extend your SFTP server functionality with an external service
To make the SFTP server available, use a third-party tool like Files.com to mount your SFTP server directly into Files.com as a folder. Files.com is a robust cloud-based file-sharing solution. It allows users to upload, download, share, and collaborate on any file using a wide variety of file-sharing mechanisms.
You can set Files.com as an “SFTP client” to make the SFTP server available via a web interface, API, SDKs, and other inbound SFTP connections.
In addition, you can also use Files.com and integrate it into your SFTP solution in two additional ways:
- Files.com can operate as an inbound SFTP server. Just like your Ubuntu SFTP server, Files.com can also help you to set up an SFTP server (via files.com) and allow your SFTP clients to connect to it. The advantage of this approach is that you can let users access different portions of a Files.com account and even synchronize folders to other providers like Dropbox or Amazon S3.
- Scheduled Synchronizations. Configure Files.com to synchronize a copy of a folder (or folders) on a one-way or two-way approach with your SFTP server. This solution is perfect for scheduling backups.
- Broad support for SFTP clients. Files.com SFTP server amplifies support for virtually every FTP/SFTP client program and library, including OpenSSH, FileZilla, WinSCP, etc. In addition, among a wide variety of authentication methods, Files.com supports SFTP /SSH Keys.
Files.com offers a 7-day free trial.
8. Advantages of SFTP
Secure File Transfer Protocol is one of the best options for safeguarding sensitive data while it is being transported. Using it, you can remotely create directory listings and delete files. Let's have a look at the different benefits of using SFTP.
- Better Security SFTP provides high-level security and encrypts all the data during transmission to guard against eavesdropping and unwanted access. It even provides secure user verification provided by SSH authentication making it extremely resistant to hacking and data leaks. Any business that wants to prioritize its data protection during transfers must opt for SFTP for it comes with robust security features, such as user access control, authentication, encryption, and more.
- Automated File Transfers Users can use SFTP for scheduling file transfers or moving in batches by integrating it into automated processes as well as scription. This implies without the need for manual involvement, users can configure SFTP to transmit files at predetermined intervals or in reaction to specific events. Further, data synchronization and backup creation are easier.
- Supports Large Files It is possible to transfer files of different sizes, from small documents to large media files, using SFTP thanks to its effective handling of large data.
- Data Accessibility Applications running on client computers and other SFTP servers can both use SFTP servers to transfer files securely. They are therefore capable of addressing both server-to-server and user-to-server use cases. You can encourage collaboration and raise productivity inside your company by making data accessible.
- Authentication Practice Public key, password-based, and multi-factor authentication (MFA) are just a few of the authentication methods that SFTP provides. Because of their adaptability, enterprises can choose the level of security that best suits their requirements.
- Portable and Platform Independence SFTP is a viable solution for businesses with a variety of settings thanks to its portability and platform independence. It is accessible on a number of platforms and operating systems. Clients and servers can communicate with one other without having to worry about the underlying systems.
- Compliance Requirements SFTP is frequently utilized to adhere to compliance requirements set forth in regulations like the GDPR, HIPAA, and PCI DSS, which demand secure data transfer and storage procedures.
- Data Integrity SFTP has built-in integrity checks that help safeguard data integrity during file transfers. It further helps reduce the possibility of data corruption by validating that transferred files are unchanged.
- Supports Firewall and Network Address Translation (NAT) Since SFTP uses a single secure connection, it is friendly to both NAT and firewalls. Network settings are easier than with FTP due to the single connection, which necessitates separate control and data connections that could interfere with firewalls.
- Community and Support SFTP has a large community of users and provides enough resources online for guidance and help. Thus, making SFTP highly advantageous for most users. Finding answers to common issues and keeping up with best practices are made simpler as a result.
Final Words
To set up an SFTP server in Ubuntu, use OpenSSH, as this is the right way to create your SFTP server. But with OpenSSH, you'll have some configuration to do. For example, by default, SFTP allows all users to access the entire directory, so you’ll need to restrict access. In addition, you can also use a cloud-based service like Files.com and allow SFTP access to your clients to a broad set of resources.
SFTP server Setup on Ubuntu FAQs
How do I configure the SFTP settings in the SSH configuration file?
To configure the SFTP settings in the SSH configuration file, you can do the following:
- Open the SSH configuration file: sudo nano /etc/ssh/sshd_config
- Find the Subsystem line and add the following line: Subsystem sftp internal-sftp
- Find the Match Group section and add the following lines:
- Match Group sftponly
- ChrootDirectory %h
- ForceCommand internal-sftp
- Save and close the file.
How do I restrict SFTP access to a specific directory?
To restrict SFTP access to a specific directory, you can follow these steps:
- Create a new directory for SFTP access: sudo mkdir /home/<username>/sftp
- Change the owner of the directory: sudo chown root:<username> /home/<username>/sftp
- Change the permissions of the directory: sudo chmod 755 /home/<username>/sftp
- Modify the SSH configuration file to use the new directory as the root directory for SFTP access:
- Open the SSH configuration file: sudo nano /etc/ssh/sshd_config
- Find the Match Group section and add the following line: ChrootDirectory /home/<username>/sftp
- Save and close the file.
How do I connect to the SFTP server from a remote computer?
To connect to the SFTP server from a remote computer, you can use an SFTP client such as FileZilla and enter the IP address or hostname of the Ubuntu server, the username, and password.
How can I troubleshoot SFTP connection issues?
To troubleshoot SFTP connection issues, you can check the SSH and SFTP logs, check the firewall and network settings, and ensure that the SFTP service is running and configured correctly on the Ubuntu server.

