
Our funding comes from our readers, and we may earn a commission if you make a purchase through the links on our website.
How to Query Cisco ISE Using TACACS

UPDATED: April 19, 2022
Cisco ISO is a robust network access control policy and enforcement platform. It supports the TACACS+ protocol to allow fine controls and audits of network devices and configurations. You can configure your network devices to query the ISE server for authentication and authorization.
In this article, we’ll focus on how to query Cisco ISE using TACACS+. How can Cisco ISE use TACACS+ to control and audit network devices?
Cisco Identity Services Engine (ISE) supports TACACS+
Cisco Identity Services Engine (ISE) is an identity and access control policy platform. Administrators can make governance decisions by using policies that determine if a device is granted access to the network and the level of access it is given.
ISE combines AAA (Authentication Authorization and Accounting) and profiler into a single appliance. It provides a centralized management system for Device Administration in AAA framework through the Terminal Access Controller Access Control System (TACACS+).
Why TACACS+ with Cisco ISE?
ISE supports the TACACS+ protocol for enhanced control and audits of network devices configurations. The network device can be configured to query Cisco ISE for authentication and authorization and control a network admin's actions. In addition, the network device also reports to Cisco ISE with information on each session and command operations for accounting and auditing processes.
- Add network devices with TACACS+ ISE admins can add network devices using TACACS+ details from the ISE console, including IP address and shared secret.
- Fine control and audits A benefit of using Cisco ISE with TACACS+ is its fine control. ISE helps create rules and apply them to the appropriate users. For instance, you can add device admins as internal users and configure their enable passwords. In addition, through live logs and reports, ISE admins can also audit which users have used which commands.
- Device administration access service An ISE admin developing a device administration access service can create policies that allow TACACS results, such as command sets and shell profiles, to be part of an authorization policy rule.
So, how does a network device query Cisco ISE?
As mentioned earlier, the TACACS+ protocol is used between the Cisco ISE server and the network device (AAA or TACACS+ client). Keep in mind that Cisco ISE can separate Authentication, Authorization, and Accounting requests.
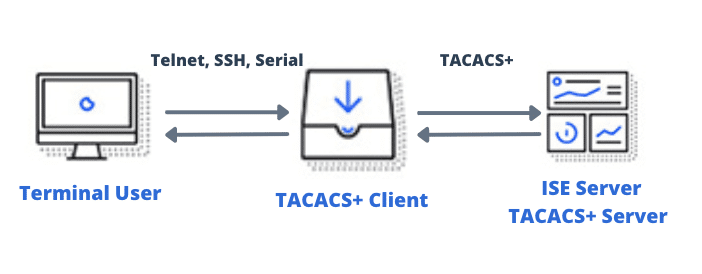
- When a network device administrator (Terminal User) attempts to log into a device (AAA/TACACS+ client) via Telnet or SSH, the device instantly queries the Cisco ISE (AAA and TACACS+ server) via the TACACS protocol to validate the authentication.
- The Cisco ISE server, in turn, uses policy authentication sets to either respond with an “accept” or “reject” to the network device.
- If the user is granted access > the network device queries the Cisco ISE using TACACS+ for authorization The ISE Server checks for authorization policy rules for TACACS+ results, such as command sets and shell profiles.
- The user is then provided with a set of commands or shell profiles to perform certain actions on the networking device.
- Finally, the Cisco ISE Server provides accounting by logging the activity and providing reports so that an ISE administrator can produce detailed audits.
Requirements for configuring Cisco ISE TACACS
Before moving on to the configuration of TACACS, you’ll need to be aware of a few requirements.
a. Device Administration License To query Cisco ISE using TACACS, you’ll need to enable the TACACS+ service on Cisco ISE, which requires a “Device Administration License”. The Device Administration license is perpetual and explicitly covers TACACS+ functionality.
-
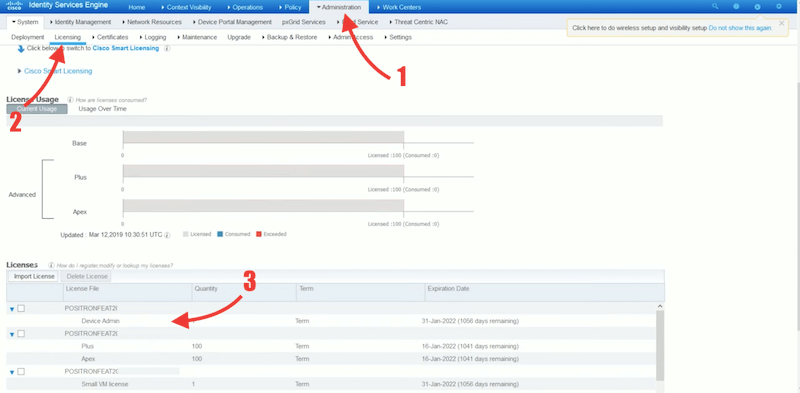
- Once you get the “Administration License”, you’ll be able to see it on the ISE platform.
- Go to Administration > Licensing.
- On the bottom “Licenses”, you’ll be able to see all registered licenses, including Device Admin.
b. Enabling Device Admin Service To allow TACACS+ operations, you'll need to enable the “device admin service”.
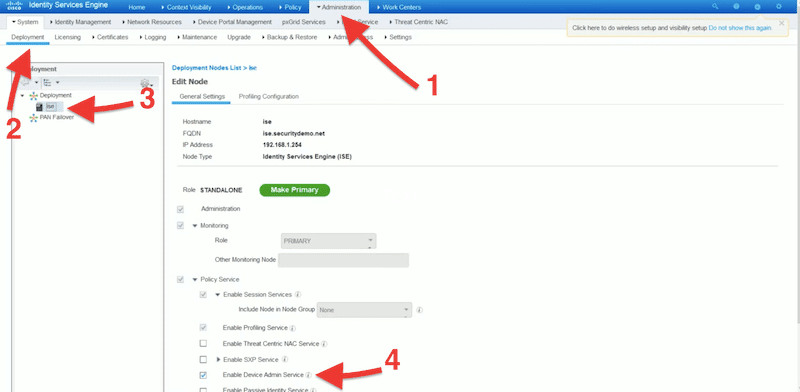
- From the Identity Services Engine platform, go to Administration > System > then “Deployment”.
- Select ISE on General Settings.
- Check the “Enable Device Admin Service” check box.
- Make sure you enable this option in each PSN.
c. Configure network device groups and add network devices Cisco ISE allows you to create authentication and authorization policies based on device attributes. Network device groups will enable you to group devices based on attributes like type or location and set policies based on those attributes. If you fail to add a network device to a group, it defaults to the “All Locations and All Device Types” device group.
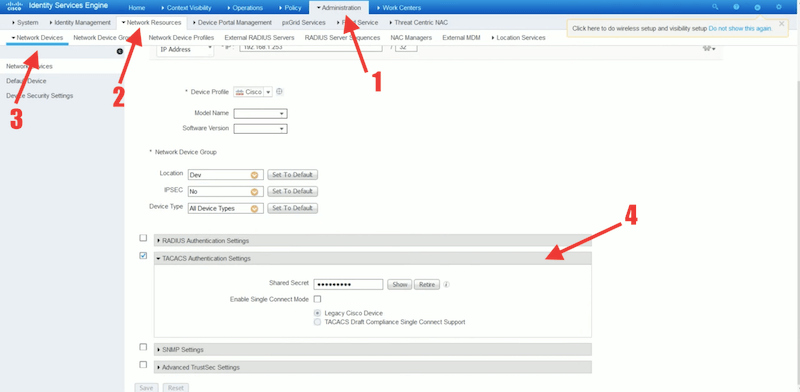
d. When adding a network device, you must:
- Provide its IP address so that ISE finds the device’s definition. If it cannot find the device definition from the IP address, you can select a device profile, including model name and software version.
- Assign the network device group Assign the network device to the correct network device group.
- Configure TACACS Authentication Setting Enter the network device’s shared secret to establish TACACS authentication between ISE and the network device.
Device Administration Work Center
The Device Administration Work Center contains everything an ISE administrator needs to administer devices. Bear in mind that the Work Centers (Device Administration) is available only if you get and register the right TACACS+ “Device Administration License.”
As shown in the following picture, the Device Administration submenu contains the options: Overview, Identities, User Identity Groups, Ext ID Stores, Network Resources, Network Device Groups, Policy Elements, Device Admin Policy Sets, Reports, and Settings.
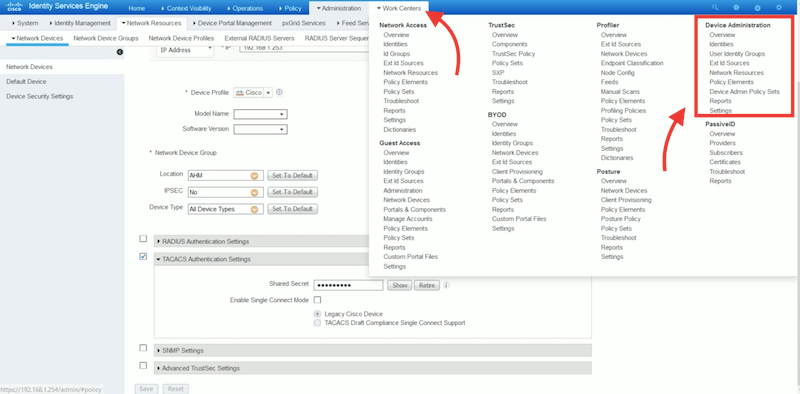
The ISE administrator can use the Device Administration options to control and audit the network devices and their configuration. From Device Administration, an ISE admin can configure a network device to query Cisco ISE using the TACACS+ protocol. ISE admins can configure the TACACS server in Cisco ISE to allow device admins to access devices based on policies. In addition, admins can also access fine-grained device administration reports and live logs.
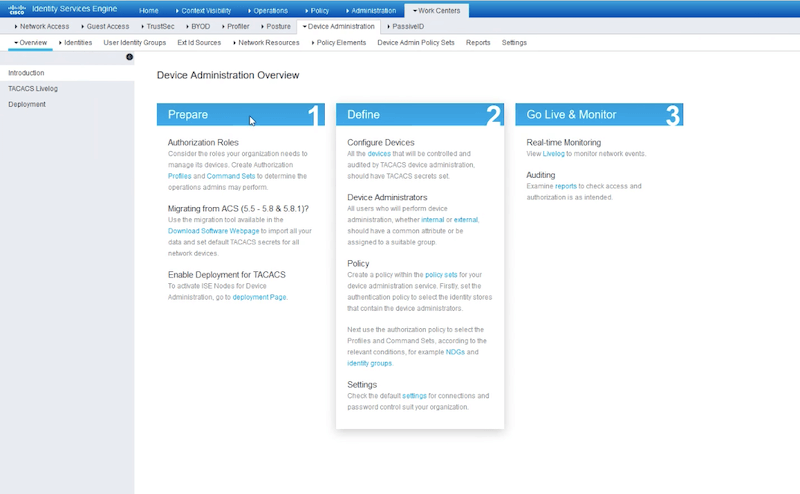
As an initial step, you can go to Work Centers > Overview, to get a summary of the actions you’ll need to follow: Preparation, Definition, and Going live and Monitoring.
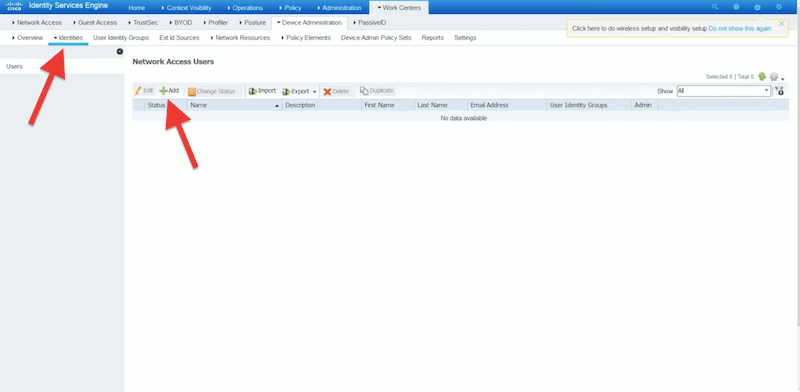
Configure User Identity Groups and Network Access Users
If you haven’t defined users and their groups, let’s create them.
- Create your user identity groups Go to Work Centers > User Identity Groups > User Identity Groups > Create a New Identity Group.
- Create internal network access users Go to Work Centers > Identities > +Add. Enter all the user information, including name, passwords, user information, and user group. If you have an Active Directory domain and would like to integrate your user’s database, you can integrate it with ISE.
TACACS commands sets
A Cisco ISE administrator can create policy sets to obtain TACACS+ command sets policy results. The “Command set policies” enforce the “specified” list of commands that the device administrator can execute. When a device admin issues a command on the device, the device queries Cisco ISE using TACACS to determine whether the admin is authorized or not.
To create a command set
- Go to Work Centers > Policy Elements > Results > TACACS Command Sets.
- ISE comes with the default command set “DenyAllCommands” which denies all commands to all users.

- Click on +Add, to add a new TACACS command Set.
- As a recommendation, assign command sets to particular user groups. For instance, if you defined a network admin group, then it is likely that this group needs access (permit) to all commands. But if you have other low privilege user groups like a help desk, then you can explicitly define the commands, such as show or debug.
- Enter the name of the command set, along with a description.
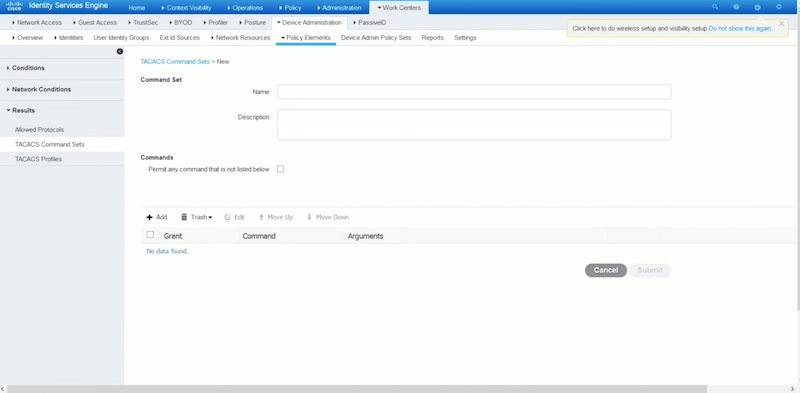
- If you are configuring commands for a network admin, check the box “Permit any command that is not listed below”. But if you are configuring commands for a technical support or help desk, then leave the “Permit any command not listed below” box unchecked, and define your commands based on your requirements. For example, show and exit are helpful for support and help desk.
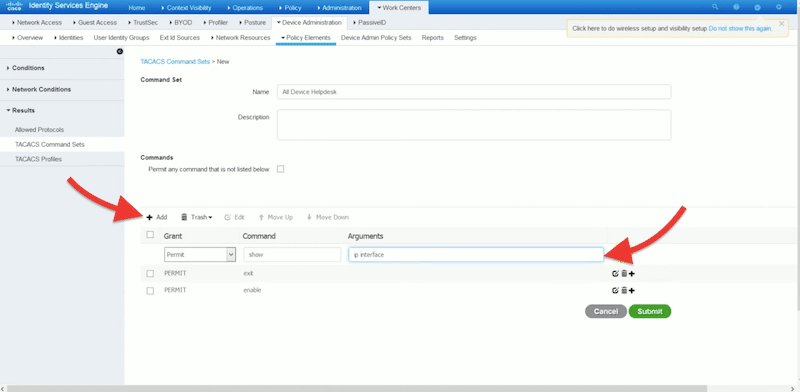
- Once you have added all commands, click on “Submit.”
TACACS Profile
An authorization session for a network device requires a response from Cisco ISE. A TACACS profile controls a device administrator’s initial login session. It can be defined as common tasks and custom attributes.
To configure a TACACS profile
- Go to Work Centers > Policy Elements > Results > TACACS+ Profile.
- Give a new name and description to the profile.
- In the Task Attribute View, you’ll be able to configure Common Tasks. These tasks allow you to choose and configure a profile’s frequently used attributes. The common task types are Shell, WLC, Nexus, and Generic.
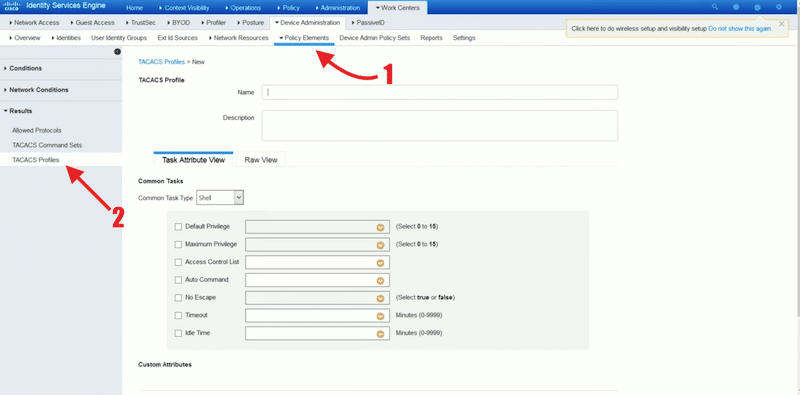
- If you are configuring a profile for a network administrator, you can check the “Default Privilege” and the “Maximum Privilege” and set their values to 15. For accounts with lower privilege, for instance, support or help desk, you can assign a lower Default Privilege to 1, and Maximum Privilege to 6 or 7.
Authentication and authorization policies
Now, go to “Device Admin Policy Sets” > On Policy Sets click on the + sign to add a new policy.
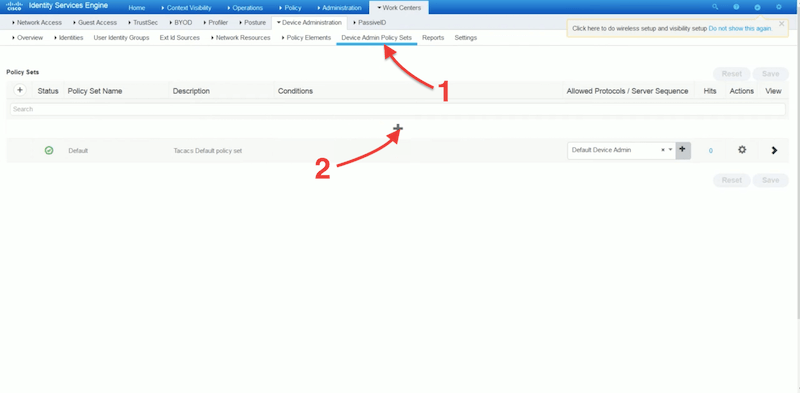
- To create a policy set, you’ll need to define status, policy set name, description, conditions, allowed, and protocols/server sequence. Give your new policy a name, description, and select allowed protocols as “Default Device Admin”.
- Click on the + sign again to open the “Conditions Studio” window. Here, you’ll be able to select attributes (for instance, user, port, or service) for your condition.
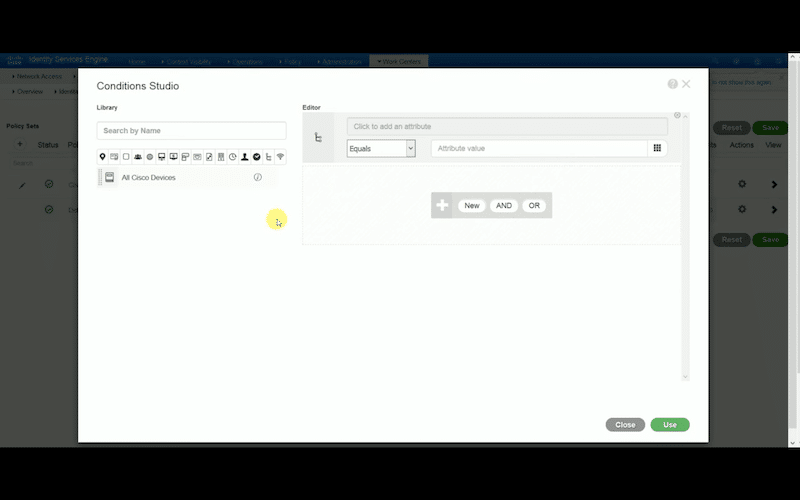
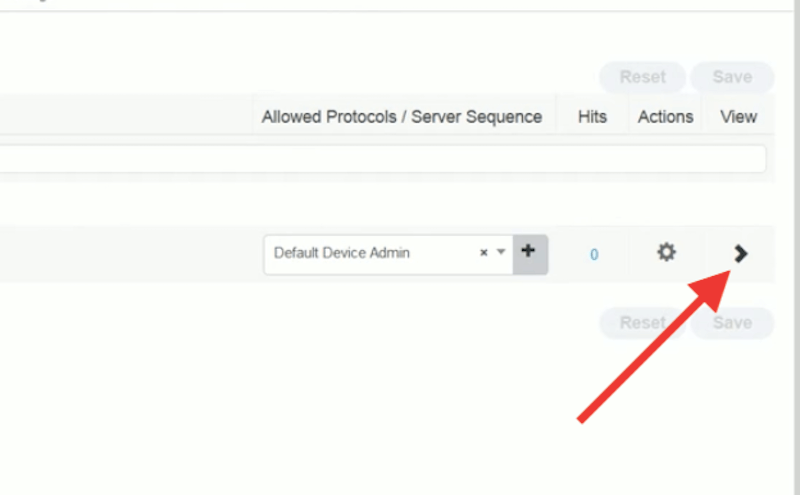
- Configure the policy sets for the Cisco devices. Click on the > sign to view more options.
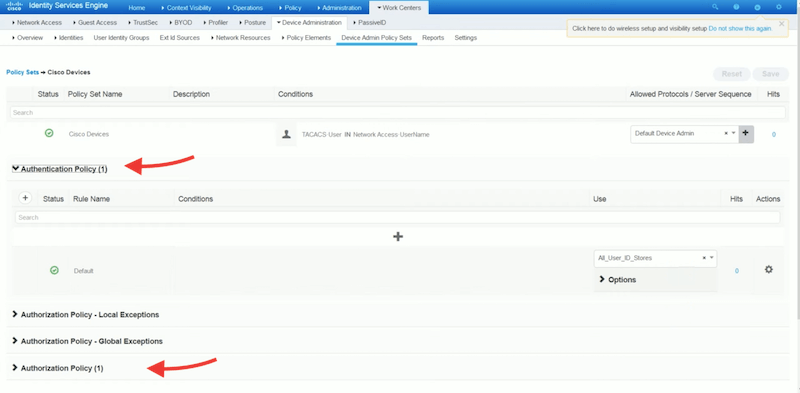
- For Authentication policy, you can define rule name, conditions, and use. You can select “All Internal Users” or “External Users”, depending on your use case.
- After changes, click on Save.
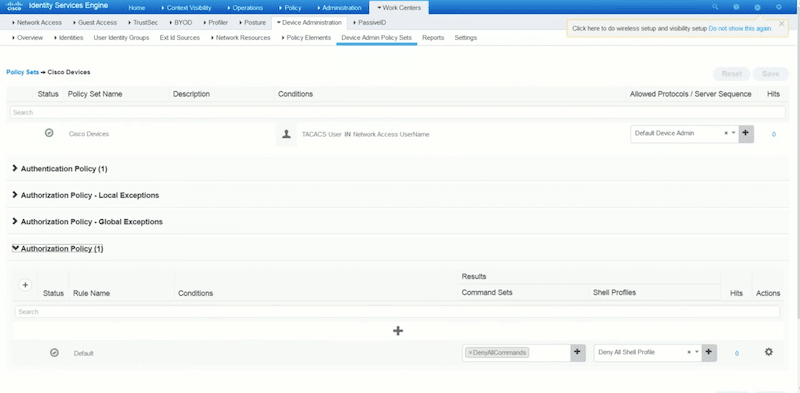
- Configure Authorization Policy. Set your rule name, conditions, command sets, and shell profiles. Bear in mind that results, command sets, and shell profiles were already configured before, so they should be accessible here.
Configure the network device to communicate with Cisco ISE
Now, you need (or the device network admin) to configure the network device to communicate with the Cisco ISE server. Before you configure your network device, you’ll need a local user with full privileges to Cisco ISE.
- Log into your network device (router, switch, or gateway).
- To do a pre-check for all your aaa configuration, run the “show running-config” command.
Log into your network device and issue the following commands:
aaa new-model
aaa group server tacacs+ ISE
server name ISE
tacacs server ISE
address ipv4 [ISE IP address]
key cisco [Shared secret key]
- You can test the availability of your server with the “aaa” command.
Query Cisco ISE with TACACS+
Now that we have configured the Cisco ISE and your network device, it is time to query it with TACACS+. Any action by a particular network administrator, including authorization, authentication will be instantly queried to ISE. Cisco ISE provides various logs and reports that show you information related to authentication, authorization, and accounting of the devices configured with TACACS.
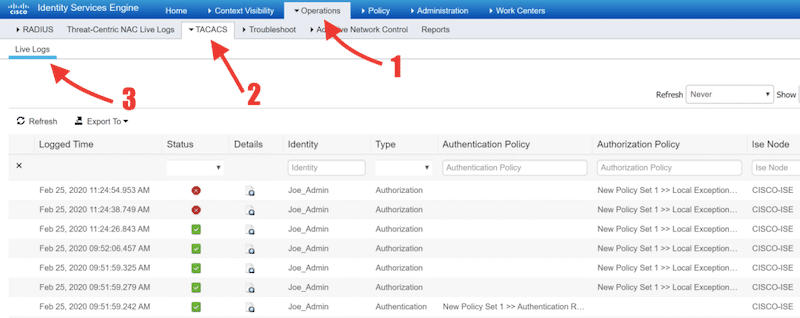
- On the Cisco ISE server, you can get a list of live logs to audit operations on network devices.
- Go to Operations > TACACS > Live logs. You can click on each live log to see more details.
To open reports, go to Work Centers > Reports. Here, you can get Device Administration Reports for TACACS Accounting, Authorization, and Authentication.
Cisco ISE using TACACS FAQ:
How does Cisco ISE handle the TACACS+ AAA framework? All the network devices protected by Cisco ISE are configured to query ISE for authentication and authorization for network admin actions on devices. When it comes to accounting, network devices are configured to send accounting messages to ISE to log those actions.
What is the difference between a Device administrator and a Cisco ISE administrator? Within the context of ISE, a device administrator logs into network devices (switches, routers, gateways, wireless APs, etc.) to configure and maintain them. On the other hand, a Cisco ISE administrator logs in to the Cisco ISE platform to control who and how these device administrators log in.
What are the differences between ISE and ACS? The Cisco Identity Services Engine (ISE) and Access Control Server (ACS) are policy-based security servers. Both ISE and ACS support TACACS+. The differences are that ISE provides more integrations and services than ACS. Additionally, ISE also provides more scalability. ISE supports up to 50 PSNs, while ACS supports only 22 backup servers. ISE support +50 AD domains (on a single node), while ACS supports one AD domain per node. Device administration configuration can be migrated from an ACS server (versions 5.5, 5.6, 5.7, and 5.8) to ISE.

