
Our funding comes from our readers, and we may earn a commission if you make a purchase through the links on our website.
How to Configure a Cisco Switch
UPDATED: March 27, 2023
Cisco switches are targeted at businesses or enterprises that need flexibility, power, and security to connect medium-to-large networks. As opposed to plug-n-play, administrable switches require and allow configuration via an interface. For instance, administrable switches such as the Cisco Catalyst 3600 Series require an initial basic configuration that determines management, security, monitoring, and other foundational parameters.
How to configure a Cisco switch step by step? In this post, we'll configure a Cisco Switch from top to bottom using the popular IOS CLI. We will be using a Cisco Catalyst Series 3500, Model 3550, inside a Cisco switch/router simulator. We will go through the process of connecting to the switch, configuring security, management, and setting additional parameters.
In this post
- Connecting to the hardware
- Moving through command modes and specifying a hostname
- Configure initial security
- Configuring a management interface and gateway
- Configuring VLANs and access ports
- Save your configuration settings
- Configuring your Cisco Switch: FAQ
1. Connecting to the hardware
Before diving deep into the step-by-step to configuring your Cisco switch, you’ll first need to get to know your hardware. If it’s off and unplugged, inspect the power cables and ensure they are not damaged. If the power cables look good, go ahead and plug the switch and make sure the indicator lights are operational.
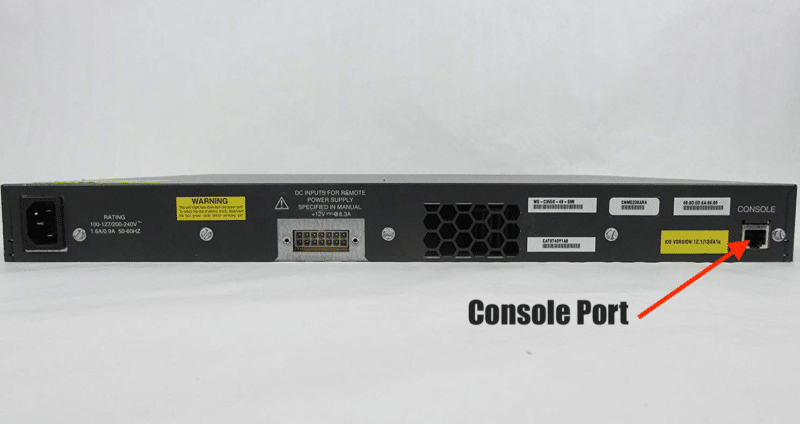
The backside of a 48-smi Catalyst 3550 10/100 48-port Switch. Here, you’ll find a power supply and console port.
a. How to connect to the Cisco Switch?
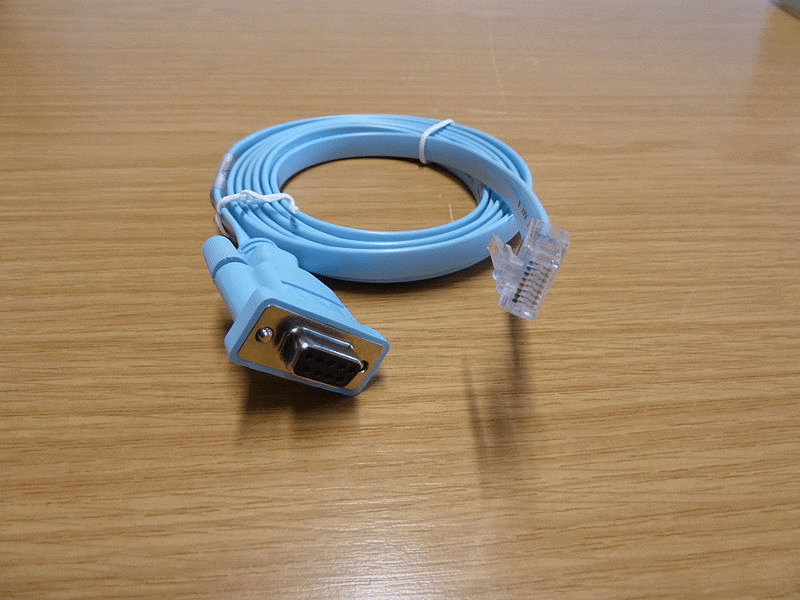
The traditional way to connect to a Cisco switch’s management port is by using a rollover cable (also known as console cable). This cable lets you connect your computer to the switch’s console port. Cisco switches also come with other ports like the Mini USB port or AUX port.
You can connect to this port using an RJ-45 rollover cable or a Serial DB9 to RJ-45 console cable (such as the picture below). You can also use an adapter, such as the Serial to USB adapters that convert Serial to USB signals. For this type of adapter connection, you’ll need to install a driver on your computer.
b. Establish a serial connection
You could configure a Cisco switch using a modern Web GUI. But to get more versatility, speed, and a higher precision level, you can configure it using the Cisco IOS Command-Line Interface. To connect to this interface, you’ll need software on your computer to control serial lines and establish a connection.
PuTTy replaces the good old HyperTerminal when it comes to serial communications. PuTTy is an SSH, Telnet, rlogin, and TCP client with a free license. Unfortunately, PuTTy is only supported by Windows. SecureCRT and MobaXTerm are good alternatives to PuTTy.
Download and connect using PuTTy
- Go ahead and install PuTTy on your Windows computer (or use an alternative for different OSs.)
- If the console cable is plugged correctly between the switch and your computer, go ahead and open PuTTy.
- If you connect the switch's serial to your USB port with an adapter, you’ll need to verify the COM port number. You can do this by going to Windows Device Manager and checking your USB connections.
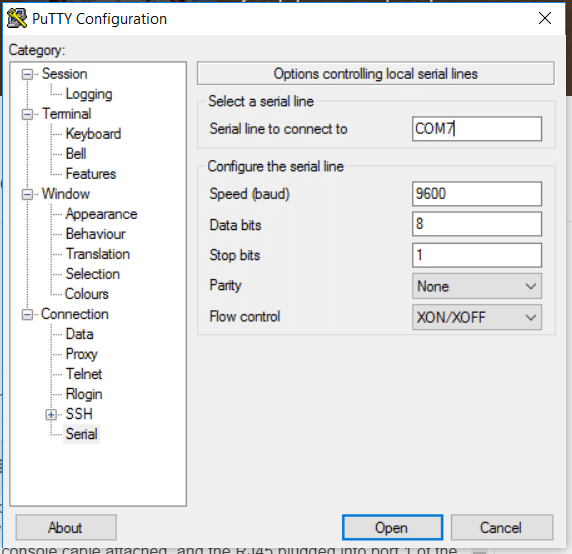
- Now, you’ll need to configure puTTy’s serial connection lines. First, go to Connection > Serial. From this menu, set the following port parameters.
- The serial line to connect to, if using an adapter, COM# is the one you found in the device manager.
- Speed (baud): 9600 baud (This number might vary according to your switches series)
- Data Bits: 8 data bits
- Stop Bits: 1
- Parity: None
- Flow Control. (default or set to none)
- Save your connection settings and click on Open.
You’ll now be connected to the switch and are ready to configure it.
2. Moving through command modes and specifying a hostname
Once you are connected to the switch, you’ll be greeted with debug information and the following prompt: “Switch>”
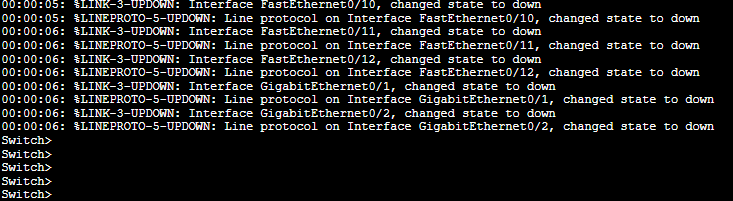
The initial “>” means you are in an unprivileged command mode. Here you won’t be able to change anything, only display information. You’ll need to scale privileges to configure your router.
The Command modes
The Cisco IOS software is hierarchically structured with different levels of command modes. The “unprivileged” User EXEC and the “privileged” User EXEC modes. There are five modes within the privileged mode: global configuration mode, interface configuration mode, subinterface configuration mode, router configuration mode, and line configuration mode.
To move through these command modes, use the following:
- enable Switch from unprivileged to privilege.
- disable Switch from privilege to unprivileged.
- exit Go back to one mode.
- end Go back to the privilege enable mode.
Let’s configure a customized hostname
- Go to privilege mode (type enable). Since this is an initial configuration, EXEC privilege mode (enable) does not have any password yet. We’ll secure the privilege mode in the next section.
- Once in privilege mode, you can enter the global configuration mode with a “configure terminal” or “config t”.
- Under configuration mode, give your switch a name with the command “hostname ….”
Switch>enable
Switch# config t
Switch(config)# hostname <name>

- Notice that the switch name changed from “Switch” to “PCWDLD”.
3. Configure initial security
Now, we’ll go through a couple of security best configuration practices.
a. Protect the privilege EXEC mode with a password
To secure the privileged EXEC mode from unauthorized access, use the “enable secret <…>” in the global configuration mode.
PCWDLD(config)# enable secret SECRETWORD
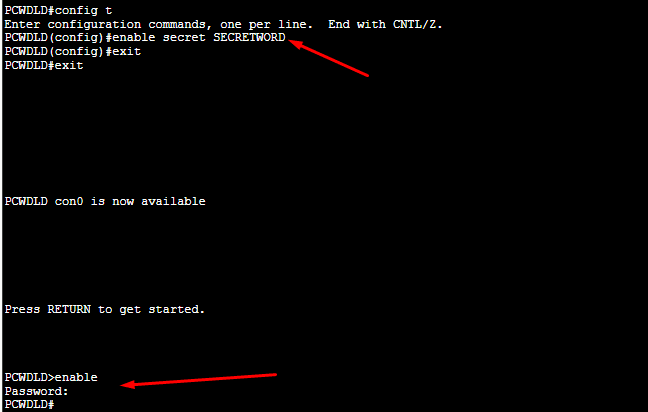
To test this, exit to the unprivileged EXEC User mode (>) and try to access the privileged EXEC mode with “enable”. As you can see below, now the switch’s first line is protected with a password request.
b. Control or restrict access to your switch
When configuring a Cisco switch for the first time, you’ll have free access (no password). You can access the switch locally via the console port (as we did previously), via the aux port, or remotely using Telnet. To secure your switch from all threats, you’ll need to configure passwords for the Telnet, Console, and Aux ports
Your switch is accessed via Virtual Terminal (VTY) lines. To learn more about the current lines on your switch, issue a “show running-config” command.
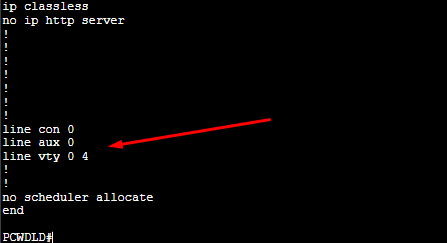
The output shows that there are one console, one auxiliary, and 5, VTY (Virtual Terminal lines used to control the inbound Telnet connections.) Some switches have more VTY lines, 16, for instance (0-15).
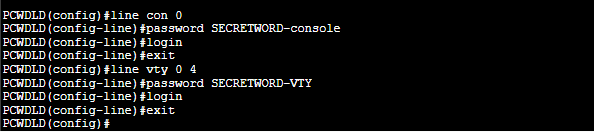
Use the following commands to set a password to these lines:
PCWDLD(config)# line con 0
PCWDLD(config-line)# password SECRETWORD-console
PCWDLD(config-line)# login
PCWDLD(config-line)# exit
PCWDLD(config)# line vty 0 4
PCWDLD(config-line)# password SECRETWORD-DD
PCWDLD(config-line)# login
PCWDLD(config-line)# exit
If your switch has an aux port, you’ll need to verify the line number with the “show line” command. Record the TTY line for the AUX port and input with the line [aux line#] command.
- Now, let’s verify with the “show running-config” command.
- As you can see in the screenshot below, both connection lines now have a password.

c. Create an ACL to restrict access at the IP level
As an optional configuration to improve the security of your switch, you can create a numbered Access Control List (ACL) and include the IP address you allow (or deny) access to your switch. You can also assign the newly created ACL to your VTY line. This configuration helps you create a fine-grained level of control by allowing only one or two IPs to access your switch.
PCWDLD(config)# ip access-list <number> <permit|deny> <ip address><wildcard>
PCWDLD(config)# line vty 0 4
PCWDLD(config-line)# access-class telnet-access in
PCWDLD(config-line)# exit

Let’s break down the command:
- The “IP access-list 10” creates the ACL number 10. The “permit 192.168.0.100 0.0.0.0” assigns IP 192.168.0.100/32 to the list and permits its access. The 0.0.0.0 is the wildcard, which equals 255.255.255.255 (a single host). The wildcard allows you to define entire subnets or single hosts.
- The “access-class telnet-access in” assigns the ACL 10 to the lines vty 0 4.
4. Configuring a management interface and gateway
Logging locally to your switch via the console port (as we did in the first place) every time you need to manage it can be a time-consuming and cumbersome process. By default, you can’t Telnet or SSH into a Layer 2 (L2) switch. L2 switches can’t be configured with IP addressing on their physical interfaces or switch ports. Routers or L3 switches, on the other hand, allow remote management via IP on any interface.
a. Configuring a Management Interface
There is a solution: If your computer is on the same network (broadcast domain) as the switch, you can Telnet using a Switched Virtual Interface (SVI). Then, to establish remote sessions, all you need to do is configure an SVI management VLAN and assign it an IP address.
PCWDLD(config)# interface vlan 1
PCWDLD(config-if)# ip address <ip address> <mask>
PCWDLD(config-if)# exit

You can use the “show IP interface” or the “show running-config” to verify your configuration. First, make sure the interface is up and that it has an IP address.
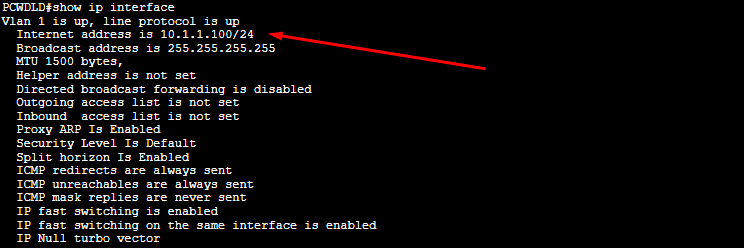
Note: Cisco Switches have VLAN 1 (known as management VLAN) as the default VLAN. It is important to note that all switch ports belong to VLAN 1. Therefore, if your switch has more VLANs configured, and you want to manage your switch from every single VLAN, you need to configure an IP address on a VLAN interface for every different VLAN.
b. Defining the default gateway
Right now, your switch can be accessed via Telnet on a local network but not over a remote network. The L2 switch can generate a network packet for a local destination, but to send a packet to a remote network, the L2 switch doesn't have the routing capabilities to determine the best path. This is where a default gateway comes into play, as it can help the switch route all “unknown network” packets to the right destination.
How to configure a default gateway on a Cisco switch?
PCWDLD(config)# ip default-gateway <ip address>
Don’t forget to test connectivity with the ping command!

5. Configuring VLANs and access ports
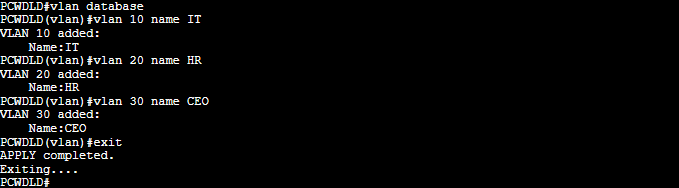
You can quickly create a series of VLANs using the “vlan database” command. Then use the “show VLAN switch” command to see the VLANs you created.
a. How to configure a vlan on a cisco switch?
PCWDLD#vlan database
PCWDLD(vlan)#vlan <number> name <name>
PCWDLD(vlan)# exit
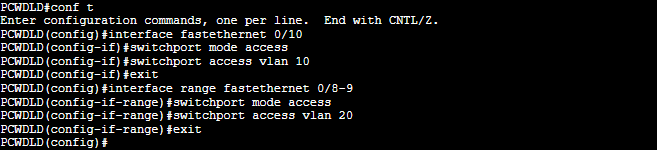
Now, you’ll need to assign the switch ports that will belong to each specific VLAN. Use the following command to make a switch port a member of a VLAN.
For example:
PCWDLD#conf t
PCWDLD(config)#interface fastethernet 0/10
PCWDLD(config-if)#switchport mode access
PCWDLD(config-if)#switchport access vlan 10
PCWDLD(config-if)#exit
Last but not least, configure the Trunk port that will connect to an L3 or L2 switch or router and share all VLAN information with the rest of the network.
b. How to configure a trunk port on a Cisco switch?
PCWDLD(config)#interface fastethernet 0/0
PCWDLD(config-if)#switchport mode trunk
PCWDLD(config-if)#exit
c. Assign a range of unused ports to a black hole VLAN
As best security practice, assign all used switch ports to particular VLANs, except VLAN 1. With all unused switch ports, you can assign them to something known as a “black hole VLAN”.
For example:
PCWDLD(config)#vlan 999
PCWDLD(config-vlan)#name BlackHole
PCWDLD(config-vlan)#exit
Avoid setting an L3 VLAN interface IP on the BlackHole route. It does not need routing.

Now let’s assign the blackhole VLAN to the unused ports. Let’s say my switch is not using interfaces GigabitEthernet0/1 and GigabitEthernet0/2.
PCWDLD(config)#int range g0/1-2
PCWDLD(config-if)#switchport access vlan 999
PCWDLD(config-if)#switchport mode access

Although you could instead disable all the unused ports with the “shutdown” approach, the reason to use a black hole VLAN is to guarantee that no port is left with VLAN 1. If someone accidentally brings up the port, it will be exposed with the VLAN 1.
6. Before you go, Save Your Configuration Settings
Before closing down the CLI, remember to save your configuration. This will ensure that your setting will be the same the next time you log in to your switch.
PCWDLD(config)# exit
PCWDLD# wr

7. Configuring your Cisco Switch: Additional Tips and FAQ
- Do you need to configure Spanning Tree Protocol on a Cisco Switch? As long as your VLANs are correctly assigned, it will help prevent L2 loops. But if you plan to use STP, there are faster and more comprehensive versions of STP, known as Rapid PVST or MST.
- How to configure multiple ports on a Cisco switch? You can configure a range of ports with a single configuration line with the “interface range” command. For instance:
switch(config)#int range g0/1-2
- How to avoid logging messages? Logging messages disturb you while you are typing your configuration. To disable them,
-
PCWDLD(config)# line con 0
-
PCWDLD(config-line)# logging synchronous
-
PCWDLD(config-line)# exit
-
PCWDLD(config)# line vty 0 4
-
PCWDLD(config-line)# logging synchronous
-
PCWDLD(config-line)# exit
- How to disable trunk/access mode auto-negotiation? Switchports can be configured in access, trunk, or dynamic modes. Unfortunately, the dynamic, desirable mode will automatically negotiate a method… To avoid this, define all your switchport modes’ to “trunk” or “access” or use the non-negotiate command.
PCWDLD(config-if)#switchport mode access- or
PCWDLD(config-if)#switchport nonegotiate
- How to disable CDP on a specific switch port? CDP (Cisco Discovery Protocol) is enabled on Cisco routers by default. To disable it, issue the following command:
-
PCWDLD(config-if)#no cdp enable
How to Configure a Cisco Switch FAQs
How do you access the Cisco switch configuration interface?
The Cisco switch configuration interface can be accessed using a command-line interface (CLI) or a web-based graphical user interface (GUI).
What is the purpose of configuring switch Link Aggregation Control Protocol (LACP)?
The purpose of configuring switch Link Aggregation Control Protocol (LACP) is to combine multiple physical connections into a single logical connection, providing increased bandwidth and network resiliency.
What is the purpose of configuring switch Quality of Service (QoS)?
The purpose of configuring switch Quality of Service (QoS) is to prioritize certain types of network traffic, improving network performance and ensuring that critical applications receive the bandwidth they need.
What is the difference between switch IOS and switch NX-OS?
Cisco switch IOS (Internetwork Operating System) is the traditional operating system used by Cisco switches, while switch NX-OS (Nexus Operating System) is used by newer Cisco switches and provides additional features and capabilities.
What is the purpose of configuring switch Spanning Tree Protocol (STP)?
The purpose of configuring switch Spanning Tree Protocol (STP) is to prevent network loops and ensure that only one active path exists between switches.
What does Virtual Router Redundancy Protocol (VRRP) do?
The purpose of configuring switch Virtual Router Redundancy Protocol (VRRP) is to provide redundancy and failover capabilities for switch routing functions.

