
Our funding comes from our readers, and we may earn a commission if you make a purchase through the links on our website.
How to Deploy a Secure FTP (SFTP) Service on Microsoft Azure
UPDATED: December 27, 2023
In this article, we’ll go through the detailed steps to deploy an Azure SFTP server. Although the typical path to accomplish this, would be to spin up a VM in Azure and then configure the SSH and SFTP services from scratch, some shortcuts are easier to manage, maintain, and more cost-efficient.
In this post, we will deploy an SSH FTP (Secure FTP) on Microsoft Azure. We will go through two paths: first using Azure Container Instance (ACI) powered by an Azure File Share, and second, integrating Azure Container storage with a third-party SFTP provider, Files.com.
1. How to Deploy a Secure FTP (SFTP) Service on Microsoft Azure
The SSH File Transfer Protocol (SFTP), also known as the Secure File Transfer Protocol (SFTP), was designed to extend the SSH protocol v2.0. SFTP includes the secure file transfer capabilities that SSH didn’t have. It provides file access, transfer, and management over the Secure Shell (SSH) protocol.
SFTP works on a client/server basis. It establishes a secure channel using port 22 over an unsecured network. To deploy an SFTP service, you can use Microsoft Azure as the SFTP server or storage and use any SFTP client to connect and transfer files.
Benefits of using Azure as an SFTP server
- Authentication In Azure, you can use username/password or SSH keys to authenticate users.
- Access For added security, you can limit the SFTP service by restricting access to containers per public IP.
- Users Configure multiple users for the SFTP service. In addition, you can mount one or more file shares for each of these users.
- Integrate your SFTP service to an existing Azure private virtual network A good option if you prefer keeping SFTP access local within the Azure environment. Use a private IP and have end-to-end VPN access between your local private network and Azure’s local private network.
What are the options to deploy an SFTP service on Azure?
Unfortunately, Azure does not offer a fully managed SFTP service (or SFTP as a Service), and although you could create a VM-based SFTP server from scratch, its maintenance and cost will increase quickly. So, there are two shortcuts:
- Use an Azure Container Instance (ACI) with an Azure File Share as storage support
This approach can be a cost-effective, simple, and fast-to-deploy SFTP solution. ACI is backed up by Azure File Share, a durable and persistent storage solution. - Integrate Azure storage with a third-party cloud file-sharing solution such as Files.com
Files.com allows you to integrate your Azure server and mount Azure’s blob storage into Files.com's SFTP service. - Create an Azure VM and install SFTP server software on it. Cerberus FTP Server is an example of such a package and that will also provide a Web-based client that users can access remotely.
2. Deploying an FTP service using the Azure Container Instances (ACI)
ACI is a managed service that allows you to deploy and run containers directly from the Microsoft Azure Cloud. With ACI, you don't need to provide underlying infrastructure as you would with VMs. Plus, you are not required to use high-level services for container management. Instead, ACI gives you the basics to manage a group of containers and supports container orchestrators like Kubernetes.
a. Deploy SFTP on ACI and File Share using Microsoft-released custom templates
Microsoft Azure’s community released two custom Azure Resource Manager templates (ARM templates) to help you create an on-demand SFTP server with ACI. These templates are based on JSON. They get you the right resources you need to deploy an SFTP solution.
These ARM templates create a storage account and File Share that is then mounted into the ACI for persistent storage when the container is terminated. The ACI is available in the selected locations, and the container image used by these templates is hosted on a Docker Hub.
- With new Azure Files persistent storage. Use the following JASON template 01
- With an existing Azure Files persistent storage. Use the following .JASON template 02
Note: You could still customize the Azure Resource Manager templates (ARM templates) to suit your needs. But you’ll need to edit the template via CLI using JASON. Bear in mind that these templates are open-source and found under the GitHub project repository. Although Azure does provide support for ACI and Azure Files, these templates are outside the scope of Azure support.
b. Fill out the required information
Open Azure and sign in. The JASON templates will take you through the following forms.
If creating an SFTP server from new Azure File storage, you’ll need to fill out the following information.
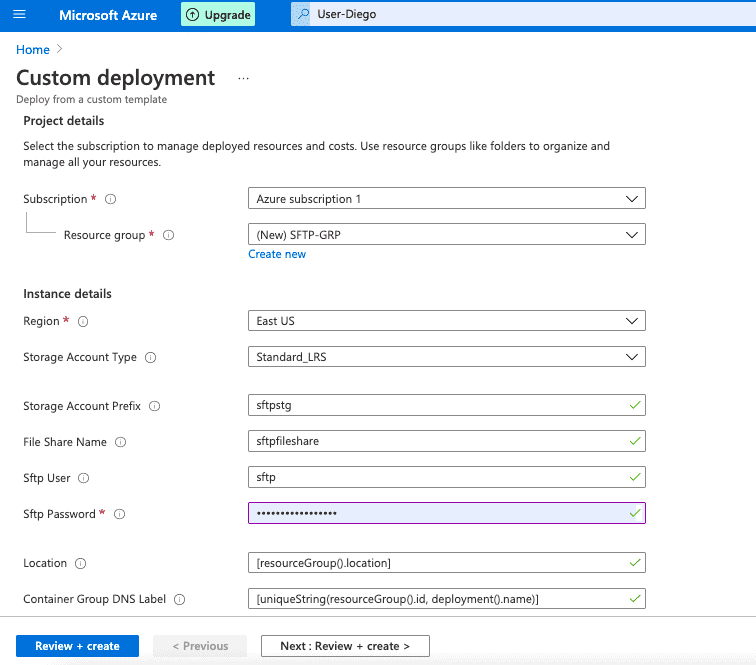
- Subscription Pick the Azure subscription to deploy the SFTP service.
- Resource Group Use an existing or create a new resource group. Azure Resource Groups are the logical collection of VMs, storage accounts, Virtual Networks, containers, databases, etc.
- Instance Details:
- Region Choose the region that is closer to the SFTP clients.
- Storage Account Type Choose between the available storage account types. The three presented in the template are standard General-purpose v1 blob storage account services. They are storage redundancy options: Standard_LRS, _ZRS, or _GRS. Locally Redundant Storage (LRS), Zone redundant storage (ZRD), and Geo-Redundant Storage (GRS).
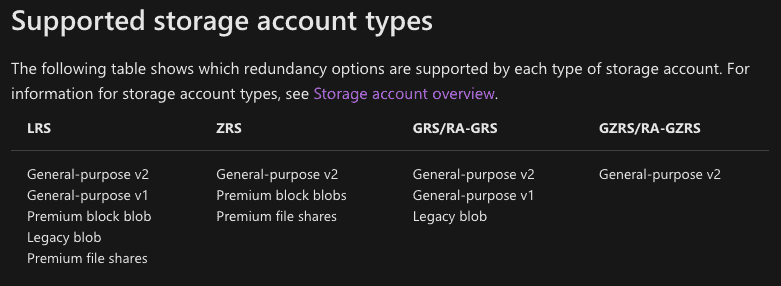
Note: Bear in mind that General-purpose v1 accounts do not have the latest features or the lowest per-gigabyte pricing compared to General-purpose v2 (GPv2).
- Storage Account Prefix Set the prefix for the new storage account.
- File Share Name Give the name of the Azure File Share a name. The Azure File share applies to the account storage type that you specified before.
Note: The latest update on this template was on 4 Sep 2020. Since that time, Microsoft Azure has updated their GPv1 to GPv2. As said before, the new account types have more features. For example, GPv2 account types allow you to deploy Azure File Shares on a standard HDD. In addition, GPv2 account types can store additional resources like blob containers, queues, and tables. Azure file shares can also be deployed into hot, cool, or transaction optimized (default) tiers.
- SFTP User and Password Provide a new SFTP username and password.
- “Location” and “Container Group DNS Label” Leave these two values as provided by the template.
- Click on “Next for Review and Create” Microsoft will send you a notification warning you about the creation of resources from a custom template.
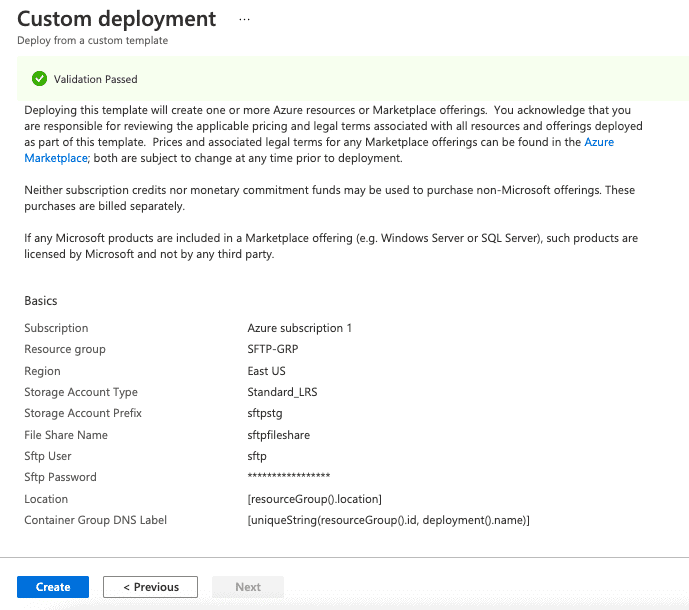
Once you click on create, your SFTP deployment process will begin.
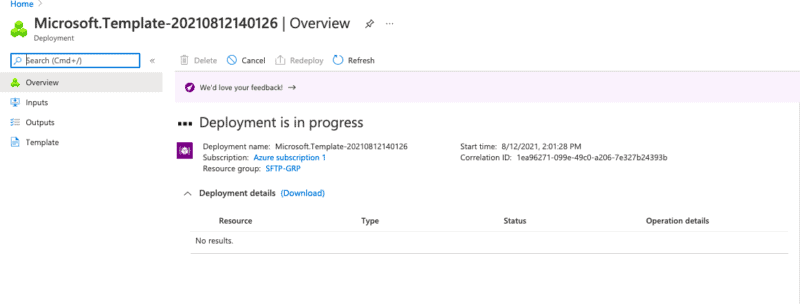
Now, you have an SFTP service running on Azure.
a. Using and testing the SFTP service
To configure an SFTP client, you’ll need to get the container group’s (sftp-group) Fully Qualified Domain Name (FQDN). We use the ACI container group’s FQDN rather than a public IP because ACI’s container groups do not support static IPs.
- To find the FQDN for your container instances group: “SFTP group,” go to your “Container Instances”
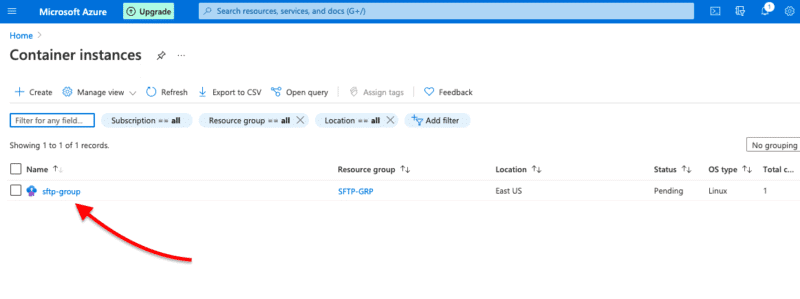
- Click on the sftp-group
- In the next screen, find and copy the related FQDN

Connect from the client
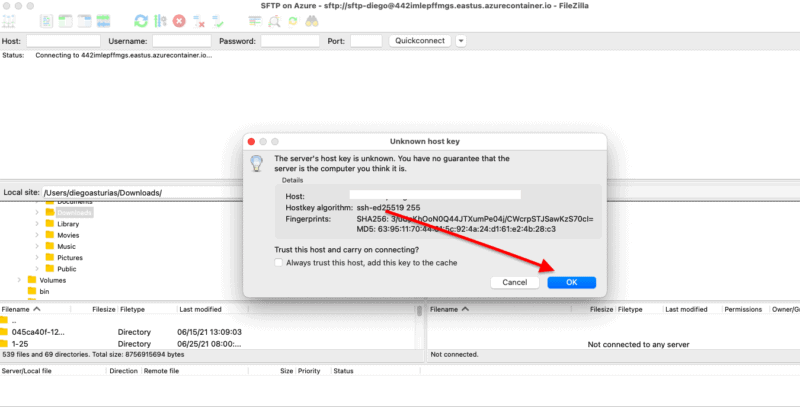
To connect remotely to the Azure SFTP server, you can use an SFTP client such as FileZilla. First, open Filezilla and enter the SFTP server's information.
When initially establishing a connection with your SFTP server, you’ll get the SSH public key. Since the SFTP client doesn’t know about this key, your client will send a message warning you of the “unknown host key.” Since you know this is your new SFTP server, click on “Ok”.
You’ll notice that the SFTP client gives you access to a folder named “upload”. When you transfer files via SFTP to this “upload” folder, the files will be placed into the Azure File Share. As a test, go ahead and upload a file into the “upload” folder.

Note: Azure’s ACI will continue to bill you for the container instance group: “SFTP-group,” regardless of whether you are transferring data or not. It is recommended to manually stop the SFTP-group once you have communicated all your files. Bear in mind that you can manually start the SFTP-group again and do the same process. If you do stop and start the SFTP-group, you’ll get the new FQDN every time.
The files will always remain accessible via the Azure File Share.
Check on the SFTP server
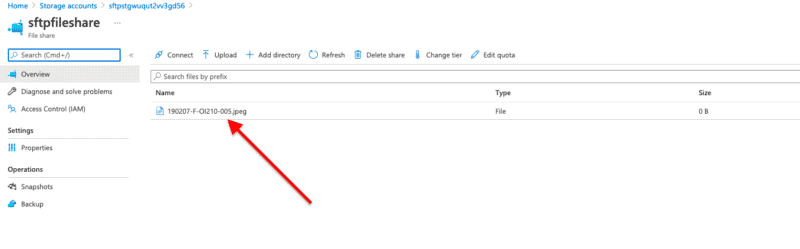
- Now go back to Azure Portal > Storage Accounts. Open the storage created for the resource group (SFTP-Group).
- Within Data Storage, go to File Shares, and open your SFTP File Share.
- From here, you’ll be able to see your uploaded files.
3. Using a third-party cloud-based file sharing solution
You are probably looking at Microsoft Azure because of its robust Blob Storage solution. With Azure, you have the peace of mind that your files are reachable from anywhere and anytime and that they are secure. But unfortunately, as stated above, Azure does not offer any SFTP as a service or SFTP managed service. Hence, you have to either use the previous solution with some inconveniences or integrate a third-party service. Another option is to set up a VM and then install an on-premises software implementation of SFTP on it.
What is Files.com and why use it
Files.com is a cloud-based, intelligent, and secure file-sharing service. Aside from being robust cloud storage, Files.com is the file-sharing service that lets you collaborate, automate and protect all your file-sharing processes. This service allows you to share files via share links, inbound inboxes, and workflows.
- One of the unique features of Files.com is its ability to integrate different services. Files.com supports FTP, SFTP, and WebDAV file transfer mechanisms and allows you to mount or sync many popular public cloud storage providers, including Azure.
Why files.com as a solution for SFTP?
Files.com integrates with Microsoft Azure Blob Storage. You can mount Azure’s blob storage directly into the Files.com SFTP service without the need for additional containers or VMs. But if needed, you can also mount an existing container into Files.com. Additionally, you can sync a Files.com folder or folders on a one-way or two-way basis with Azure’s Blob Storage.
The Azure integration requires Files.com Enterprise Connectivity Addon. This add-on is free with the Premier or Enterprise plan.
a. How to integrate Files.com with Azure and then mount a folder?
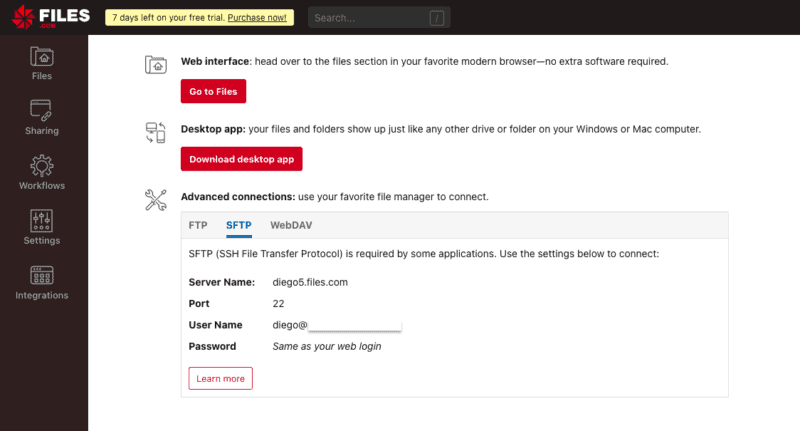
Login to your Files.com account. They offer a 7-day free trial, with unlimited access to assistance, usage, every feature, and as many users you need.
- Go ahead and open your Files.com dashboard.
- Go to Integrations.
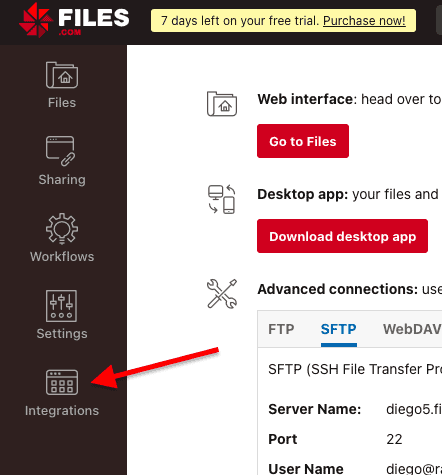
- Within Integrations, go to “Search for Integrations” and type “Azure,” and select it.
- Click on “Add Microsoft Azure as a remote server”
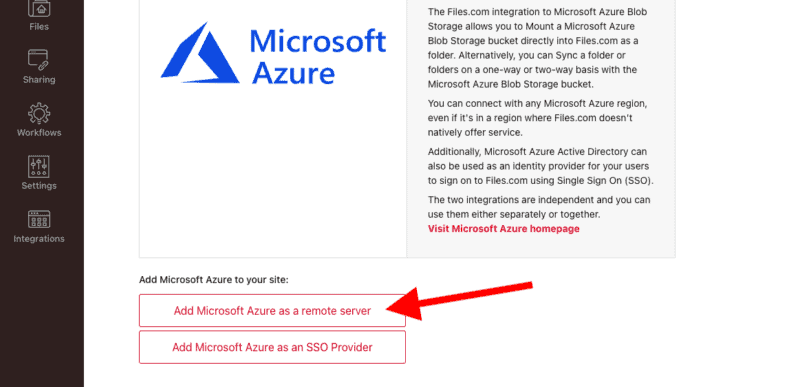
- For the integration, you’ll need to enter Microsoft Azure’s remote server information.
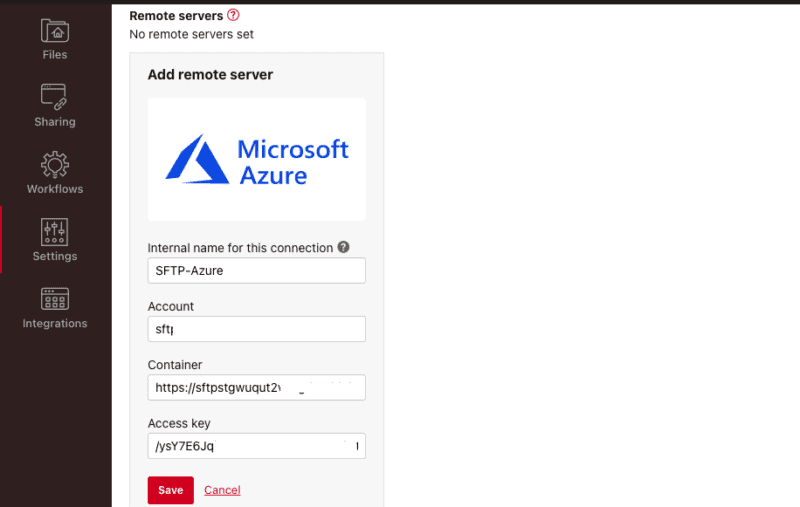
- The internal name for this connection
This information is particular to Files.com. You can give it any name you want. - Account
This information is particular to Azure. Go to Azure Portal > Storage Accounts. Select the account that you would like to integrate with Files.com. Copy the name of the Account and paste it on Files.com - Container
Azure’s blob storage uses storage containers within the storage account. Therefore, you should be able to find the “container name” within the storage account.
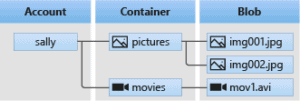
Image source: Blob Storage Introduction
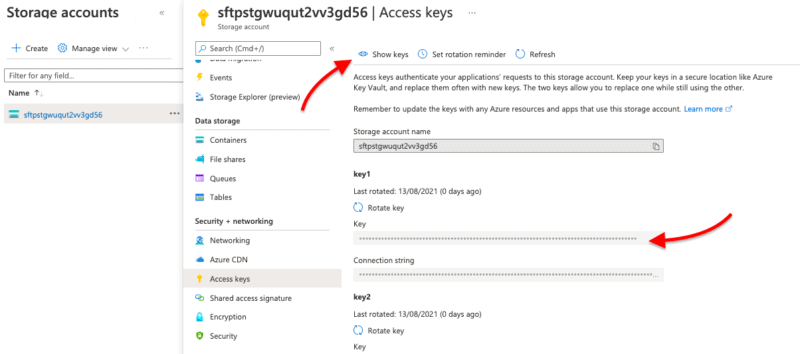
- Access Key
Within Storage Accounts > Select your Storage Account and Container as above. Next, go to Security + Networking > Access Keys. Click on “Show Keys” and copy your key. Go ahead and paste the key into Files.com.
If all information is correct, you should be able to see the remote Azure server successfully integrated into Files.com.
b. Now, let’s mount a folder
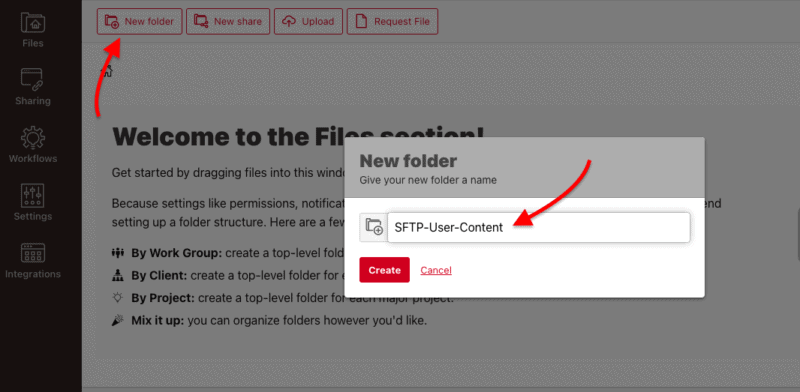
- Create a new mount folder in Files.com.
- Go to the Files.com dashboard and click on “New folder”. Give your new folder a name.
- Go back to the “Files” menu > Select your newly created folder (SFTP-User-Content, for example) > Click on “Folder Settings” > Remote server mount.
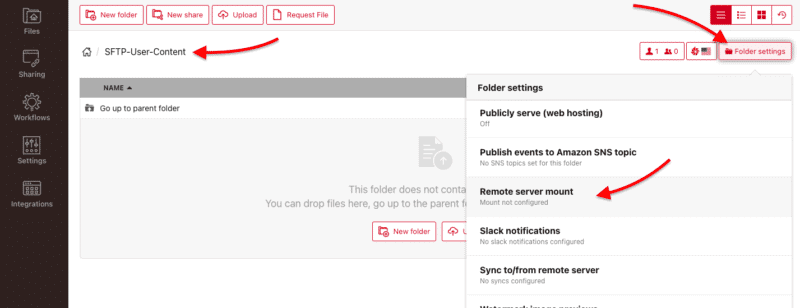
- Search for your newly added remote server, and click on “Save”
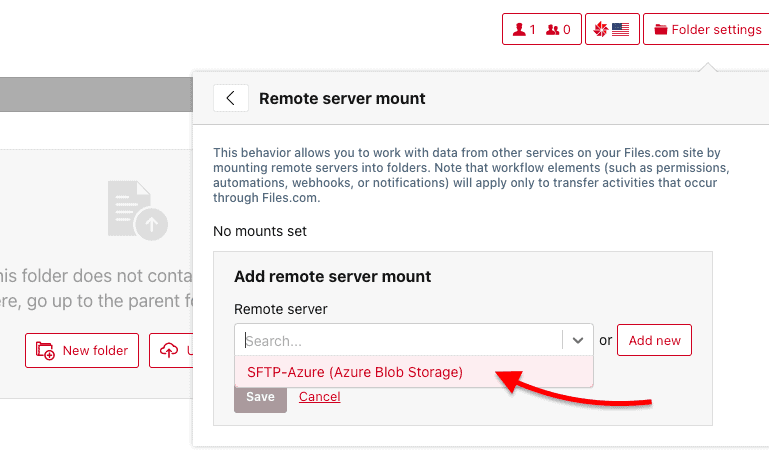
- Click on Save.
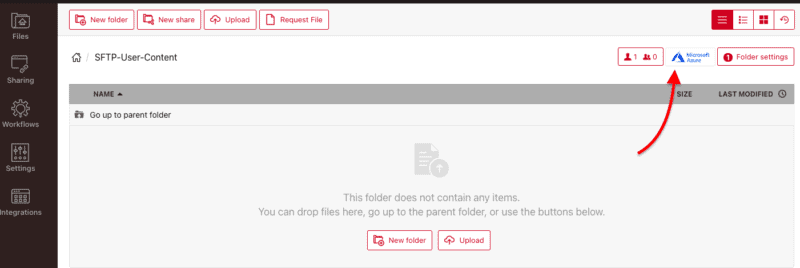
- If you successfully mounted the folder, you should see the “Microsoft Azure” icon on the top right corner of Files.com.
c. Testing your folder mount
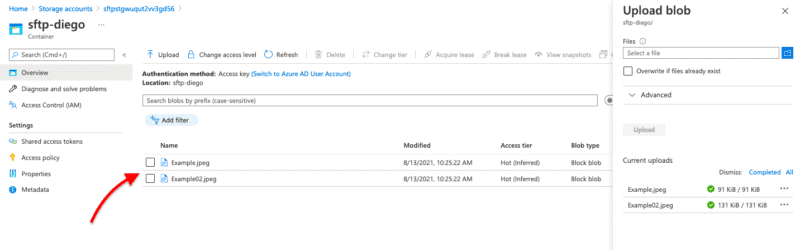
For testing purposes, I uploaded two pictures to my Azure storage container; The same container that was remotely connected with Files.com.
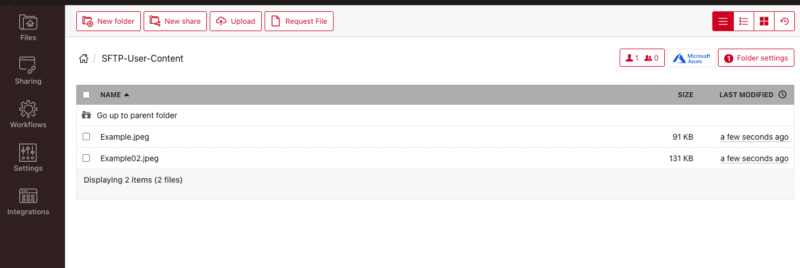
- Go back to Files.com and check on the folder mounted on Azure. Again, the same two files on Azure should be visible on Files.com.
Final Words
In this post, we deployed a Secure FTP (SFTP) on Microsoft Azure with the following two methods: First, use Azure's ACI and File Share services without the need to spin up any VM. Second, we used the ARM templates provided by Microsoft.
The second method we used was Azure's container blob storage and a third party Files.com to take care of SFTP. We also integrated the Azure server into Files.com and then mounted Azure as a folder on File.com.
Deploy SFTP Service on Azure FAQs
What is SFTP and why is it important in Microsoft Azure?
SFTP (Secure File Transfer Protocol) is a secure and reliable protocol for transferring files over the internet. It is important in Microsoft Azure because it allows for secure file transfers between on-premises systems and Azure virtual machines, ensuring the confidentiality and integrity of the transferred data.
What are the benefits of deploying SFTP in Microsoft Azure?
The benefits of deploying SFTP in Microsoft Azure include:
- Scalability: Azure provides the ability to scale up or down as needed, to handle changing file transfer needs.
- Security: Azure provides a secure platform for SFTP file transfers, with built-in security features and monitoring capabilities.
- Cost-effectiveness: Azure provides a cost-effective solution for deploying SFTP, with flexible pricing options and the ability to pay for only what you use.

