
Our funding comes from our readers, and we may earn a commission if you make a purchase through the links on our website.
Create Bulk Users in Active Directory

UPDATED: February 1, 2023
Creating an Active Directory user is not a big deal, except when you need to create many on a daily basis. Managing user accounts manually one by one starts to become a tedious and time-consuming process.
The best solution would be to generate multiple AD user accounts in bulk. You would need to gather all the user's information required to open an AD account (like first name, last name, username/password, OU, etc) in a single CSV or XLS file. And then, import this file into a script or software that bulk-creates all these users at once.
In this tutorial, we’ll go through the process of creating Active Directory users’ accounts in bulk using two methods: the task automation tool “PowerShell” and “GUI-based AD Import User Tool”. We’ll start with command-line PowerShell and then move on with the GUI-AD Admin tool. Both methods are different but accomplish the same. You can skip command-line scripting with PowerShell and if you prefer the GUI method.
Table of Contents
- PowerShell vs GUI-based AD Import User Tool
- Using PowerShell to create bulk users in Active Directory.
- Using the GUI-based AD Admin Tool
- Install PowerShell Modules
- Install the PowerShell Active Directory Module
- Install the ISE Module
- Create Users in Bulk with PowerShell
- Create the .CSV file
- Determine the OU Path
- Modify and run the PowerShell script
- Using an AD Admin GUI-Tool to Import Bulk Users
- Install and Open the SolarWinds User Import Tool
- Map Custom Fields
- Review Accounts
- Conclusion
1. PowerShell vs GUI-based AD Import User Tool
If you are managing a couple of user accounts, and adding 1-2 new users per week, creating user accounts in bulk is not as effective as if you manage more than 10 users. Large organizations dealing with many user accounts can benefit from automation tools such as PowerShell or AD admin tools.
a. Using PowerShell to create bulk users in Active Directory
To use PowerShell to manage AD user accounts, you would need to install a PowerShell module named “ActiveDirectory”. A PowerShell module is a package that contains cmdlets, variables, providers, functions, etc. This AD module lets you add AD commands to your PowerShell session and use them as if they were built-in.
The method for installing the module varies according to the Windows version. For example, if you have the Remote Server Administration Toolkit (RSAT), already, then you don’t need to download and install the module (more on this below).
To create users in bulk with PowerShell, you’ll need the following:
- PowerShell module already loaded
- CSV file with information from new users
- PowerShell script to import data and create new accounts
PowerShell gives you more flexibility and control to create bulk users but can get complicated if you don’t have scripting skills.
b. Using the GUI-based AD Admin Tool
The second method to create Active Directory users in bulk is using a free AD admin tool from SolarWinds. This GUI tool lets you import the list of users with CSV or XLS, then lets you map the fields from your file to the existing fields in AD.
To create bulk users in AD with the free AD admin tool, you’ll need the following.
- The SolarWinds GUI-tool is already installed
- The user’s list in CSV or XLS
The SolarWinds AD admin tool allows you to create users in bulk much easier and faster. Still, it doesn't give much control and flexibility as PowerShell does.
2. Install PowerShell Modules
Let’s begin, by installing two modules, the Active Directory Module and the ISE Module.
- Active Directory (AD) module for Windows PowerShell A set of special cmdlets for AD, that lets you manage AD domains, AD LDS configuration sets, and the AD Database Mounting Tool
- ISE PowerShell Module This is a PowerShell module management toolkit. ISE simply allows you to streamline the management of PowerShell modules
We’ll start by installing the PowerShell Active Directory module, then following up to install the ISE Module Browser.
a. Install the PowerShell Active Directory Module
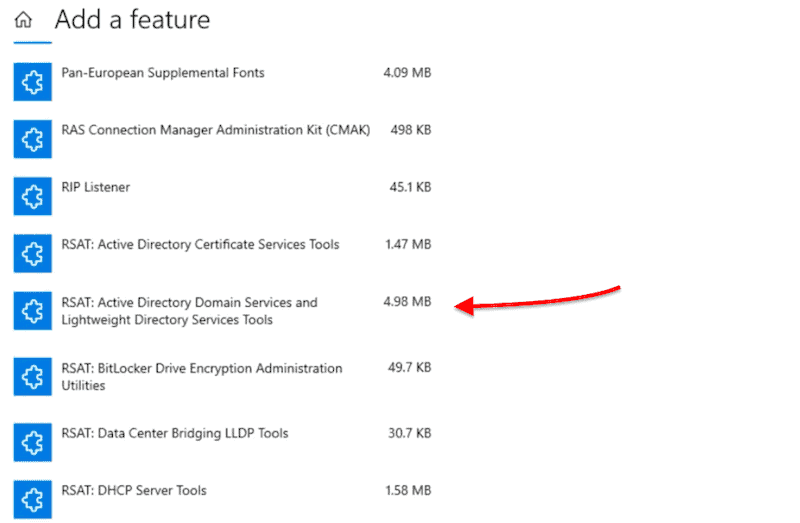
For Windows 10, you’ll only need to install the Remote Server Administration Tools (RSAT). When you install RSAT, all tools including the AD PowerShell module will be enabled by default. To get RSAT, you’ll need to:
Find: “Manage Optional Features” > click on “+ Add Feature” > find “RSAT” > and click on “Install”.
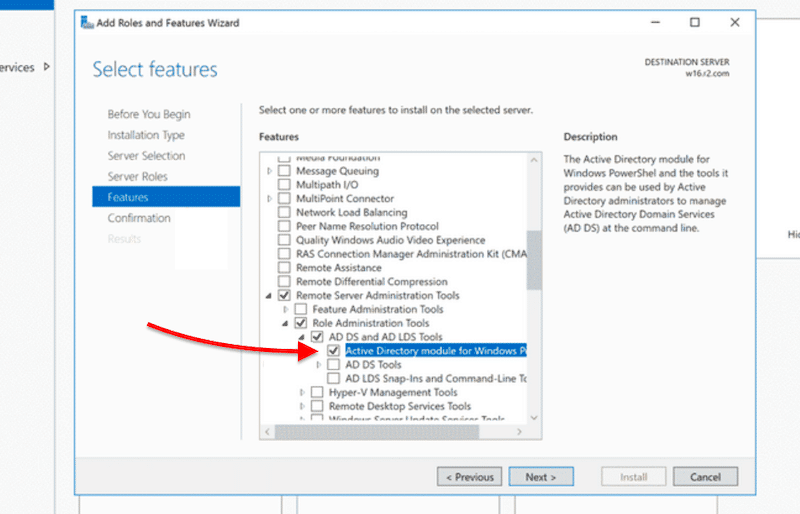
For Windows Server 2012, Windows Server 2012 R2, and Windows Server 2016, the RSAT is already there. So, all you need to do is add the PowerShell module as a feature using Server Manager.
- Go to Server Manager
- Click on “Manage” > click on “Add Roles and Features”
- Click “Next” until you find “Features”
- Go to “Remote Server Administration Tools” > Role Administration Tools > AD DS and AD LDS Tools > enable “Active Directory Module for Windows PowerShell”
Another way to install the RSAT-AD PowerShell module (on Windows Server 2012, 2012R, and 2016) is to install it right from the PowerShell console.
Open PowerShell and type:
- Add-WindowsFeature RSAT-AD-PowerShell

b. Install the ISE PowerShell Module
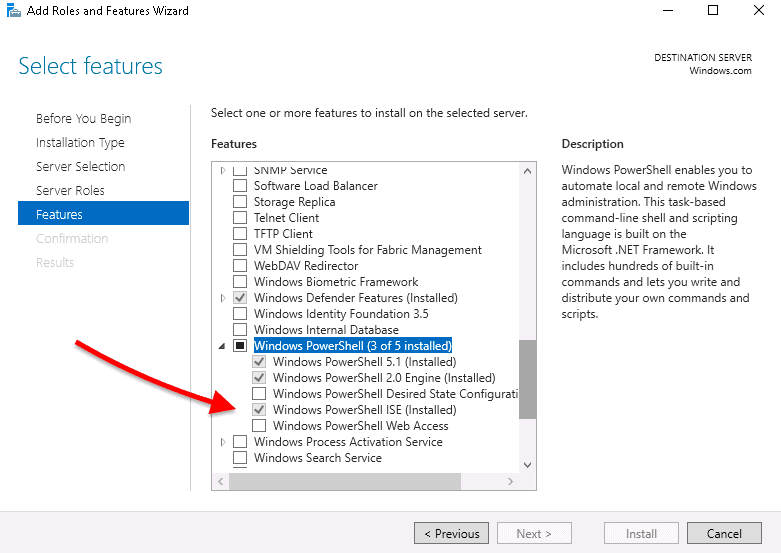
For Windows Server 2012, Windows Server 2012 R2, and Windows Server 2016, you can do a similar process as shown before. You can add the Windows PowerShell ISE as a feature with Server Manager.
- Open “Server Manager”
- Click on “Add Roles and Features”
- Click “Next” until you find “Features”
- Find the feature “Windows PowerShell” > select and install “Windows PowerShell ISE”
3. Create Users in Bulk with PowerShell
So the PowerShell modules are already loaded, now all you’ll need to do is create a CSV file listing all the user's information and import it into a PowerShell script, to automate the entire process.
Bear in mind, that you’ll need to have administrative rights to login and create user accounts.
a. Create the .CSV file
The PowerShell script wouldn't produce results without input data. First, we need to create a CSV file containing AD data fields like name, username, password, OU, description, or more— to feed into our PowerShell Script.
Let’s create a simple CSV file with the following data fields
- firstname
- lastname
- username
- password
- OU
So, below is a screenshot of a spreadsheet created using Google sheets— which you can later export as Comma Separated Value (CSV). You can create a CSV using notepad or MS Excel.
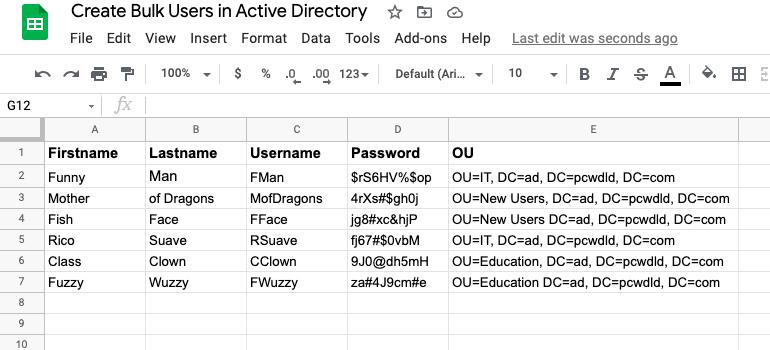
This document contains the required data fields, First name, Last name, Username, Password, and OU. It is recommended to use strong password policies, like avoid mixing repetitive password configurations and requiring password change at the next logon (which is done in the PowerShell script).
Notice that when defining the OU, you can set the accounts to import into different OUs. For example, two accounts are going to be imported into OU=IT, two accounts into OU=New Users, and two accounts into OU=Education.
b. How to Determine the OU?
An OU stores users and computer accounts, and provides an organizational structure to help sort objects according to geography, department, etc. When you create a new user in Active Directory Users and Computers, you’ll need to select the Domain Controller (i.e. pcwdld.com) and then an OU (such as New Users).
For example, this particular new user will be created in this “OU Path” > pcwdld.com/New Users
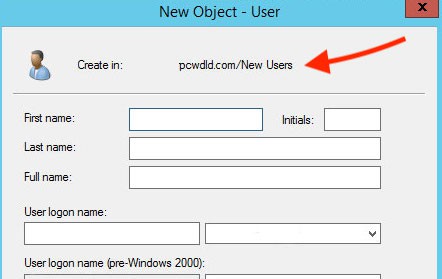
This OU Path is an attribute referred to as “DistinguishedName.”
In our CSV file example, we have three departments (sub-organizational OUs) where our new users are going to be created (IT, Marketing, and Sales). Our OU paths would look something like this:
- pcwdld.com/IT
- pcwdld.com/Marketing
- pcwdld.com/Sales
To find this OU Path, open “Active Directory Users and Computers,” > and browse the OU where you want to import your new user (or users). Right-click on the OU and click on “Properties”.
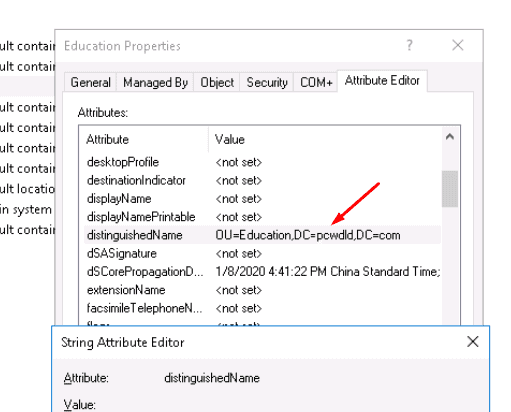
Go to the “Attribute Editor” label, and find the Attribute with the name: “DistinguishedName” > double-click on it to open the “String Attribute Editor” and copy the “Value”.
Now, go ahead and paste this value (OU path) into the OU column of your CSV fil
Your CSV file should be ready to be imported into PowerShell. Now all you need is to create and set up the PowerShell script.
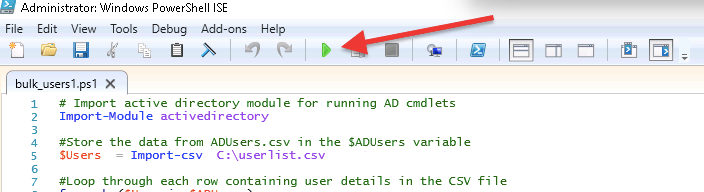
c. Modify and Run the PowerShell Script
So, your PowerShell Active Directory module has been already loaded and you have already created the CSV file containing the right information on your new users. Now, it is time to open and test the PowerShell script.
Open the Script
To open the PS script, make sure to open the PowerShell console with administrator rights. To successfully create users in bulk, by importing the data from CSV, you’ll need to update some information on the script.
To open and modify the script (ps), you can either use PowerShell ISE by right-clicking on the .ps file and selecting “Edit”. Or, open the file using .txt editors like notepad or notepad++, then use the “save as” option with the .ps extension.
Modify the Script:
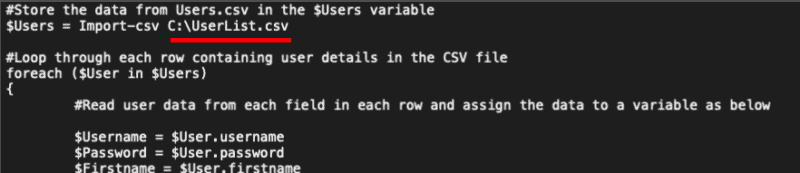
Update the default path (C:\UserList.csv) of the CSV file with your path.
- $Users = Import-csv “your path”
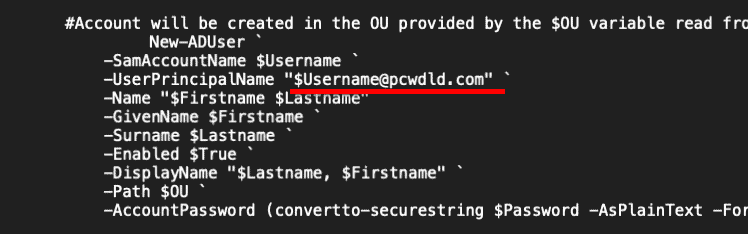
Update the UPN “UserPrincipalName” to your correct domain name.
- UserPrincipalName “$your domain”
Save your changes.
Run the Script
Now, that the CSV file contains the right data from all users and your PowerShell script is already modified to input/output the right information, it is time to run the PS script.
To execute the script:
- Open it using PowerShell ISE. Right-click on the file and click on “Edit”. Click the Green button to execute the script.
- The prompt below will show you whether the script ran successfully or any warning messages (such as accounts that already exist).
- Verify that all user accounts have been created. Open the Active Directory Users and Computers and open the right domain and OU to ensure all new users have been successfully created.
4. Using an AD Admin GUI-Tool to Import Bulk Users
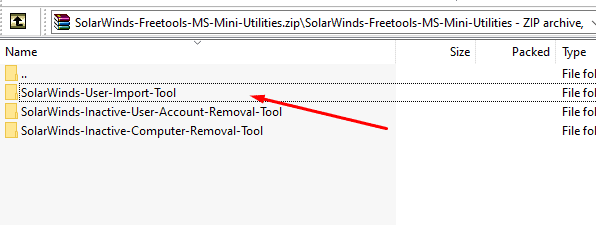
SolarWinds Admin Bundle for Active Directory is a free GUI bundle of mini-utilities that features three AD management tools. With this bundle, you can find inactive users and machines, remove them, and of course import users in bulk.
Download SolarWinds GUI-tool for importing users in bulk. The tool is 100% free.
a. Install and Open the SolarWinds User Import Tool
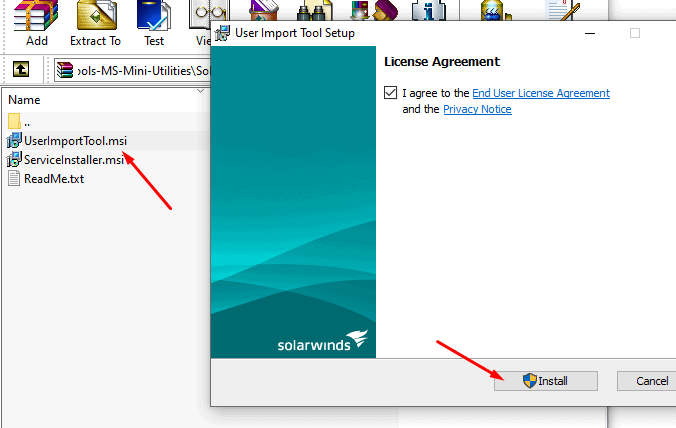
Once downloaded, go ahead and open the “SolarWinds-User-Import-Tool” folder from the zip file, and open the UserImportTool.msi file
Go ahead and “Agree to the terms and conditions”, and click “Install”.
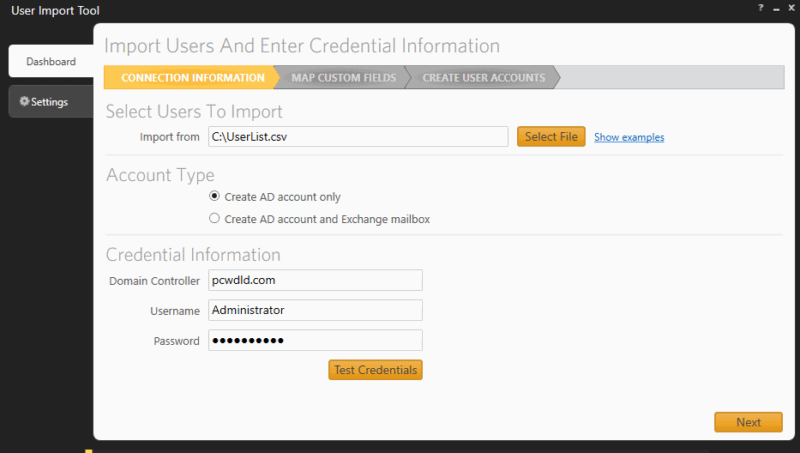
Once installed, go ahead and open the SolarWinds “User Import Tool”. To create bulk users with this tool, all you’ll need to provide is the file with your user’s information.
- Select your file To import data from your CSV, click on “Select File” and browse your file. You can also import data from an Xls file.
- Select Account type Select “Create AD account only”, unless you also want to create Exchange Mailbox.
- Provide the Credential Information Use administrator credentials, and click “Next.”
b. Map Custom Fields
The Next screen “Map Custom Fields,” will show you the fields in your CSV file. Now, you’ll need to map the custom fields “From” your file to what is actually available in your Active Directory. For example, user > SAM, department > Organizational Unit, etc.
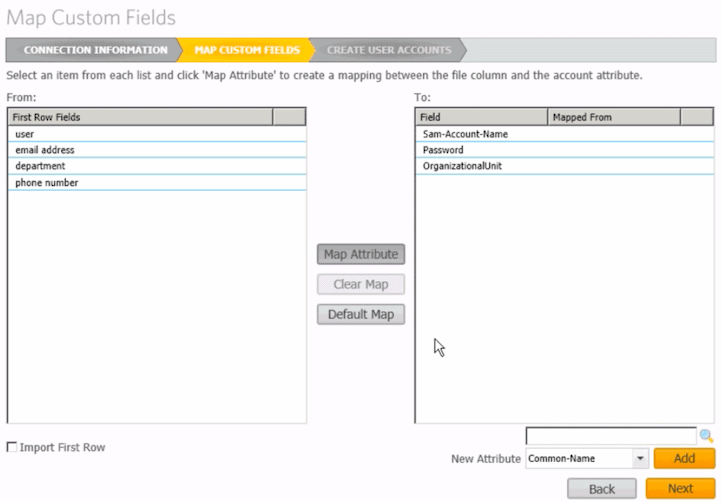
If an attribute does not exist, you can add it, using the bottom-right button “Add” to add the new attribute.
c. Review Accounts
- Click “Next” to see the “Create User Accounts” summary. Here, you’ll be able to see the User preview and select (or de-select) any users to be created (or excluded).
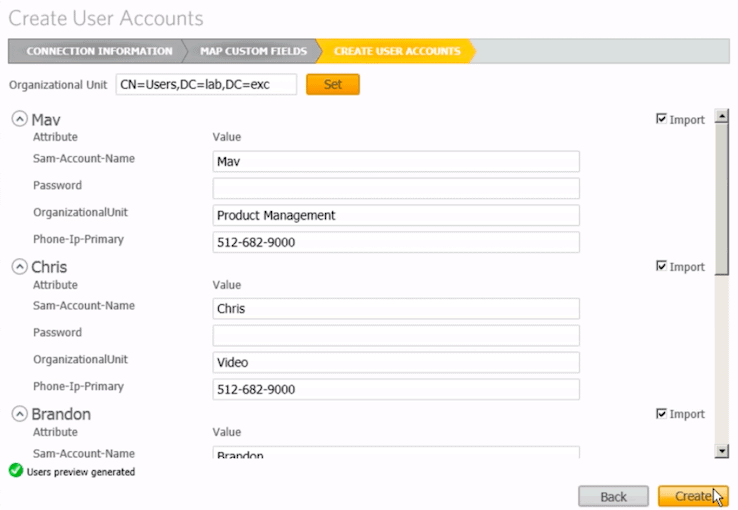
- Click on “Create” to import all users from a CSV file and create all users in bulk.
- Verify whether all users have been created successfully Go to Active Directory Users and Computers and check on the Users OU. Verify that all the user accounts have been created.
ManageEngine ADManager Plus – FREE TRIAL
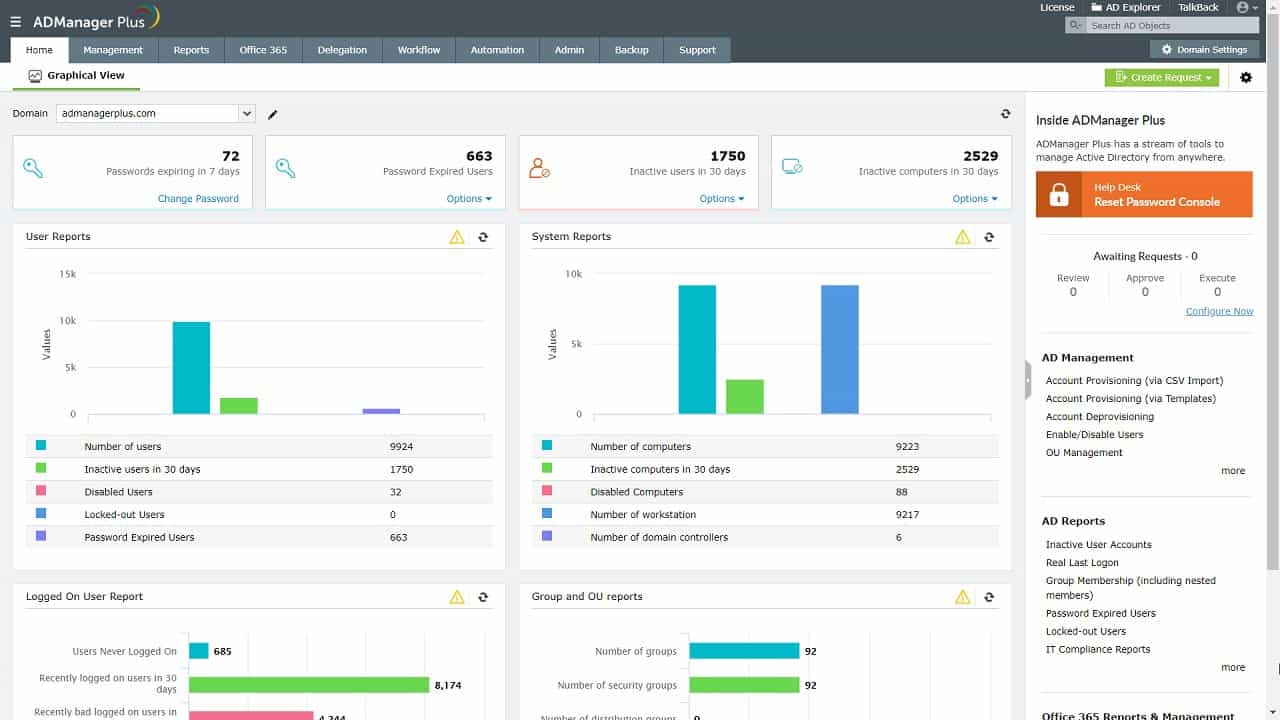
ManageEngine ADManager Plus is another third-party tool that allows you to create users in bulk.
Key features:
- Supports enterprise-level bulk automations
- Supports native graphing and robust reporting
- Has manual and automated account auditing capabilities
Pros:
- Detailed reporting, can generate compliance reports for all major standards (PCI, HIPAA, etc.)
- Supports multiple domains
- Supports delegation for NOC or helpdesk teams
- Allows you to visually view share permissions and the details of security groups
Cons:
- Is a comprehensive platform that takes time to fully explore
This system uses a template to standardize user account data. So, the first step in creating a batch of user accounts is to define the template that should be used for accounts. You can figure out your requirements with a 30-day free trial.
Conclusion
In this tutorial, we learned how to create users in bulk in Active Directory using two different methods: the PowerShell script and the GUI User Import Tool.
Both methods can be highly effective. If you want more control and flexibility, use PowerShell. But bear in mind that you’ll need some scripting abilities to update and troubleshoot your script. On the other hand, creating bulk users in Active Directory with the SolarWinds User Import Tool is much easier and faster, because it saves you from customizing scripts.
Create Bulk Users in Active Directory FAQs
How do I create AD user in CSV?
A CSV file is a plain-text file with comma-separated values. You can create such a file with Notepad or some other text editor. However, it is easier to create a CSV file of Active Directory user accounts in a spreadsheet, such as Excel. Spreadsheet systems allow you to save your file in CSV format. Put headings at the top of the first few columns in your spreadsheet. These headings will be the fields of data in your CSV file for import into Active Directory. The least you will need are the following columns:
- First Name
- Last Name
- Username
- Password
- OU
Enter data into each of these columns. This will create a number of records with each row representing a new user account. Select to save the file in CSV format. For example, in Excel, expand the drop-down list that is shown below the file name field – CSV is an option in this list.
How do I create a bulk user in Active Directory Azure?
To create users in bulk for Azure AD, follow these instructions:
- In the AzureAD console, select Users.
- Click on Bulk create in the ribbon menu at the top of the All Users list. This opens a side panel.
- Click on the Download button in the Bulk create user window. This will give you a template.
- Open the template in a text editor or a spreadsheet.
- Enter the values for each column in the template, creating one line for each new user.
- Save the template with a different name by Selecting Save As from the File menu.
- Go back to the console with the Bulk create user window still open.
- Click on the folder icon next to the 3. Upload your csv file field.
- Find your file and click Select. The system will validate your file.
- Click on Submit in the next screen to upload your new user accounts.
What are bulk users?
When people talk about bulk users in Active Directory they are just using bad grammar. What they are really trying to say is “create user accounts in bulk,” which means they want to insert a batch of user accounts rather than entering each one individually.

