
Our funding comes from our readers, and we may earn a commission if you make a purchase through the links on our website.
Apache Server Security Guide

UPDATED: October 23, 2023
Although Apache server has a good reputation for its embedded security, it still has optional default functionalities, that if not correctly configured, can put your server at risk. So, it is vital to follow specific security practices that will improve the security standpoint of your server.
In this step-by-step guide to securing your Apache web server, we’ll go through some of these best practices, including updates, backups, installing and removing unnecessary modules, setting up a WAF, and more. To demonstrate step-by-step, we’ll use the Apache server installed on Ubuntu 20.04.2 LTS running on an AWS EC2.
Table of Contents
- First things, first, Backup, Update, and Upgrade
- Back up your Apache configuration file.
- Add an updated Apache2 repository.
- Upgrade your Apache server.
- Avoid sensitive information from displaying publicly.
- Disable ServerSignature and set ServerTokens to Prod.
- Disable mod_info and mod_status.
- Disable Directory Listing.
- Disable Unnecessary Modules and Services.
- Disable some services, including CGI execution, symbolic links, and server-side includes.
- Create Appropriate User and Group
- Specify user and group.
- Let’s create a new user and group.
- Enable the Security and Evasive Modules.
- Install and configure the Security Module.
- Enable and Add the Core Rule Set.
- Installing and Configuring Mod_evasive.
- Enable logging.
- Edit logs
1. First things, first, Backup, Update, and Upgrade!
One of the most critical security measurements for any server is updates. When you update and upgrade your Apache server regularly with the latest version, you’re ensuring the latest features and security fixes (patches).
Updating your Apache web server is straightforward. All you need to do is backup, install prerequisites, add a repository, and update.
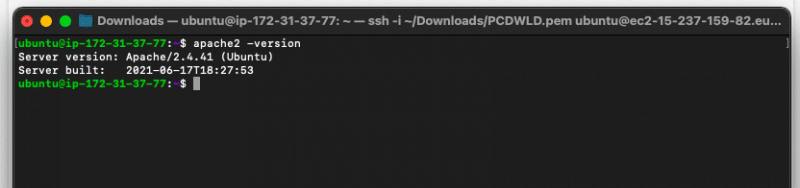
- To see what is your current Apache version. For example, use the command: “apache2 -version”.
a. Back up your Apache configuration file
Before updating and tweaking the security settings of your Apache server it is of paramount importance to backup up your Apache’s configuration file. Depending on the Apache installation and distribution, your “httpd.conf or apache2.conf” might be located on paths like:
- /etc/apache2/httpd.conf
- /etc/apache2/apache2.conf
- /etc/httpd/httpd.conf
- /etc/httpd/conf/httpd.conf

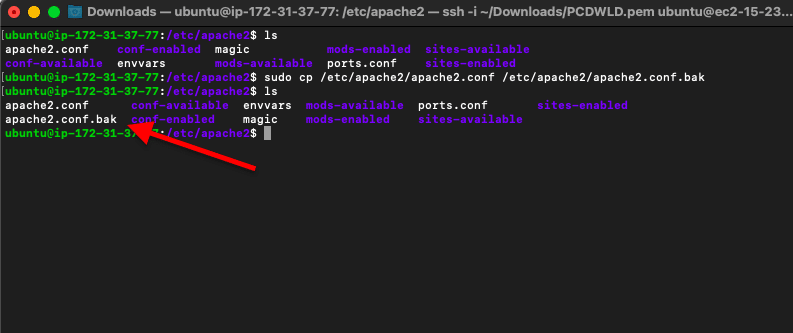
Run the following command to create a backup of your configuration file.
This command will create an “apache2.conf.bak” and save it under the same folder as “apache2.conf”
- $ sudo cp /etc/apache2/apache2.conf /etc/apache2/apache2.conf.bak
b. Add an updated Apache2 repository.
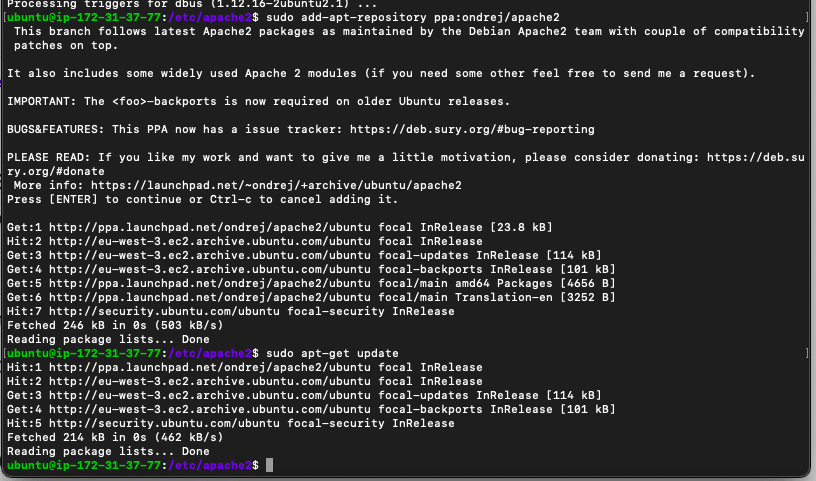
Run the following commands to add and update the Apache2 PPA repository. The first command (software-properties-common) is a prerequisite package. It provides useful scripts for adding or removing PPAs.
- $ sudo apt-get install software-properties-common
- $ sudo add-apt-repository ppa:ondrej/apache2
- $ sudo apt-get update
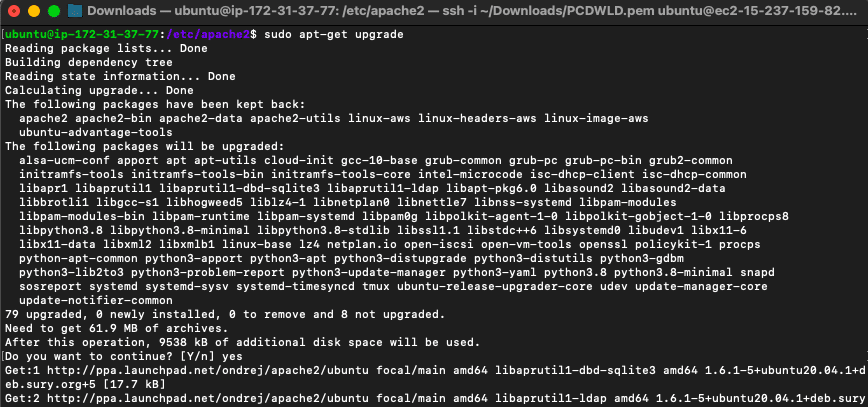
Bear in mind that updating is not enough. The update command keeps the package list up to date with the latest available versions, but it does not install (upgrades) the package.
So to make your update take effect, you’ll need to upgrade.
c. Upgrade your Apache server
Running the (apt-get update) followed by the (upgrade) commands is relatively a safe operation. This is because these commands only download and install bug fixes and security patches.
BUT WAIT! Before upgrading, especially if you are upgrading a web server in production, keep in mind the following:
- Always upgrade to a stable version. Unstable versions can be risky for your website.
- According to Apache’s upgrade policy: The upgrades are backward compatible. Therefore, updating shouldn’t cause issues with at least 3 “earlier” releases.
- If you are upgrading an old live server and unsure if the upgrade will come out successful, try running the upgrade to a sandbox (test server). Create an image of the whole system (Apache server) and run it within a virtual box. Then test the apt update/upgrade and see the behavior.
To upgrade, run the following command:
- $ sudo apt-get upgrade
2. Avoid sensitive information from displaying publicly.
By default, your Apache web server responds to specific requests made by clients. Some of these responses contain sensitive information, such as web server version number, server’s OS details, the Apache modules, and more.
While gathering intelligence, a hacker can gain a good deal of fingerprint information by simply getting the webserver itself to provide server-generated documents. Attackers can then exploit vulnerabilities on these systems and try to gain access.
a. Disable ServerSignature and set ServerTokens to Prod
The ServerSignature allows adding a footer line to the server-generated documents. This line shows the Apache webserver name, OS, and version number under server-generated documents like errors. For example, the ServerSignature might have three possible values: On, Off, or E-Mail.
The ServerTokens, on the other hand, determines the type of information sent back in the Apache Server’s response header field. This Apache directive can be set to Full, Prod, Major, Minor, Min, or OS. In this case, the directive should be set to “Prod” to ensure the server returns “Apache” in the server response header.
Changing these directives.
To turn off the ServerSignature Directive , and ServerTokens you’ll need to access and edit the Apache configuration file. Use Vi (or Vim) to edit your configuration file:
- $ sudo vi /etc/apache2/apache2.conf
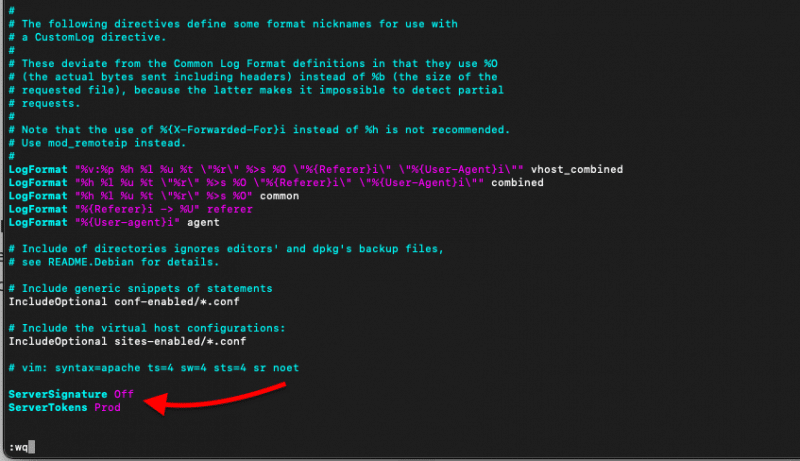
Add (or modify) the two lines below the configuration file.
- ServerSignature Off
- ServerTokens Prod
Restart the Apache service, and check whether it is enabled.
- $sudo service apache2 restart
- $service –status-all
b. Disable mod_info and mod_status
The mod_status provides useful /server-status information while the mod_info provides the /server-info.
By default, these modules are enabled. With the mod_info module, the entire system’s configuration information may be visible from the “/server-info” page. This page exposes sensitive information such as server version, database names, system paths, and more. The mod_file is configured and viewed under the <Location /server-info>, (example.com/server-info, for example).
These two (mod_info and mod_status) modules are beneficial for administration and monitoring. However, if you need to use them, you can secure them by using the HTTP Basic Auth or make them only accessible from localhost (127.0.0.1).
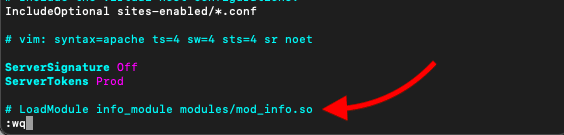
To disable the server-info directive
you’ll need to comment out (#) the mod_info module found in Apache’s configuration file.
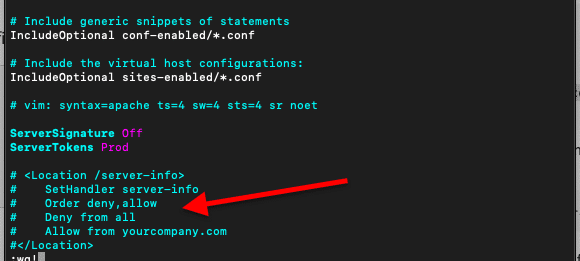
And also, comment out configuration related to server-info.
The status module (mod_status) helps an Apache server admin know the performance and health of the server. When this module is enabled, the directive <Location /server-status> shows an HTML page with information such as server uptime, load, current HTTP request, and client’s IP addresses. If a hacker has access to this information, they can craft an attack like a DDoS and bring the website’s service down.
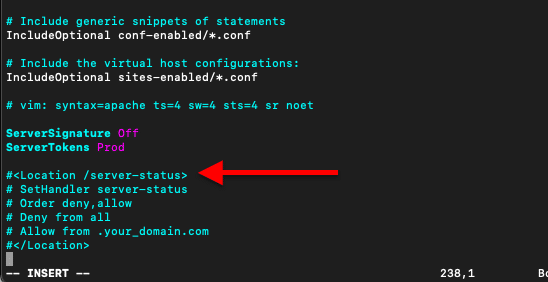
To disable the server-status directive
you’ll also need to comment the LoadModule on mod_status and comment out the configuration on the “httpd.conf” or “apache2.conf” file.
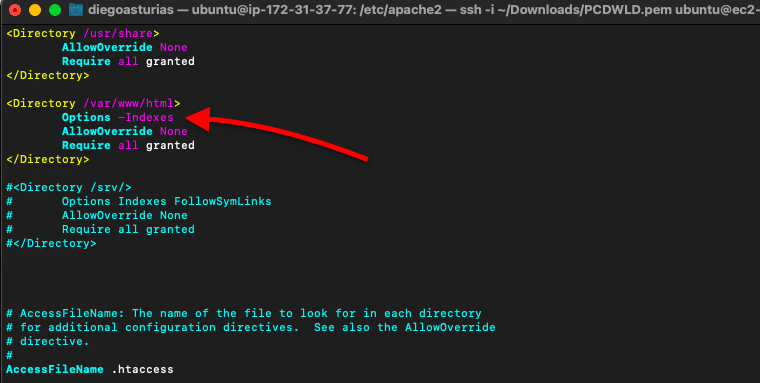
c. Disable Directory Listing
By default, the Apache server will list all the contents of the root directory. If this directive is enabled, an attacker could find and view any file and reverse-engineer an application to get its source code.
To turn off this directory listing for a specific directory, for example, within your website/directory, you would need to modify the “Options” directive in the configuration (httpd.conf or apache2.conf) file.,
- Set the Options to -Indexes:
3. Disable Unnecessary Modules and Services
By default, the Apache server comes with many pre-installed and enabled modules (as mod_status and mod_info). If you are not using a specific module, it is better to disable it. Leaving all modules enabled might make everything work smoothly, but it also opens many doors for security vulnerabilities.
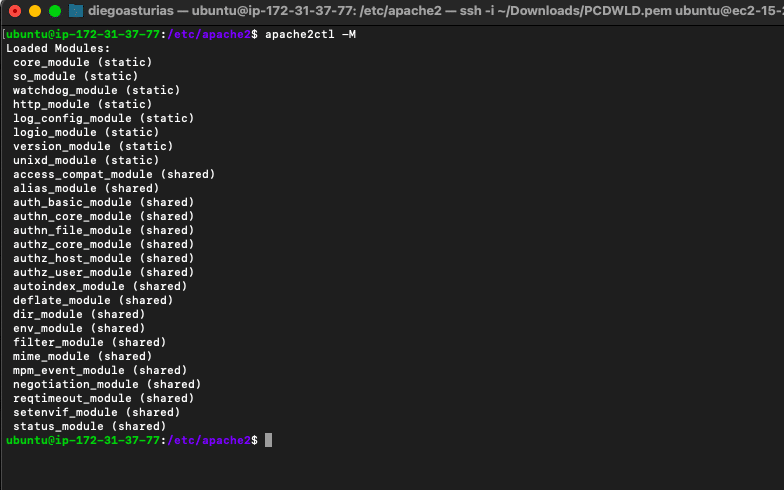
Use Apache’s official module index to learn about all the available modules. To get a list of all currently loaded modules in your Apache server and which ones you are not currently using, use the following command:
- $ apache2ctl -M
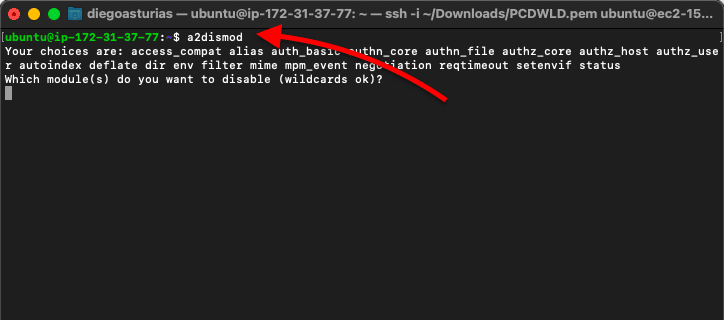
In addition, Debian and Ubuntu come with two features that help you enable or disable modules faster, in the case of Apache2. These two scripts modify the mods-enabled file in “/etc/apache2/mods-enabled”.
- $ a2enmod [name]: Enable a specific module in the Apache2 configuration. You can also use this script to display a list of all available modules.
- $ a2dismod [name]: Disable a specific module in the Apache2 configuration
To disable an Apache module in other Linux distributions such as CentOS, Fedora, or Redhat (RHEL), you’ll need to modify Apache’s module configuration (.conf) file stored under the /etc/httpd/conf.d/ directory. First, back up the modulename.conf to modulename.bak, and restart the httpd service.
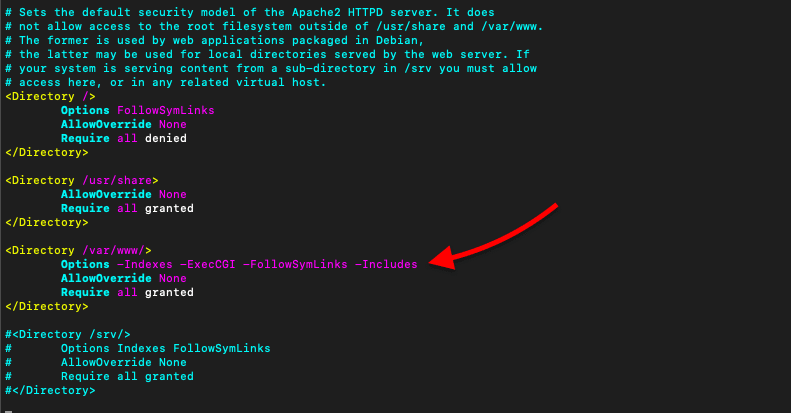
a. Disable some services, including CGI execution, symbolic links, and server-side includes
If you are not using CGI execution, symbolic links, and server-side includes services, you may want to disable them. However, if not configured properly, these services may put your web server at risk. To disable them from your server’s root directory and its sub-directories, open the Apache configuration file and find the “Options” directive.
- Change Options to -ExecCGI -FollowSymLinks -Includes
4. Create Appropriate User and Group
By default, for security reasons, the new Apache installations do not give access to run system commands; it only provides access to the DocumentRoot directory. So, the Apache process would typically run with an unprivileged user and group.
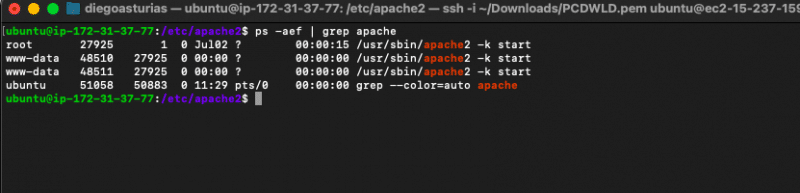
The default user and group names given to the Apache process will vary from every distribution. For example, in Debian and Ubuntu, Apache runs user and group: “www-data” by default, and in CentOS, Apache uses “apache.”
Although the security is already enforced, when different processes within the server, like Apache, MySQL, PHP, etc., use the same user/group name, a security issue in one process might lead to exploits in these other processes.
So, as a best security practice, create a brand new user.
a. Specify user and group
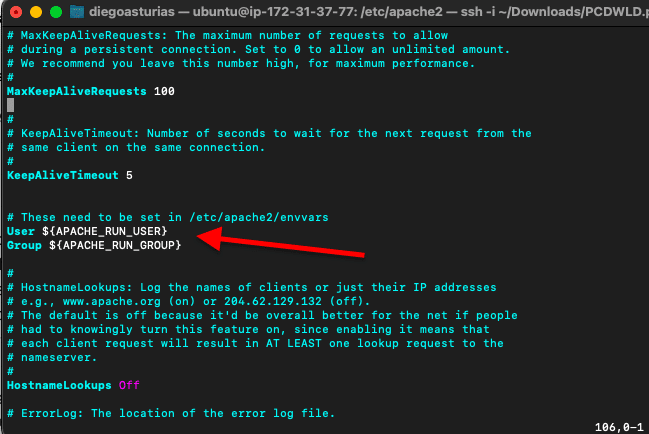
There are various methods to determine the user and group in Apache. The easiest way is to take a look at your Apache’s configuration file. Find the User and Group directives and set the name that you want the Apache process to run with.
Avoid running Apache as “Root,” as an exploited script can grant full access to the server.
- For Ubuntu and Debian, you might not find the specific user/group but an environment variable specified under the “envvars” file.
To see the user and group use the same method Apache does to set them; display the line of text of both variables like:

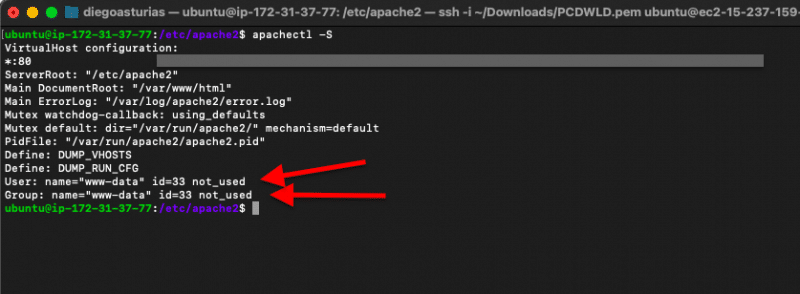
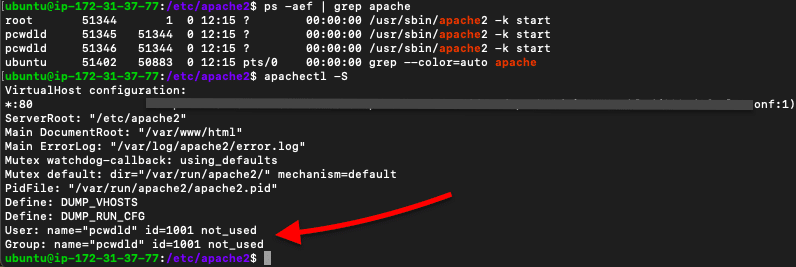
In addition, you can also use the “$apachectl -S” command to show general information on your Apache server, including User and Group.
b. Let’s create a new user and group
Use the following commands to create a new user and group.
- $ sudo groupadd pcwdld
- $ sudo useradd -g pcwdld pcwdld
Ensure the new user and group have the correct permission to the folder.
- $ sudo chown -R pcwdld:pcwdld /var/www/html/
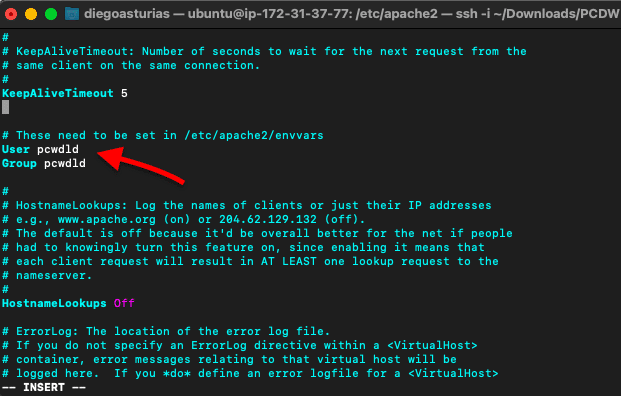
Modify the configuration file with the new User and Group, with:
- $ sudo vi apache2.conf
Restart the Apache2 service.
- $ sudo service apache2 restart
Verify if the Apache process is using the new user, using the command:
- $ apachectl -S
5. Enable the Security and Evasive Modules
There are two popular modules “mod_security” and “mod_evasive” that will help improve Apache's server security standpoint. These two modules are used to protect a web server against potential DDoS, brute-force, and SQL injection attacks.
- ModSecurity is an open-source Web Application Firewall (WAF) engine for Apache, IIS, and Nginx. It provides key security functionalities, such as filtering, intrusion detection and prevention, identity masking, null-byte attack prevention, and real-time traffic monitoring.
- Mod_evasive is an open-source module for Apache designed to evade DoS, DDoS, and brute force attacks. To evade potential DoS/DDoS attacks, Mod_evasive can be used as a detection-filtering tool for IP addresses that send too many concurrent requests or are blacklisted.
Do you need both? Mod_security and Mod_evasive?
By itself, ModSecurity takes care of a wide range of security tasks, including protection from DDoS and Brute force, which is exactly what mod_evasive does. Still, mod_evasive is useful for dealing with DDoS’s floods of unnecessary requests that can bring a server down.
a. Install and configure the Security Module.
To install mod_security in Apache (for Ubuntu or Debian), use the following commands:
- Update your repositories: $sudo apt update -y
- Install the ModSecurity: $sudo apt install libapache2-mod-security2
- Enable the module: $sudo a2enmod security2
- Ensure the module is on: $sudo apachectl -M | grep security
- Restart the service: $sudo service apache2 restart
- Show the configuration output with: $apt-cache show libapache2-mod-security2
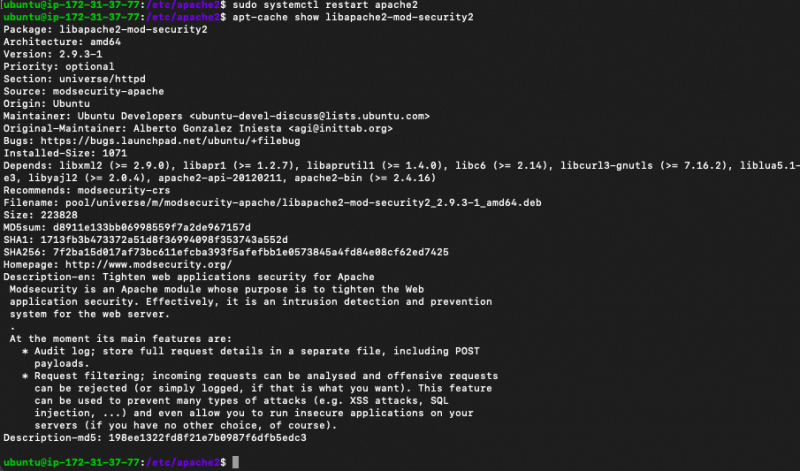
As you can see, from the above screenshot, by default, helpful in there are no security rules configured. Create a backup of the mod_security configuration file and then open it with the vi editor.
- $sudo cp /etc/modsecurity/modsecurity.conf{-recommended,}
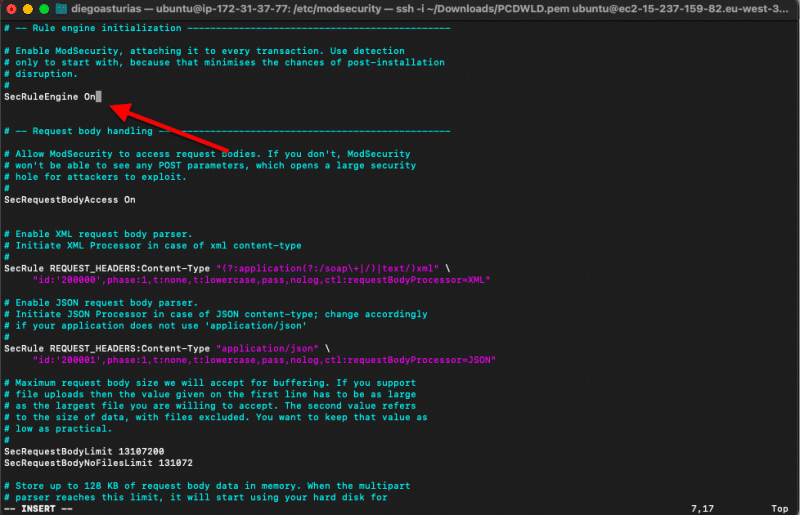
- $sudo vi /etc/modsecurity/modsecurity.conf
- Then change the “SecRuleEngine” to “On” (as shown in the screenshot below)
b. Enable and Add the Core Rule Set
To enable the recommended Open Web Application Security Project (OWASP) core rule set, use the following commands:
- $sudo apt-get install git
- $sudo git clone https://github.com/SpiderLabs/owasp-modsecurity-crs.git
- $sudo mv /usr/share/modsecurity-crs /usr/share/modsecurity-crs.bak
- $sudo mv owasp-modsecurity-crs /usr/share/modsecurity-crs
- $sudo mv /usr/share/modsecurity-crs/crs-setup.conf.example /usr/share/modsecurity-crs/crs-setup.conf

Now, to include the OWASP’s core rule set into the security module, you’ll need to edit the ModSecurity’ configuration file.
- $sudo vi /etc/apache2/mods-enabled/security2.conf
- Include the following at the bottom of the configuration file.
- IncludeOptional “/usr/share/modsecurity-crs/*.conf
- IncludeOptional “/usr/share/modsecurity-crs/rules/*.conf
Now, restart the Apache server:
- $systemctl restart apache2
b. Installing and Configuring Mod_evasive.
To use Mod_evasive would require you to update iptables.
To install mod_evasive, use the following commands:
- Install mod_evasive:
$sudo apt-get install libapache2-mod-evasive - Enable mod_evasive:
$sudo a2enmod evasive - Ensure the module is on:
$ sudo apachectl -M | grep evasive
To get some help on the correct parameters for mod_evasive, refer to the Mod_evasive README file.
- Open and edit the evasive configuration file:
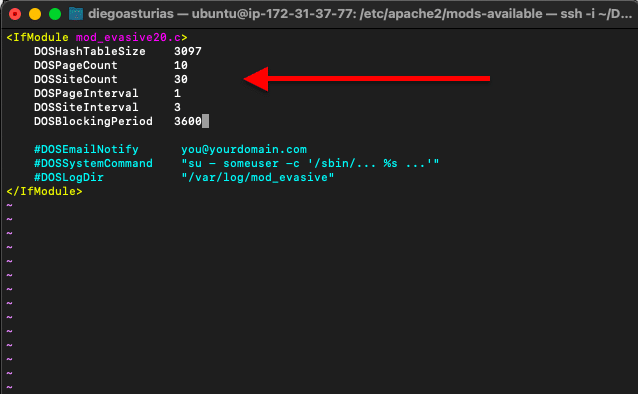
$sudo vi /etc/apache2/mods-available/evasive.conf - Edit the file by removing comments (#) and set the recommended values for Apache 2.0:
- DOSHashTableSize 3097
- DOSPageCount 2
- DOSSiteCount 50
- DOSPageInterval 1
- DOSSiteInterval 1
- DOSBlockingPeriod 10
- In addition, don’t forget to configure your email for notification and the directory for the logs.
6. Enable Logging
Apache is capable of logging events that were handled by the Apache server. All the activity happening in and around your Apache server, from login attempts, client requests, responses sent, and internal actions of the webserver, are considered security events.
Therefore, most of these events should be logged so that you are aware of the current state of affairs around your Apache server.
To make Apache start logging (independent from your OS logs), you’ll need to use the mod_log_config module (log_config_module). This module is static, which means that it is compiled by default into the configuration file. This module creates log files using three different directives:
- TransferLog, to create the log.
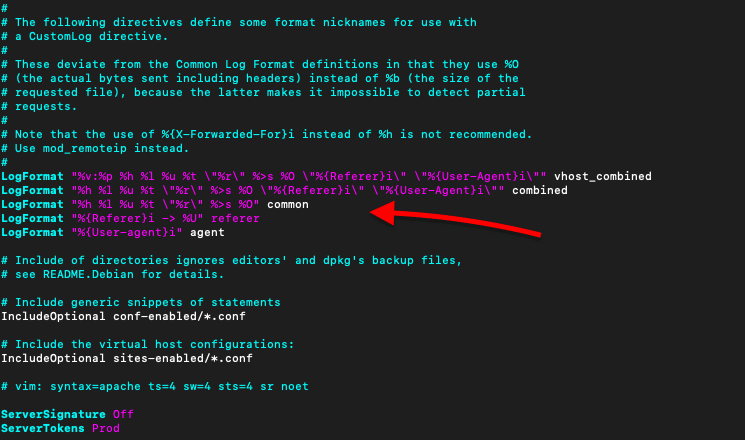
- LogFormat, to specify a log format
- CustomLog, to create and format the log.
a. Edit Logs.
These directives are specified under the Apache configuration file. To see them and edit, you’ll need to use the vi editor.
- sudo vi /etc/apache2/apache2.conf
Use the following source to learn how to configure the Apache Logging Basics.
In addition, you can use third-party tools like SolarWinds Loggly to centralize, manage, and analyze all logs not only from the Apache server but from your entire environment.

